Introduction
This manual provides essential information for the safe and effective use of the Aexit Rotary Selector Wall Switch. This device features 3 decks, 3 poles, and 11 positions, designed for 220V applications. Rotary switches are used to select one of several electrical circuits or positions by rotating a knob. They are commonly found in various electronic and industrial applications where precise selection between multiple states is required.
Product Overview
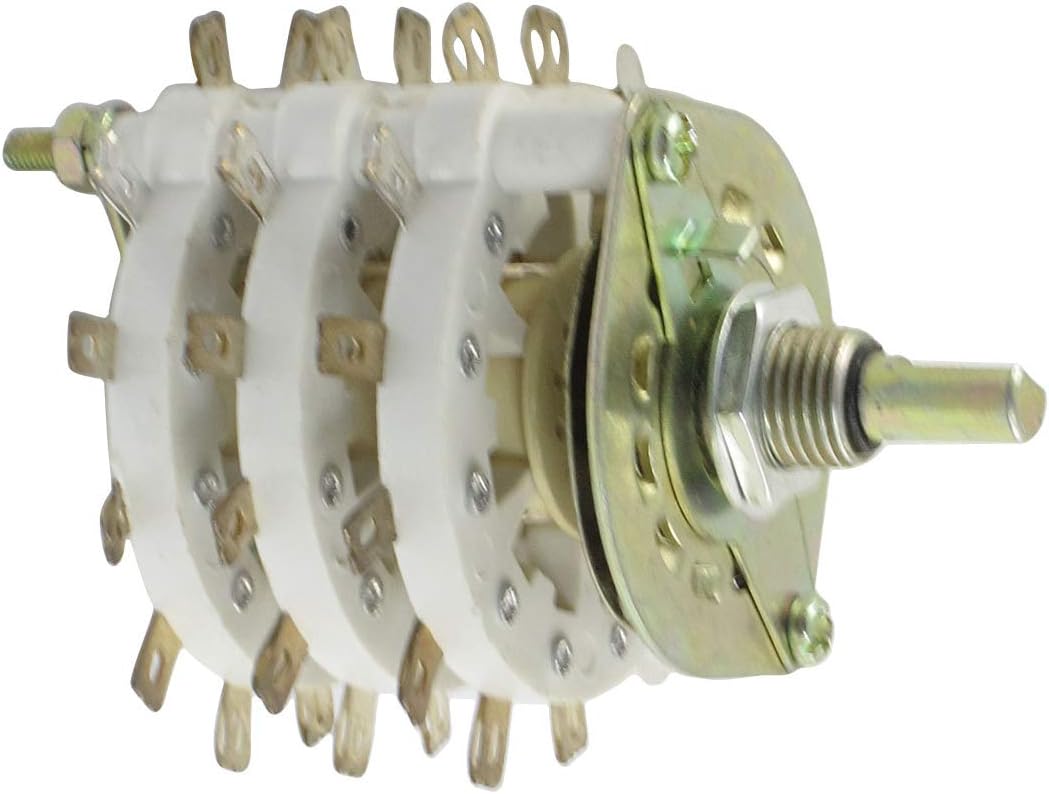
Image: The Aexit Rotary Selector Wall Switch, featuring its multi-deck construction. The image clearly displays the three white insulating decks, each with multiple brass terminals arranged in a circle. On the right, the metal mounting plate and the threaded shaft for attaching a control knob are visible. The overall design indicates a robust component for electrical circuit selection.
Key Features:
- Product Name: Rotary Switch
- Model No.: KCT3X11
- Contact Type: 3 Pole 11 Positions
- Rated Voltage: 220V
- Deck Number: 3
- Shaft Diameter: 5.8mm / 0.23"
- Threaded Collar Diameter: 9.5mm / 0.37"
- Overall Size (Approx.): 72 x 54mm / 2.8" x 2.1"(L*D)
- Net Weight: 74g
Specifications
| Specification | Value |
|---|---|
| Manufacturer | Aexit |
| Part Number | f190413ae002507 |
| Item Model Number | modle |
| Material | Other |
| Mounting Type | Pole, Deck, Wall Mount |
| Switch Style | Rotary |
| Rated Voltage | 220V |
| Contact Type | 3 Pole 11 Positions |
Setup and Installation
Important Safety Notice: Installation of electrical components should only be performed by qualified personnel. Ensure power is disconnected at the source before beginning any installation work. Failure to do so may result in electric shock, injury, or damage to equipment.
- Mounting: Secure the rotary switch to the desired surface (pole, deck, or wall) using appropriate fasteners through the mounting holes on the metal plate. Ensure the switch is firmly in place to prevent movement during operation.
- Shaft and Knob Installation: If a knob is not pre-installed, slide the compatible knob onto the shaft. Secure it using the set screw on the knob, aligning it with the flat side of the shaft for proper rotation and position indication.
- Wiring: Identify the common terminal and the individual position terminals on each deck. Refer to your specific circuit diagram for correct wiring. Connect the input and output wires to the appropriate terminals. Ensure all connections are secure and insulated.
- Testing: After installation and wiring are complete, carefully restore power. Test the switch by rotating the knob through all 11 positions to verify correct circuit selection and functionality.
Operating Instructions
The Aexit Rotary Selector Switch is designed for straightforward operation.
- Rotation: To select a desired circuit or position, gently rotate the knob clockwise or counter-clockwise. The switch will click into each of its 11 distinct positions.
- Position Indication: The knob, when properly installed, should have an indicator mark that aligns with markings on the mounting surface or a separate dial plate (not included) to show the currently selected position.
- Circuit Selection: Each position corresponds to a specific electrical connection as determined by your wiring configuration. Rotating the switch changes the active circuit.
- Smooth Operation: The switch is designed for smooth, positive detent action at each position. Do not force the knob if it feels stiff; ensure no obstructions are present.
Maintenance
The Aexit Rotary Selector Switch is a durable component designed for long-term reliability with minimal maintenance.
- Cleaning: Periodically inspect the switch for dust or debris accumulation. If necessary, gently clean the exterior with a dry, soft cloth. Do not use liquid cleaners or solvents, as they may damage the internal components.
- Connection Check: From time to time, verify that all electrical connections to the terminals remain secure. Loose connections can lead to intermittent operation or overheating.
- Environmental Conditions: Ensure the switch is operated within its specified environmental conditions (e.g., temperature, humidity) to prevent premature wear or failure.
- No Lubrication Required: The internal mechanisms are factory-lubricated and do not require additional lubrication.
Troubleshooting
| Problem | Possible Cause | Solution |
|---|---|---|
| Switch does not change circuit | Incorrect wiring; Loose connections; Internal damage | Verify wiring against circuit diagram; Check and tighten all terminal connections; If internal damage is suspected, replace the switch. |
| Knob is stiff or hard to turn | Obstruction; Misaligned knob; Internal mechanism issue | Inspect for foreign objects; Re-seat the knob, ensuring it's not binding; If issue persists, the switch may need replacement. |
| Intermittent circuit connection | Loose wiring; Worn contacts | Check and secure all wiring connections; If contacts are worn, the switch requires replacement. |
If you encounter issues not listed here or if the suggested solutions do not resolve the problem, please contact customer support.
Warranty and Support
For warranty information and technical support, please refer to the documentation provided with your purchase or contact Aexit customer service directly. Keep your purchase receipt as proof of purchase for any warranty claims.
Manufacturer: Aexit
Model: KCT3X11 (Item model number: modle)