Introduction
The Sena R1 Smart Cycling Helmet integrates advanced communication technology into a traditional cycling helmet design. It features built-in speakers and a microphone, enabling seamless communication, music playback, GPS navigation, and phone calls. Designed for comfort and safety, the R1 enhances your cycling experience whether you're riding solo or with a group.
This helmet complies with CPSC 16 CFR Part 1203 safety standard.
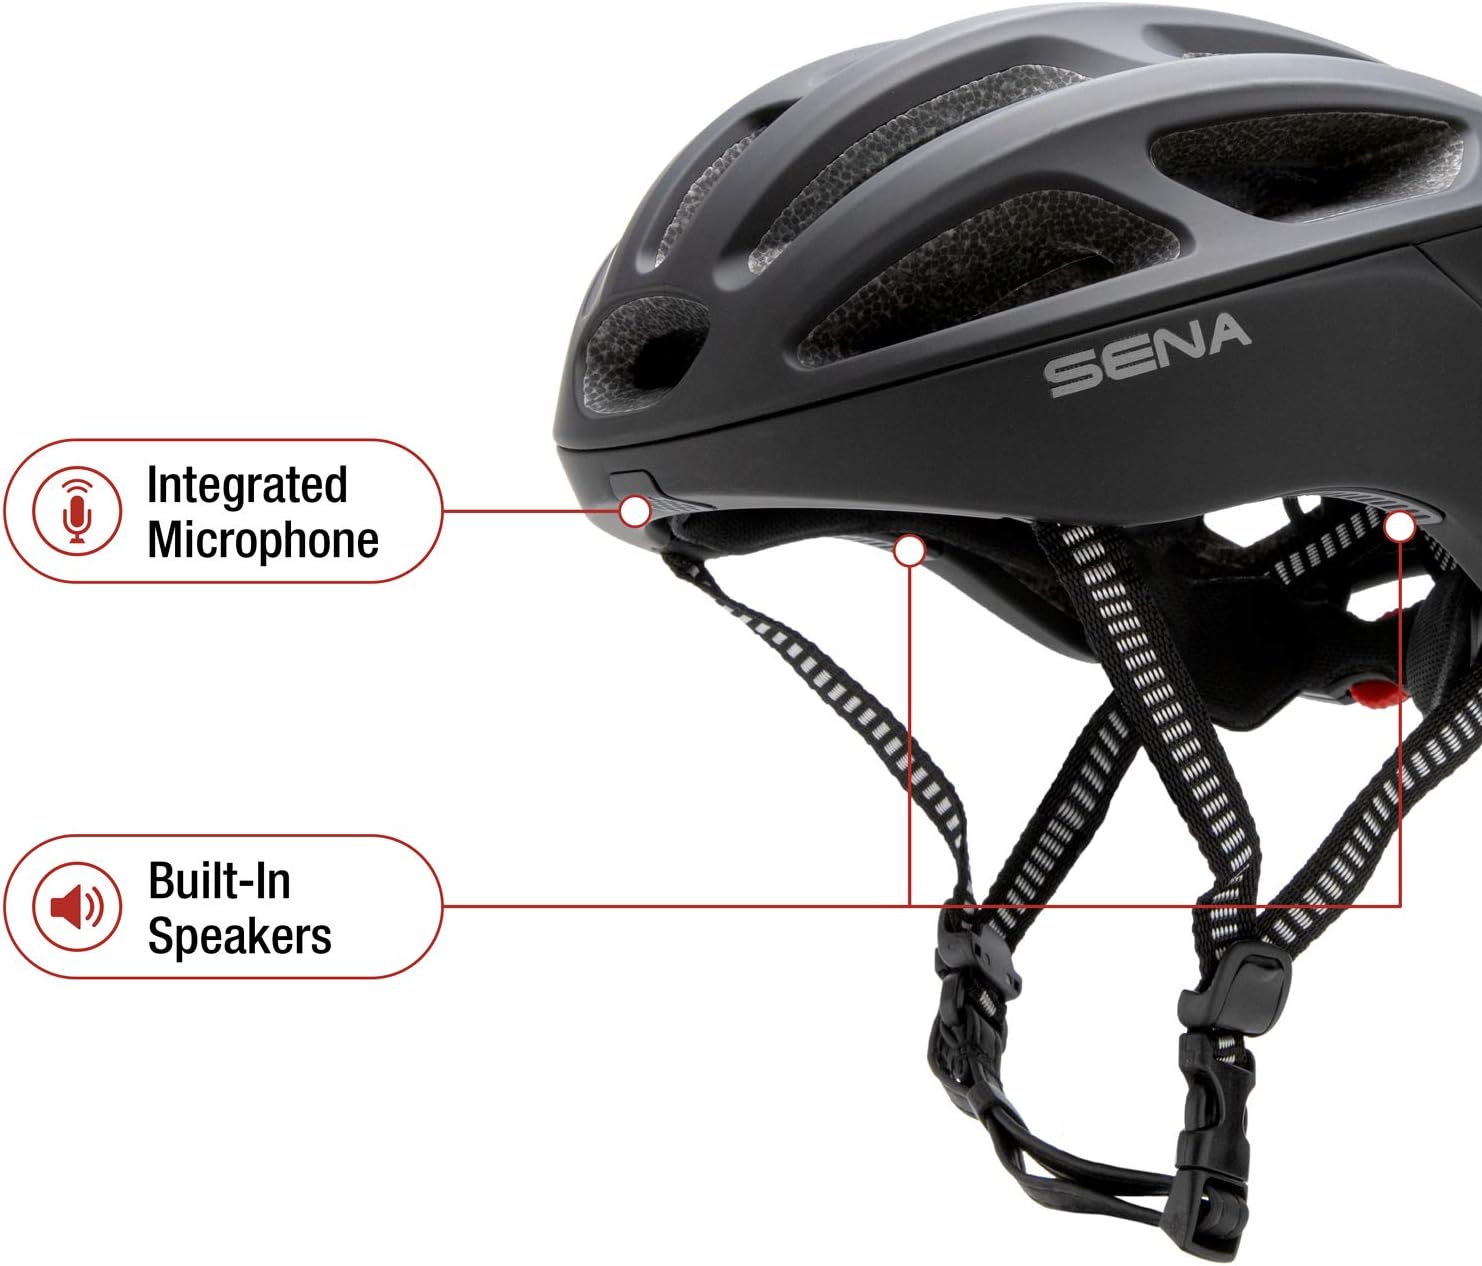
Figure 1: Sena R1 Smart Communications Helmet, side view.
What's in the Box
- Sena R1 Smart Communications Helmet
- USB Charging Cable

Figure 2: Key features of the Sena R1 Helmet.
Setup
1. Measuring Your Head for Proper Fit
Before using your Sena R1 helmet, ensure it fits correctly for optimal comfort and safety. A proper fit is crucial for the helmet's protective capabilities.
- Measure Circumference: Use a flexible tape measure to wrap horizontally around your head, approximately one inch above your eyebrows and the top of your ears.
- Snug Fit: Pull the tape measure snugly but comfortably. Ensure it remains level from front to back.
- Record Measurement: Note the measurement where the tape overlaps.
- Compare to Size Chart: Refer to the Sena R1 sizing guide to find the helmet size closest to your head measurement.
Video 1: Sena Cycling Helmet Size Guide. This video demonstrates how to measure your head and adjust the helmet for a secure fit.
2. Adjusting the Helmet
- Loosen Dial Adjustment: Before placing the helmet on your head, open the dial adjustment at the back to ensure the helmet shell can fit down properly.
- Position Helmet: The helmet should sit level on your head, not too far forward or backward. The front edge should be about one inch above your eyebrows.
- Tighten Dial Adjustment: Turn the dial at the back of the helmet clockwise to tighten it until it feels snug but comfortable. It should not be overly tight, just secure enough to prevent excessive movement.
- Buckle Chin Strap: Fasten the chin strap. It should be loose enough to allow you to move your mouth comfortably, but tight enough that you can only fit two to three fingers between your chin and the strap.
- Adjust Side Straps: Adjust the buckles on the side straps so they form a 'V' shape just below your ears and lie flat against your head. The straps should not touch your ears.

Figure 3: Rear view of the Sena R1 helmet, highlighting the adjustment dial for a secure fit.
3. Charging the Helmet
Locate the charging port on the rear of the helmet, typically covered by a small rubber flap. Connect the provided USB charging cable to the port and to a power source. The LED indicator will show charging status.

Figure 4: Rear view of the Sena R1 helmet, showing the charging port and control buttons.
Operating Instructions
1. Power On/Off
- Power On: Press and hold the center button on the helmet's control panel until you hear an audible prompt or see the LED indicator light up.
- Power Off: Press and hold the center button again until the helmet powers down.
2. Bluetooth Pairing (Smartphone)
The Sena R1 helmet can be paired with your smartphone to access features like music, GPS navigation, and phone calls.
- Enter Pairing Mode: With the helmet powered off, press and hold the center button for several seconds until the LED flashes rapidly, indicating pairing mode.
- Enable Bluetooth on Smartphone: Go to your smartphone's Bluetooth settings and search for available devices.
- Select Sena R1: Choose 'Sena R1' from the list of devices. Once connected, the LED will change to a steady blue light.

Figure 5: Pairing your smartphone with the Sena R1 helmet for music, GPS, and phone calls.
3. Group Intercom
The R1 supports 4-way group intercom, allowing communication with up to three other riders within a range of up to 900 meters (0.5 miles) in open terrain.
- Initiate Pairing: On two helmets, press and hold the center button until you hear 'Intercom Pairing'. The LED will flash red.
- Connect Helmets: Tap the center button on one of the helmets to connect them.
- Add More Riders: To add additional riders (up to four total), repeat the process by tapping the previously connected helmet and then the new helmet.
- Activate Group Intercom: Once all desired helmets are paired, tap any connected helmet to jump back into group intercom mode.
Video 2: Sena Tech Talk: R1 - Bluetooth Bicycle Helmet. This video provides an overview of the R1's features, including group intercom and smartphone connectivity.

Figure 6: Communicate with other riders using Bluetooth intercom.
4. Music, GPS, and Phone Calls
- Music Streaming: Once paired with your smartphone, you can stream music from your favorite apps directly to the helmet's built-in speakers. Use the helmet's control buttons to adjust volume, skip tracks, or pause playback.
- GPS Navigation: Audio cues from your smartphone's GPS application will be transmitted through the helmet speakers, providing turn-by-turn directions without needing to look at your phone.
- Phone Calls: Answer or make phone calls using the integrated microphone and speakers. Sena's Advanced Noise Control technology helps ensure clear voice transmission by reducing wind and background noise.

Figure 7: Solo rider features include music streaming, GPS, and phone calls.
5. FM Radio
The Sena R1 includes a built-in FM radio. Use the helmet's controls to scan for stations and adjust volume.
6. Sena Cycling App
Customize settings, manage friend groups for intercom, and access other features using the dedicated Sena Cycling App on your smartphone. The app provides a visual interface for easy configuration.

Figure 8: Manage settings from your phone with the Sena Cycling App.
Maintenance
1. Cleaning the Helmet
- Exterior: Wipe the helmet's exterior with a soft, damp cloth and mild soap. Avoid harsh chemicals or abrasive cleaners.
- Interior Padding: The inner padding is removable and washable. Follow the care instructions on the padding label, typically hand wash with mild soap and air dry.
2. Battery Care
- Charge the helmet regularly, even if not in frequent use, to maintain battery health.
- Avoid extreme temperatures when storing or charging the helmet.
Troubleshooting
- No Power: Ensure the helmet is fully charged. Check the charging cable and power source.
- Bluetooth Connectivity Issues: Ensure the helmet is in pairing mode. Forget the device on your smartphone's Bluetooth settings and attempt to re-pair. Ensure no other Bluetooth devices are interfering.
- Intercom Not Connecting: Ensure all helmets are within range and in intercom pairing mode. Follow the group intercom pairing steps carefully.
- Audio Quality Issues: Check volume levels on both the helmet and your connected device. Ensure the microphone is not obstructed.
Specifications
| Feature | Detail |
|---|---|
| Brand | Sena |
| Model Name | R1-STD |
| Color | Matte Black |
| Age Range | Adult |
| Outer Material | Polycarbonate (PC) |
| Inner Material | Leather |
| Item Weight | 380 Grams |
| Item Dimensions | 10.4 x 13.1 x 7.6 inches |
| Special Features | Bluetooth, Visor (Visor sold separately) |
| Connectivity | Bluetooth 4.1 |
| Intercom | 4-Way Group Intercom, up to 900m (0.5 miles) range |
| Audio | Built-in HD Speakers & Microphone, Advanced Noise Control, FM Radio |
| Battery Life | Up to 12 hours (Intercom) |
| Safety Standard | CPSC 16 CFR Part 1203 |
Safety Information
Always wear your helmet correctly and ensure all straps and adjustment systems are properly secured before riding. A helmet can only provide protection if worn and fitted correctly. Regularly inspect your helmet for any signs of damage. Replace the helmet after any significant impact, even if visible damage is not apparent.
Warranty and Support
The Sena R1 Smart Communications Helmet comes with a 2 Year Warranty. For detailed warranty information, technical support, or to access user guides, please visit the official Sena website: www.sena.com.