Introduction
Thank you for choosing the Fimer X 176 Inverter 160 Amp Welding Machine. This manual provides essential information for the safe and efficient operation, maintenance, and troubleshooting of your new welding equipment. Please read this manual thoroughly before operating the machine and keep it for future reference.
Safety Information
Welding can be dangerous. Always follow safety precautions to prevent injury or damage. This section outlines critical safety guidelines.
- Electric Shock: Can kill. Ensure proper grounding. Do not touch live electrical parts. Wear dry insulating gloves.
- Fumes and Gases: Can be hazardous to your health. Keep your head out of the fumes. Use ventilation or exhaust to remove fumes from the breathing zone.
- Arc Rays: Can burn eyes and skin. Wear a welding helmet with a proper shade filter. Wear appropriate protective clothing.
- Fire and Explosion: Welding sparks can cause fire or explosion. Keep flammable materials away from the welding area. Have a fire extinguisher readily available.
- Hot Parts: Can cause severe burns. Allow equipment to cool before touching.
- Pacemakers: Magnetic fields from high currents can affect pacemakers. Consult your doctor before welding.
Package Contents
Upon unpacking, verify that all items are present and undamaged. If any items are missing or damaged, contact your supplier immediately.
- Fimer X 176 Inverter 160 Amp Welding Machine
- Electrode Holder with Cable
- Ground Clamp with Cable
- Shoulder Strap (for portable use)
- User Manual
Setup
Proper setup is crucial for safe and effective welding. Follow these steps carefully.
- Power Connection: Ensure the welding machine is switched off. Connect the power cord to a suitable power outlet. The Fimer X 176 typically operates on a standard single-phase power supply. Verify the voltage and current rating of your outlet matches the machine's requirements.
- Ground Clamp Connection: Connect the ground clamp cable to the negative (-) terminal on the front panel of the welding machine. Securely attach the ground clamp to the workpiece or a sturdy metal workbench that is in direct electrical contact with the workpiece. A good ground connection is essential for stable arc and safety.
- Electrode Holder Connection: Connect the electrode holder cable to the positive (+) terminal on the front panel of the welding machine. Insert the desired electrode into the electrode holder, ensuring it is firmly gripped.
- Work Area Preparation: Clear the welding area of any flammable materials. Ensure adequate ventilation. Wear all necessary Personal Protective Equipment (PPE), including a welding helmet, gloves, and protective clothing.
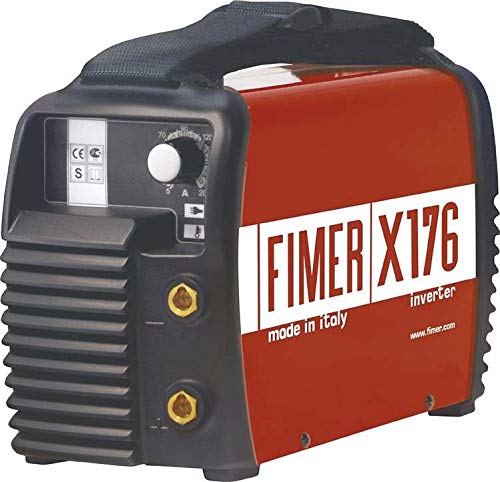
Figure 1: The Fimer X 176 Inverter 160 Amp Welding Machine. This image shows the compact design of the inverter welder, with the front panel visible, indicating where the electrode holder and ground clamp cables connect. The machine is designed for portability, as suggested by its 'Çanta' (bag/portable) designation.
Operating Instructions
This section guides you through the basic operation of the Fimer X 176 welding machine for Stick (MMA) welding.
- Power On: Switch the welding machine on using the power switch, usually located on the rear panel. The indicator light on the front panel should illuminate.
- Set Welding Current: Use the current adjustment knob on the front panel to set the desired welding amperage. The appropriate current depends on the electrode diameter and the material thickness. Refer to the electrode manufacturer's recommendations.
- Prepare Workpiece: Ensure the workpiece is clean and free of rust, paint, or grease. A clean surface promotes a stable arc and quality weld.
- Strike an Arc: With your welding helmet down, gently scratch the electrode tip against the workpiece like striking a match. Once the arc is established, lift the electrode slightly to maintain the arc length. Avoid sticking the electrode. If it sticks, quickly twist it free or release the electrode from the holder.
- Maintain Arc Length and Travel Speed: Maintain a consistent arc length (typically equal to the electrode diameter) and a steady travel speed. Observe the molten puddle and adjust your technique to achieve a uniform bead.
- Finish Welding: To stop welding, simply pull the electrode away from the workpiece. Allow the weld to cool before handling.
- Power Off: After completing your work, switch off the welding machine and disconnect it from the power supply.
Maintenance
Regular maintenance ensures the longevity and optimal performance of your Fimer X 176 welding machine.
- Cleaning: Periodically clean the machine's exterior with a dry, soft cloth. Use compressed air to blow out dust and metal particles from the ventilation openings. Ensure the machine is disconnected from power before cleaning.
- Cable Inspection: Regularly inspect all cables (power, electrode, ground) for cuts, cracks, or damaged insulation. Replace damaged cables immediately to prevent electric shock and ensure proper current flow.
- Terminal Inspection: Check the electrode holder and ground clamp connections for tightness and corrosion. Clean any corrosion to ensure good electrical contact.
- Storage: Store the welding machine in a clean, dry, and well-ventilated area, away from direct sunlight, moisture, and corrosive substances.
Troubleshooting
This section provides solutions to common issues you might encounter during operation. For problems not listed here, contact qualified service personnel.
| Problem | Possible Cause | Solution |
|---|---|---|
| Machine does not power on. | No power supply; Power switch off; Internal fuse blown. | Check power cord and outlet; Turn on power switch; Contact service for fuse replacement. |
| No arc or weak arc. | Poor ground connection; Incorrect current setting; Damp or old electrodes; Damaged cables. | Ensure good ground contact; Adjust current; Use dry electrodes; Inspect and replace cables. |
| Electrode sticks frequently. | Low current setting; Incorrect arc length; Improper electrode angle. | Increase current; Maintain proper arc length; Adjust electrode angle. |
| Overheat indicator light on. | Exceeded duty cycle; Blocked ventilation. | Allow machine to cool down; Clear ventilation openings. |
Specifications
The following are general technical specifications for the Fimer X 176 Inverter 160 Amp Welding Machine. Specifications are subject to change without notice.
- Model: Fimer X 176
- Input Voltage: 230V AC, 50/60 Hz (Single Phase)
- Input Current: Approximately 20-25A (at max output)
- Output Current Range: 20 - 160 Amps
- Duty Cycle: 60% at 160 Amps (This means it can weld at 160A for 6 minutes out of every 10-minute period)
- Electrode Diameter: 1.6 - 4.0 mm
- Protection Class: IP21S
- Insulation Class: H
- Weight: Approximately 4-6 kg (portable design)
- ASIN: B07KF5SMDW
- First Available Date: December 6, 2018
Warranty and Support
Fimer products are manufactured to high-quality standards. This product comes with a standard manufacturer's warranty against defects in materials and workmanship. The specific terms and duration of the warranty may vary by region and retailer. Please retain your proof of purchase for warranty claims.
For technical support, service, or warranty inquiries, please contact your authorized Fimer dealer or visit the official Fimer website for contact information.


