SolarEpic Tracer10420AN
EPEVER 100 Amp MPPT Solar Charge Controller User Manual
Model: Tracer10420AN
Brand: SolarEpic
1. Introduction
The SolarEpic EPEVER Tracer10420AN MPPT Solar Charge Controller is designed for efficient and reliable power management in off-grid solar systems. It features advanced Maximum Power Point Tracking (MPPT) technology to maximize energy harvest from solar panels and ensure optimal battery charging. This manual provides essential information for the safe and effective installation, operation, and maintenance of your solar charge controller.

This image displays the EPEVER 100 Amp MPPT Solar Charge Controller, the MT50 remote meter, and the accompanying connection cables, providing a complete overview of the product components.
2. Setup
Before installation, ensure all power sources are disconnected. Connect the battery to the controller first, followed by the solar panels, and then the load. This specific model features a common negative design. Refer to the wiring diagram for detailed connection instructions. The MT50 remote meter can be easily installed and connected to the controller for convenient monitoring and parameter adjustments.
2.1 Wiring Diagram
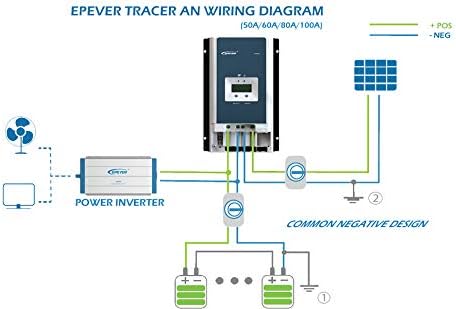
This diagram illustrates the typical wiring setup for the EPEVER Tracer AN series, showing connections from solar panels to the controller, then to the battery bank and a power inverter for common negative design systems.
2.2 Connection Terminals

A top-down perspective of the solar charge controller with its terminal cover removed, revealing the connection points for solar panels, battery, and load. This view is crucial for understanding the wiring process.

This image provides a close-up of the controller's connection terminals, labeling inputs for load control relay, remote voltage sensor, diesel generator relay, remote temperature sensor, and indicating the PV reverse polarity alarm.
2.3 Multiple Unit Parallel Connection

A schematic demonstrating how multiple EPEVER Tracer AN series controllers can be connected in parallel to increase system capacity, along with the PT-ADP communication adapter.
2.4 Installation Video
This video provides an overview of the EPEVER Tracer AN series high current solar charge controllers, demonstrating their negative grounding design and compatibility with 12V, 24V, 36V, and 48V battery systems. It highlights key features and applications for various current ratings.
3. Operating Instructions
The EPEVER Tracer10420AN features an intuitive LCD display for monitoring system performance and adjusting settings. Use the 'SELECT' and 'ENTER' buttons to navigate through various screens, including real-time data for solar panel input, battery status, and load output. The controller supports multiple battery types (Sealed, Gel, Flooded, and User-defined) to optimize charging. Load control functions allow for manual or automated management of connected devices.
3.1 Display and Operation

This image details the LCD display interface of the EPEVER controller, showing various screens for monitoring PV status, battery voltage, current, and load. It also highlights the 'SELECT' and 'ENTER' buttons for navigation.
3.2 MT50 Remote Meter Operation
This video demonstrates the unboxing, installation, and LCD display settings of the MT50 remote meter, specifically designed for use with EPEVER Tracer MPPT AN series solar charge controllers. It shows how to connect the meter and navigate its interface for monitoring and parameter adjustments.
4. Maintenance
To ensure long-term performance and safety, regular maintenance of your solar charge controller is recommended. Periodically inspect all wiring connections for tightness and corrosion. Keep the controller's surface clean and free from dust and debris to maintain proper heat dissipation. Monitor battery health and electrolyte levels (for flooded batteries) as per battery manufacturer guidelines.
5. Troubleshooting
If you encounter issues with your solar charge controller, perform the following basic troubleshooting steps:
- No Charging/Low Output: Check all wiring connections for secure contact. Verify solar panel output voltage and current. Ensure battery voltage is within the controller's operating range.
- Error Codes: Refer to the controller's display for specific error codes and consult the manual's troubleshooting section for corresponding solutions.
- Overheating: Ensure adequate ventilation around the controller. Clear any obstructions from cooling fins.
If problems persist, contact customer support.
6. Specifications
Detailed technical specifications for the EPEVER Tracer10420AN MPPT Solar Charge Controller are provided below:

A comprehensive table outlining the technical parameters for various Tracer AN series models, including nominal system voltage, battery input voltage range, rated charge current, and maximum PV open circuit voltage.
| Specification | Value |
|---|---|
| Manufacturer | Epsolar |
| Package Dimensions | 19.76 x 12.56 x 8.94 inches |
| Item Weight | 19.69 pounds |
| ASIN | B07KB6FMCX |
| Item model number | Tracer10420AN |
| Color | black |
| Brand | SolarEpic |
| Voltage | 2E+2 Volts (DC) |
| Display Type | LED |
7. Warranty & Support
The SolarEpic EPEVER Tracer10420AN MPPT Solar Charge Controller comes with a manufacturer's warranty. For warranty claims, technical support, or any product-related inquiries, please contact SolarEpic customer service. Keep your purchase receipt as proof of purchase.
Ask a question about this manual
Ask about setup, troubleshooting, compatibility, parts, safety, or missing instructions. Manuals+ will review the question and use this page’s manual context to help answer it.