Evertech 16CH-2HDD
Evertech 16 Channel Digital Video Recorder (Model 16CH-2HDD) User Manual
Comprehensive instructions for setting up, operating, and maintaining your Evertech 16 Channel Digital Video Recorder.
1. Introduction
This manual provides detailed instructions for the installation, configuration, and operation of your Evertech 16 Channel Digital Video Recorder (DVR), Model 16CH-2HDD. This DVR is designed for advanced surveillance, supporting H.264/H.265 hybrid recording and compatibility with 4-in-1 camera types: AHD, TVI, CVI, and traditional analog cameras. It includes an 8TB hard drive for continuous video recording and offers remote viewing capabilities via smartphone, tablet, or PC.

Figure 1: Evertech 16 Channel DVR with included 8TB hard drive and remote viewing on a smartphone.
2. Package Contents
Verify that all items listed below are included in your package. If any items are missing or damaged, please contact customer support.
- Evertech 16 Channel Digital Video Recorder (DVR)
- 8TB Hard Drive (pre-installed or included for installation)
- Power Supply Adapter
- USB Mouse
- CD for Video Instructions (may contain software and digital manual)
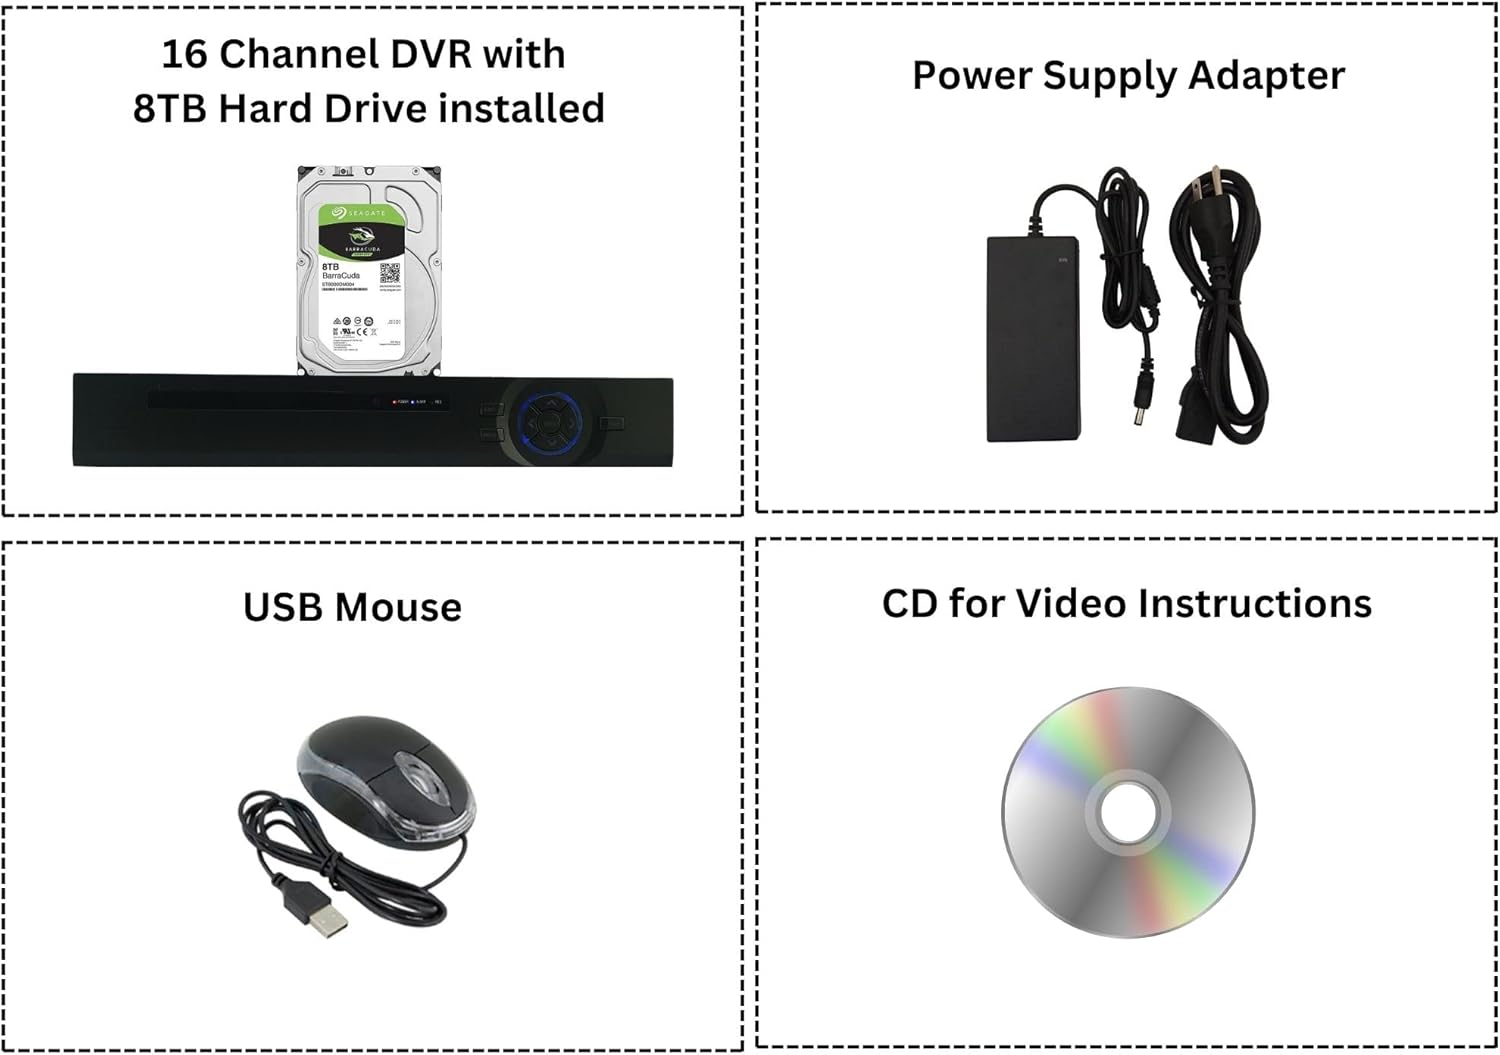
Figure 2: Included components: DVR unit, 8TB hard drive, power adapter, USB mouse, and instruction CD.
3. Setup and Installation
3.1 Hard Drive Installation (if not pre-installed)
The DVR supports up to two SATA hard drives, each up to 8TB, for a total capacity of 16TB. If your 8TB hard drive is not pre-installed, follow these steps:
- Unscrew the cover of the DVR unit.
- Carefully connect the SATA data and power cables from the DVR to the hard drive.
- Secure the hard drive within the DVR chassis using the provided screws.
- Replace and secure the DVR cover.

Figure 3: Example of a SATA hard drive for installation.
3.2 Connecting Cameras and Peripherals
Connect your security cameras and other peripherals to the appropriate ports on the rear panel of the DVR.

Figure 4: Rear panel connections for the DVR.
- Video In (BNC ports): Connect up to 16 compatible security cameras.
- Audio Input/Output (RCA ports): Connect external audio devices if required.
- HDMI/VGA: Connect a monitor for local viewing.
- USB: Connect the included USB mouse for navigation and external storage for backup.
- Ethernet (RJ45): Connect to your network router for remote access.
- RS485: For PTZ (Pan-Tilt-Zoom) camera control.
- Power In (12V DC): Connect the power supply adapter.
This DVR is compatible with 1080P, 960P, 720P TVI, AHD, CVI, and traditional analog cameras. It is not compatible with HD-SDI cameras or cameras exceeding 2.4MP resolution.
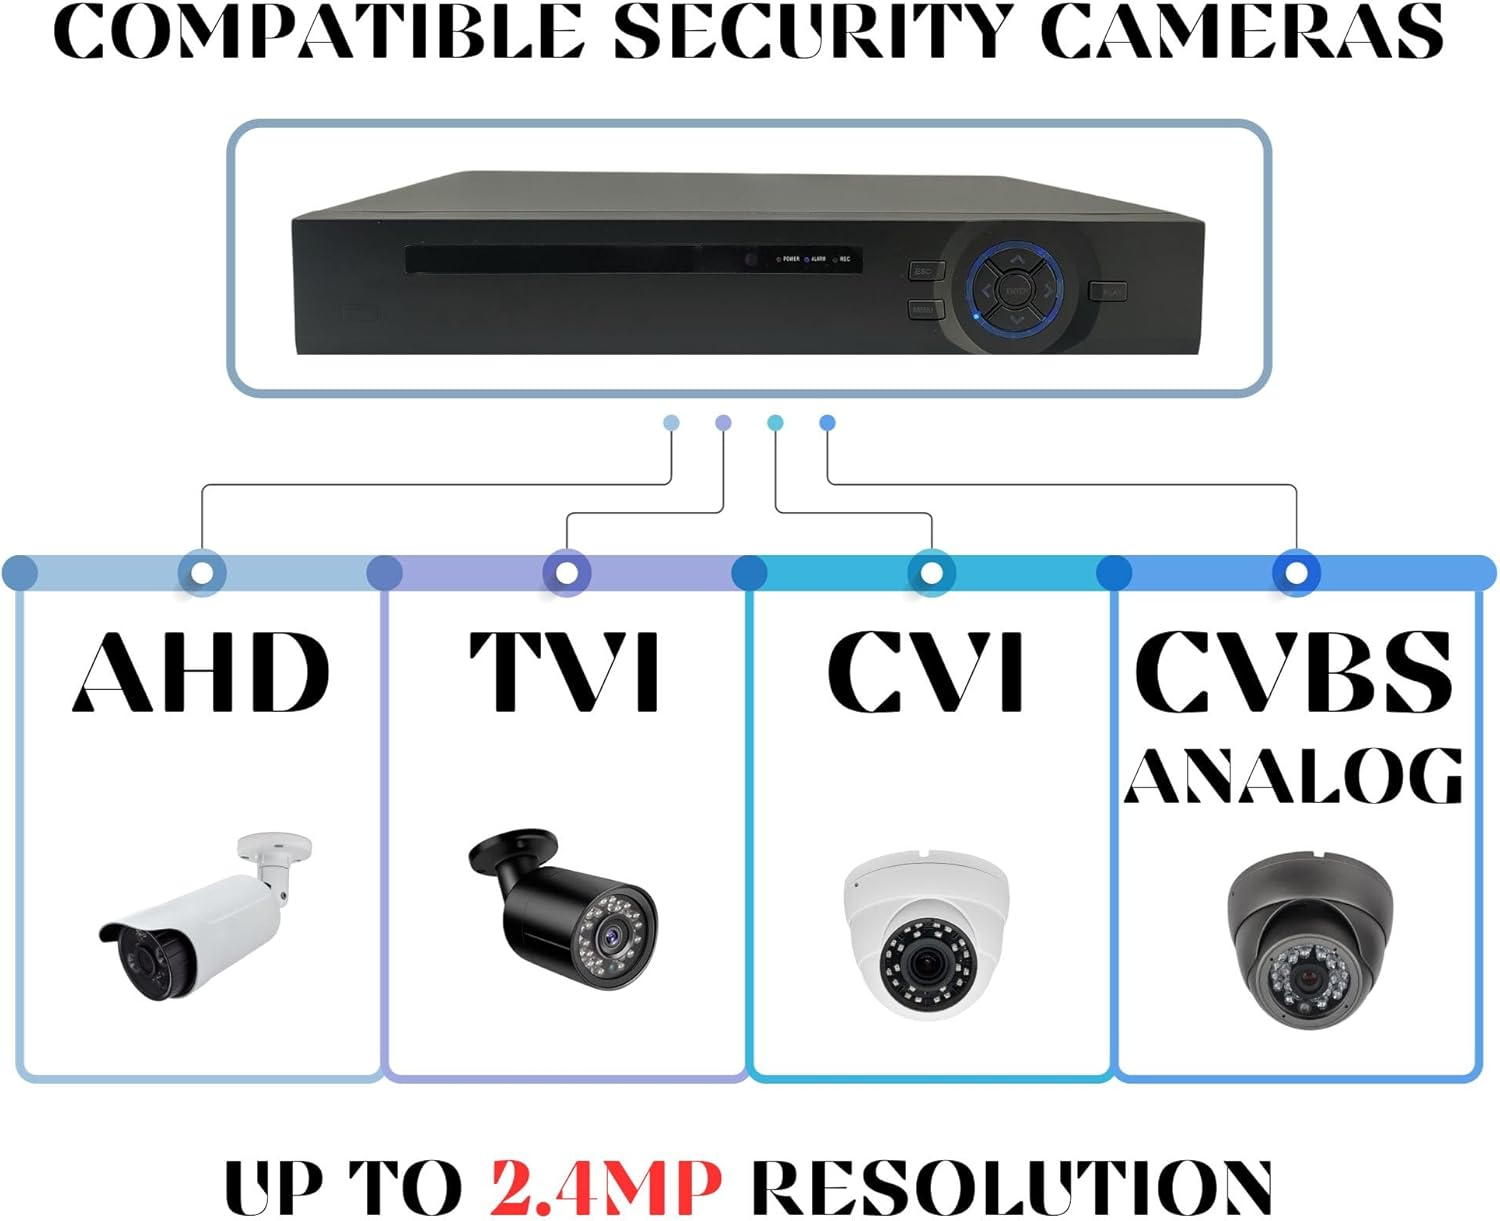
Figure 5: Compatible camera types for the DVR.
4. Operating the DVR
4.1 Initial Power-On and Configuration
- After connecting all necessary cables, plug in the power supply adapter to an electrical outlet.
- The DVR will power on automatically. Follow the on-screen prompts to complete the initial setup, including setting the date, time, and administrator password.
- Ensure the hard drive is formatted through the DVR's menu system to enable recording.
4.2 Live View and Playback
You can view live camera feeds and playback recorded footage directly on a connected monitor or remotely via the VMS Client Software on a PC or the mobile application.

Figure 6: Live view and playback options on PC and mobile devices.
To access playback functions:
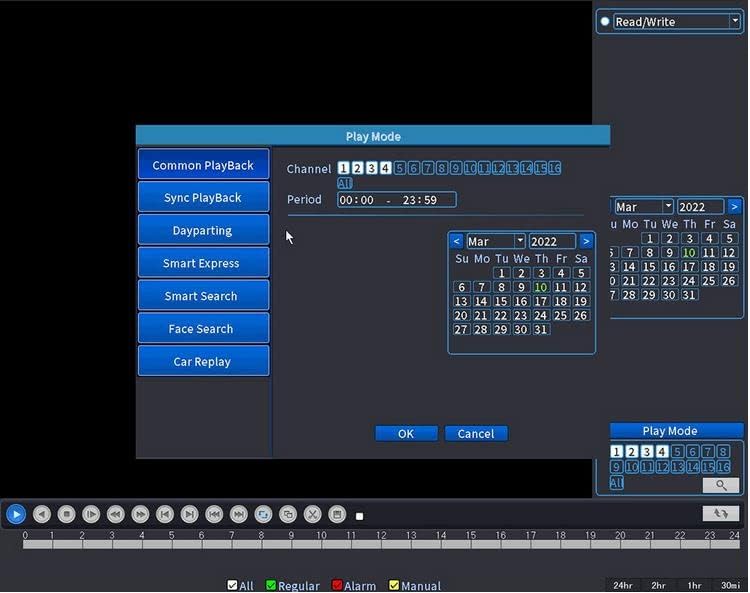
Figure 7: Playback mode interface on the DVR.
- Navigate to the "Play Mode" menu using the USB mouse.
- Select the desired channel(s) and date from the calendar.
- Use the timeline to select the specific time for playback.
- Options like Common Playback, Sync Playback, Dayparting, Smart Express, Smart Search, Face Search, and Car Replay are available depending on your system's capabilities and recorded data.
4.3 Motion Detection and Alerts
The DVR supports motion detection and can send push alerts to your mobile application.
- Access the DVR's menu and navigate to the "Alarm" or "Motion Detection" settings.
- Enable motion detection for desired channels and configure detection zones and sensitivity.
- Ensure push notifications are enabled in both the DVR settings and the mobile application settings.

Figure 8: Motion detection alerts received on a smartphone.
5. Remote Access Setup (XMeye App)
The XMeye application allows you to view live and recorded video from your DVR on your smartphone or tablet.
- Download the XMeye App:
- For iOS devices, download from the Apple App Store: https://itunes.apple.com/en/app/id884006786
- For Android devices, download from Google Play or directly: http://xmeye.net/android/xmeye.apk
- Alternatively, scan the QR codes provided in Figure 9.
- Register and Login: Open the XMeye app, register a new user account, and log in.
- Add Device: Click the "+" icon or "Add Device" option within the app.
- Scan QR Code or Manual Add:
- Scan the QR code displayed on your DVR's monitor (usually found in Network settings or Device Info).
- Alternatively, manually enter the device's serial number or IP address.
- Enjoy Live View: Once the device is successfully added, you can access live camera feeds and playback.

Figure 9: Easy remote access setup using the XMeye app.
6. Storage Management
The Evertech DVR comes with an 8TB hard drive pre-installed, providing ample storage for continuous recording. The system supports up to two SATA hard drives, each with a maximum capacity of 8TB, allowing for a total storage of 16TB.
- Recording Modes: Configure recording schedules (continuous, motion-triggered, alarm-triggered) via the DVR's menu.
- Storage Overwrite: The DVR will automatically overwrite the oldest footage when the hard drive is full, ensuring continuous recording.
- Backup: Use the USB port to connect an external storage device for backing up important footage.


Figure 10: DVR with 8TB and potential 16TB storage configurations.
7. Specifications
| Feature | Detail |
|---|---|
| Model Number | 16CH-2HDD |
| Video Channels | 16 |
| Video Compression | H.264 / H.265 |
| Camera Compatibility | AHD, TVI, CVI, Analog (up to 2.4MP) |
| Hard Drive Capacity | 8TB (expandable to 16TB with 2 SATA HDDs) |
| Connectivity | USB, Ethernet, HDMI, VGA, RS485 |
| Remote Access | Smartphone (XMeye App), PC (VMS Client, Web Browser) |
| Special Features | Motion Detection, Push Alerts, Face Detection, USB Backup |
| Product Dimensions | 10.25 x 8.75 x 1.87 inches |
| Item Weight | 4 pounds |
8. Troubleshooting
This section addresses common issues you might encounter with your Evertech DVR.
- No Video Display:
- Check all video cable connections from cameras to DVR and from DVR to monitor.
- Ensure the monitor is powered on and set to the correct input source (HDMI/VGA).
- Verify camera power supply.
- No Recording:
- Ensure the hard drive is properly installed and formatted.
- Check recording schedules and motion detection settings.
- Verify that the hard drive is not full (though it should overwrite automatically).
- Remote Access Issues:
- Ensure the DVR is connected to the internet via an Ethernet cable.
- Verify network settings on the DVR (DHCP enabled or static IP configured correctly).
- Check your router's internet connection.
- Confirm correct device ID/serial number entered in the XMeye app.
- Ensure the app has necessary network permissions on your smartphone.
- DVR Not Powering On:
- Check the power adapter connection to the DVR and the wall outlet.
- Ensure the power outlet is functional.
- Use the original power adapter provided.
9. Maintenance
Regular maintenance helps ensure the longevity and optimal performance of your DVR system.
- Keep Clean: Periodically clean the DVR unit and cameras with a soft, dry cloth. Avoid using liquid cleaners directly on the devices.
- Ventilation: Ensure the DVR is placed in a well-ventilated area to prevent overheating. Do not block ventilation openings.
- Firmware Updates: Check the manufacturer's website periodically for firmware updates. Updates can improve performance, add features, or fix bugs.
- Password Security: Regularly change your DVR's administrator password and use strong, unique passwords.
- Data Backup: Regularly back up important footage to an external storage device to prevent data loss.
10. Warranty and Technical Support
All Evertech products come with a one-year warranty. Free technical support is available to assist you with any questions or issues you may encounter.
For technical assistance or warranty claims, please contact Evertech customer service. Refer to the contact information provided with your product or visit the official Evertech website.
Ask a question about this manual
Ask about setup, troubleshooting, compatibility, parts, safety, or missing instructions. Manuals+ will review the question and use this page’s manual context to help answer it.