Introduction
This manual provides detailed instructions for assembling your JEKCA Cat 18S-M04 Tabby Cat Plastic Building Blocks set. Please read all instructions carefully before beginning assembly to ensure a smooth and enjoyable building experience. The JEKCA system utilizes a unique interlocking brick-through mechanism for sturdy and aesthetic models.

Image: The completed JEKCA Tabby Cat model, showcasing its detailed design and dynamic pose.
Safety Information
WARNING: CHOKING HAZARD - Small Parts.
This product contains small parts and is not suitable for children under 3 years of age. It is recommended for individuals 14 years and older due to the intricate nature of the assembly and the presence of small components.
What's in the Box
Before starting assembly, please verify that all components listed below are present in your package:
- Instruction Manual
- Building Bricks (various shapes and colors)
- Connecting Pins
- Pin Driver Tool
- Quick Guide
Assembly Instructions
Follow these steps carefully to assemble your JEKCA Tabby Cat model. The JEKCA system uses a unique interlocking mechanism for enhanced stability.
Understanding the JEKCA Interlocking System
The JEKCA building system utilizes small pins to securely connect bricks. This method ensures a strong and durable model once completed.

Image: Illustration of the JEKCA interlocking brick system. Step 1 shows inserting a pin into a brick. Step 2 shows turning the pin 90 degrees with the pin driver to lock it in place, creating a sturdy connection.
Step 1: Insert Pin - Place a connecting pin into the designated hole on the brick. Ensure it is fully inserted.
Step 2: Turn 90° - Use the provided pin driver tool to turn the pin 90 degrees. This action expands the pin within the brick, creating a secure lock. Repeat for all connections as indicated in the detailed instruction manual included in your box.
General Assembly Process

Image: A three-step diagram illustrating the connection of JEKCA bricks. Step 1 shows two bricks being aligned. Step 2 shows pins being inserted. Step 3 shows the pins being turned 90 degrees with the driver tool to secure the connection.
- Preparation: Unpack all components and organize your bricks by color and shape if desired. Refer to the detailed instruction manual for specific brick counts and types.
- Follow the Manual: The included instruction manual provides step-by-step visual guides for each section of the Tabby Cat model. Pay close attention to the orientation of bricks and the placement of pins.
- Connect Bricks: As shown in the diagrams, align the bricks and insert the connecting pins. Use the pin driver to turn each pin 90 degrees to secure the connection.
- Build Layer by Layer: JEKCA models are typically built in layers. Ensure each layer is firmly connected before proceeding to the next.
- Verify Connections: Periodically check that all connections are secure. A properly assembled JEKCA model will be sturdy and resistant to falling apart.
Care and Maintenance
To ensure the longevity and appearance of your JEKCA Tabby Cat model, follow these simple care guidelines:
- Cleaning: Dust the model regularly with a soft, dry cloth or a soft brush. For more thorough cleaning, gently wipe with a damp cloth and mild soap, then dry immediately. Avoid harsh chemicals or abrasive cleaners.
- Storage: If disassembling for storage, keep all bricks and pins organized to prevent loss. Store in a cool, dry place away from direct sunlight to prevent material degradation or color fading.
- Handling: While sturdy, avoid dropping the model or applying excessive force, which could cause connections to loosen or bricks to break.
Troubleshooting
Here are solutions to common issues you might encounter during assembly or with your finished model:
- Difficulty Connecting Bricks: Ensure the pins are correctly aligned and fully inserted before turning. If a pin is bent, try using a new one. Do not force connections.
- Loose Connections: If parts feel loose, verify that all pins in that section have been turned 90 degrees. Re-tighten any loose pins with the pin driver.
- Missing Parts: Carefully check all packaging materials. If parts are genuinely missing, please contact JEKCA customer support with your product model number and a description of the missing components.
- Model Instability: Review the assembly steps for the unstable section. Ensure all bricks are correctly oriented and all pins are securely locked.
Specifications
| Feature | Detail |
|---|---|
| Product Model | 18S-M04 (ST19CA18) |
| Product Dimensions (Assembled) | Approximately 18.23 x 3.7 x 8.54 inches (46.3 x 9.4 x 21.7 cm) |
| Item Weight | 2.86 pounds |
| Recommended Age | 14 years and up |
| Material | Plastic Building Blocks |
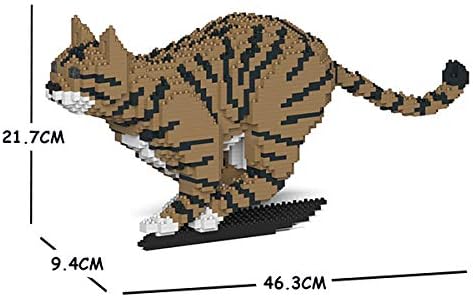
Image: Dimensional diagram of the assembled JEKCA Tabby Cat model, indicating approximate measurements of 46.3 cm length, 9.4 cm width, and 21.7 cm height.
Customer Support
For further assistance, missing parts, or inquiries regarding your JEKCA product, please contact JEKCA customer support through their official channels. Refer to the packaging or the JEKCA website for contact information.
JEKCA Official Website: Visit the JEKCA Store on Amazon


