VEVOR K72-125 Lathe Chuck 5 Inch 4-Jaw
VEVOR K72-125 Lathe Chuck Instruction Manual
Model: K72-125 Lathe Chuck 5 Inch 4-Jaw
Brand: VEVOR
1. Introduction
This manual provides essential information for the safe and effective operation and maintenance of your VEVOR K72-125 Lathe Chuck. The K72-125 is a 5-inch (125 mm) 4-jaw independent chuck designed for precision clamping of various workpieces on lathes and other turning machines. Its independent jaw design allows for holding irregular shapes and achieving high concentricity when properly adjusted.

Figure 1: VEVOR K72-125 Lathe Chuck with included accessories.
2. Safety Instructions
WARNING: Failure to follow these safety instructions may result in serious injury or damage to the equipment.
- Always read and understand the entire instruction manual before operating the lathe chuck.
- Wear appropriate personal protective equipment (PPE), including safety glasses or a face shield, hearing protection, and suitable work gloves.
- Ensure the lathe chuck is securely mounted to the lathe spindle or backplate before operation. Verify all mounting bolts are tightened to the manufacturer's specifications.
- Never attempt to adjust, clean, or remove the chuck or workpiece while the lathe is running.
- Ensure the workpiece is securely clamped in the jaws before starting the lathe. An improperly clamped workpiece can become a dangerous projectile.
- Do not exceed the maximum recommended speed of 3000 RPM for this chuck.
- Keep hands and clothing clear of rotating parts.
- Use the correct chuck key for tightening and loosening jaws. Remove the chuck key immediately after use to prevent it from being thrown during operation.
- Regularly inspect the chuck for any signs of wear, damage, or loose components. Do not use a damaged chuck.
- Ensure the work area is clean, well-lit, and free of obstructions.
3. Included Components
The VEVOR K72-125 Lathe Chuck package typically includes the following items:
- 1 x K72-125 Lathe Chuck (5 Inch 4-Jaw)
- 1 x T-Wrench (Chuck Key)
- Mounting Screws (typically 4)
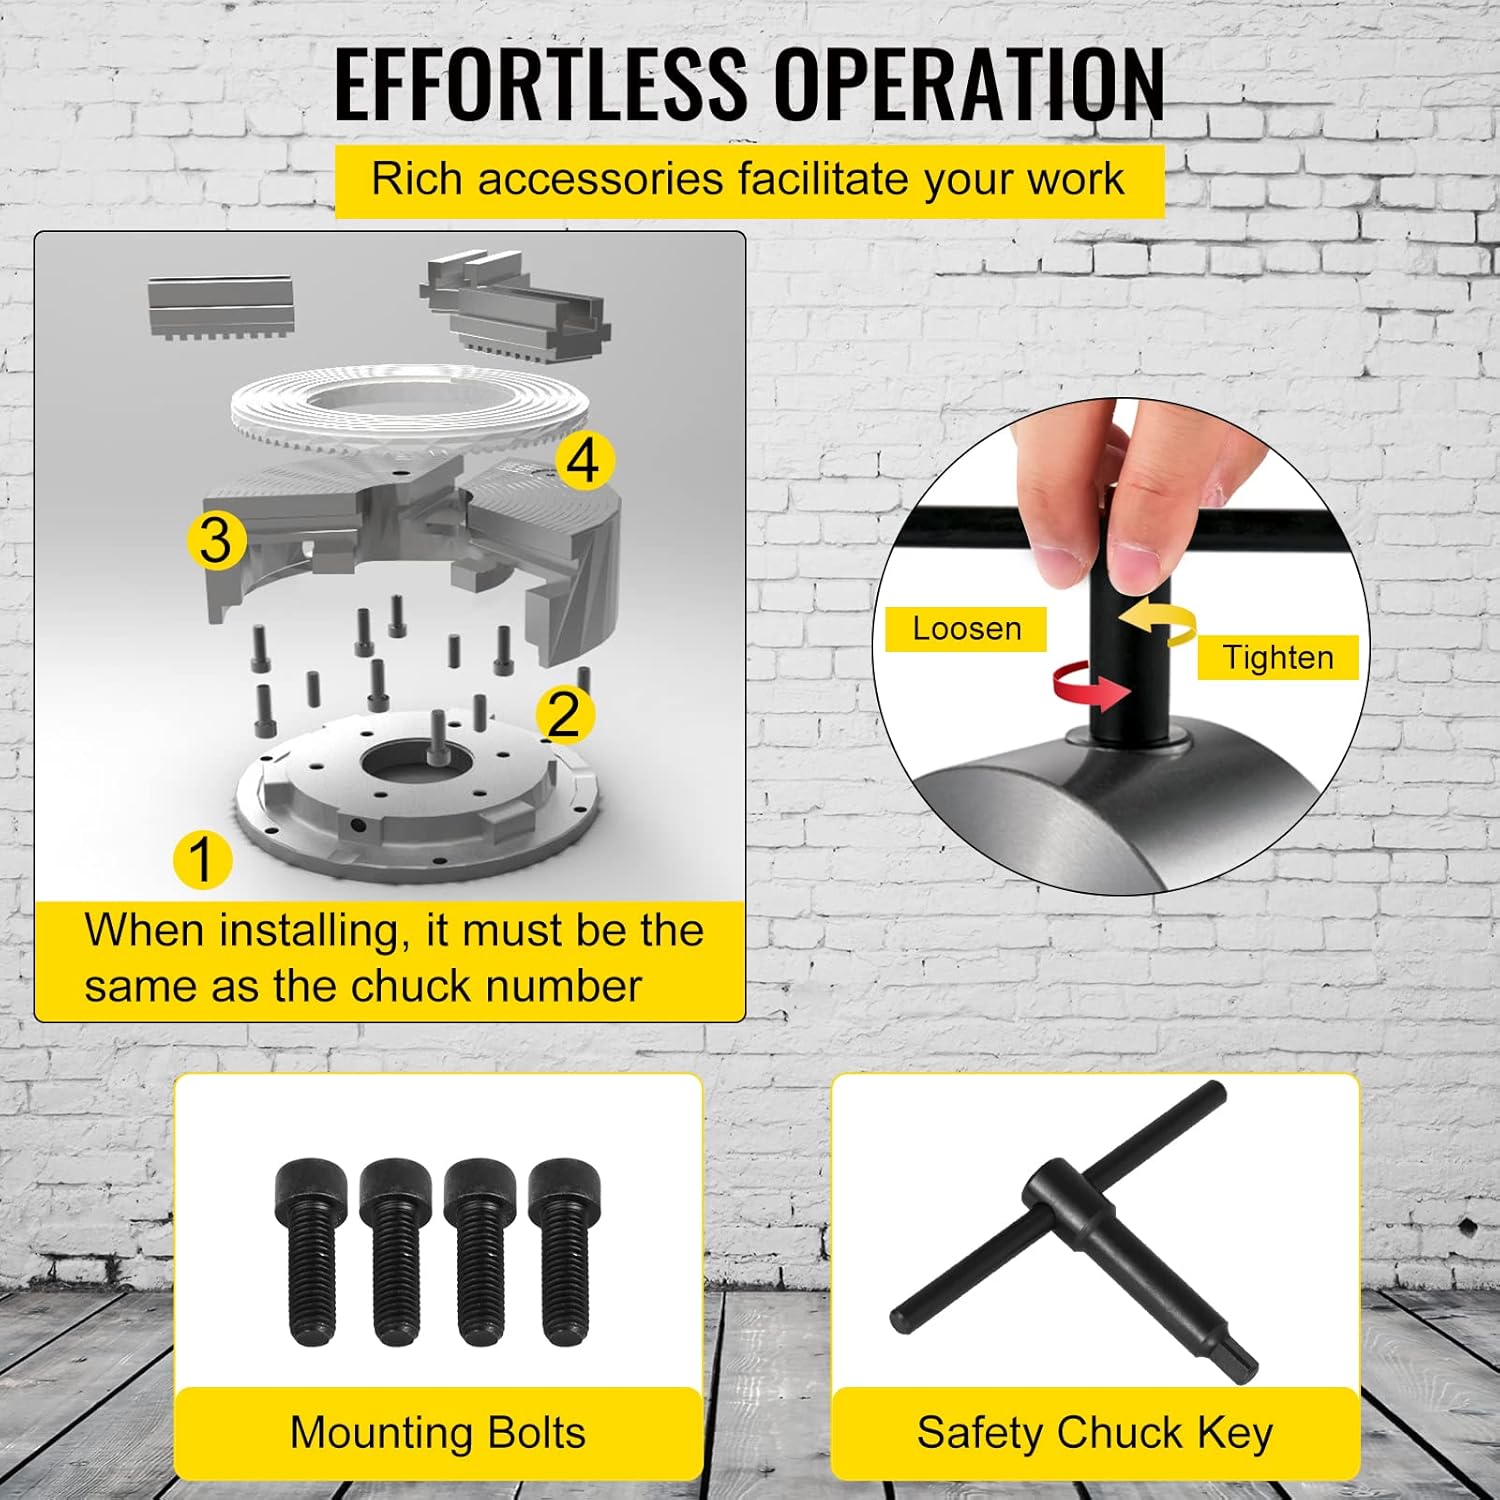
Figure 2: Main components: Lathe Chuck, Mounting Bolts, and Safety Chuck Key.
4. Product Specifications
| Feature | Specification |
|---|---|
| Model | K72-125 |
| Chuck Diameter | 125 mm (4.92 inches) |
| Jaw Type | 4-Jaw Independent, Reversible |
| Material | HT 300 Durable Cast Iron |
| Maximum Speed | 3000 RPM |
| Precision Tolerance | ≤0.07 mm (0.003 inches) |
| Item Weight | 10.9 pounds (4.94 kg) |
| Product Dimensions (L x W x H) | 4.9 x 4.9 x 4.9 inches |
| Internal Jaw Clamping Range (A-A1) | 7-57 mm (0.276-2.25 inches) |
| Internal Jaw Clamping Range (B-B1) | 57-125 mm (2.25-4.92 inches) |
| External Jaw Clamping Range (C-C1) | 48-125 mm (1.89-4.92 inches) |

Figure 3: Clamping range specifications for internal and external jaws.
5. Setup and Installation
Proper installation of the lathe chuck is crucial for safe and accurate operation. This chuck is designed for direct mounting onto a lathe spindle or an appropriate backplate.
5.1 Mounting the Chuck
- Prepare the Lathe Spindle/Backplate: Ensure the lathe spindle or existing backplate is clean and free of debris. Any foreign material can affect concentricity and stability.
- Align the Chuck: Carefully align the mounting holes on the back of the K72-125 chuck with the corresponding holes on your lathe spindle or backplate. Note that some lathes may require specific mounting hardware (e.g., headless hex bolts and nuts) not always included with the chuck. Verify compatibility with your lathe model.
- Secure with Mounting Screws: Insert the provided mounting screws (or appropriate hardware for your lathe) through the chuck and into the spindle/backplate.
- Tighten Securely: Using an appropriate wrench, gradually tighten all mounting screws in a star pattern to ensure even pressure and secure attachment. Do not overtighten, but ensure the chuck is firmly seated and shows no wobble.
- Verify Stability: Before operation, manually rotate the chuck to confirm it spins freely and is securely attached without any play.

Figure 4: Exploded view showing chuck body, internal jaw, mounting bolt, and safety chuck key for installation.
6. Operating Instructions
The VEVOR K72-125 is an independent 4-jaw chuck, meaning each jaw moves independently. This allows for clamping irregular shapes and achieving precise concentricity by adjusting each jaw individually.
6.1 Clamping a Workpiece
- Select Jaws: The chuck comes with reversible jaws. Determine whether internal or external clamping is required for your workpiece. The jaws can be reversed by removing them and re-inserting them in the opposite orientation.
- Insert Workpiece: Place the workpiece into the chuck jaws.
- Adjust Jaws: Insert the T-wrench into the square hole for each jaw. Rotate the T-wrench clockwise to advance the jaw and counter-clockwise to retract it. Adjust each jaw individually until it makes contact with the workpiece.
- Center the Workpiece: For cylindrical workpieces, use a dial indicator to achieve concentricity. Adjust each jaw incrementally until the workpiece runs true. For irregular shapes, position the workpiece as desired.
- Final Tightening: Once the workpiece is positioned and centered, tighten each jaw firmly using the T-wrench. Ensure all jaws are equally tightened to prevent the workpiece from shifting during operation.
- Remove Chuck Key: Always remove the T-wrench from the chuck immediately after tightening.

Figure 5: Illustration of reversible jaws and the tightening/loosening mechanism with the T-wrench.
6.2 Applications
This 4-jaw independent chuck is versatile and suitable for various applications, including:
- Wood Lathes
- Metal Lathes
- Drilling Machines
- Milling Machines

Figure 6: Wide application range of the VEVOR K72-125 Lathe Chuck.
7. Maintenance
Regular maintenance ensures the longevity and optimal performance of your lathe chuck.
- Cleaning: After each use, clean the chuck thoroughly to remove chips, dust, and coolant residue. Use a brush and compressed air. Avoid using harsh chemicals that could damage the finish or internal components.
- Lubrication: Periodically apply a thin coat of anti-rust oil to all exposed metal surfaces, especially the jaws and screw mechanisms, to prevent corrosion. The chuck features an anti-rust coating surface for increased service life.
- Inspection: Regularly inspect the jaws for wear or damage. Check the mounting screws for tightness. Ensure the chuck key operates smoothly.
- Storage: When not in use, store the chuck in a clean, dry environment to prevent rust and damage.

Figure 7: Anti-rust coating and ground jaw teeth contribute to durability.
8. Troubleshooting
This section addresses common issues you might encounter with your VEVOR K72-125 Lathe Chuck.
| Problem | Possible Cause | Solution |
|---|---|---|
| Workpiece not running true (high runout) | Improper jaw adjustment; debris between chuck and spindle/backplate; worn jaws. | Re-adjust each jaw individually using a dial indicator until desired concentricity is achieved. Clean mounting surfaces. Inspect and replace worn jaws if necessary. Remember this is an independent jaw chuck, not self-centering. |
| Chuck difficult to mount | Incorrect mounting hardware; debris on mounting surfaces. | Ensure you have the correct type and size of mounting hardware for your specific lathe model (e.g., M8x1.25 x 35mm headless hex bolts and M8 nuts for some VEVOR lathes). Clean all mating surfaces thoroughly. |
| Jaws are stiff or difficult to move | Lack of lubrication; accumulation of chips/debris; minor corrosion. | Clean jaws and screw mechanisms thoroughly. Apply a light machine oil or anti-rust oil to the jaw slides and screw threads. |
| Workpiece slips during operation | Jaws not tightened sufficiently; workpiece surface is oily/slippery; jaws are worn smooth. | Ensure all four jaws are tightened firmly and evenly. Clean the workpiece clamping surface. Inspect jaws for wear; replace if gripping surfaces are smooth. |
9. Warranty and Support
For specific warranty information regarding your VEVOR K72-125 Lathe Chuck, please refer to the documentation included with your purchase or contact VEVOR customer support directly.
You can visit the official VEVOR store for more information and support:
Ask a question about this manual
Ask about setup, troubleshooting, compatibility, parts, safety, or missing instructions. Manuals+ will review the question and use this page’s manual context to help answer it.