CACAZI A10
CACAZI Wireless Doorbell Kit User Manual
Model: A10
1. Introduction
Thank you for purchasing the CACAZI Wireless Doorbell Kit. This manual provides detailed instructions for the installation, operation, and maintenance of your new doorbell system. Please read this manual thoroughly before use to ensure proper functionality and longevity of the product.
2. Product Overview
The CACAZI Wireless Doorbell Kit is designed for convenience and reliability, offering a wide operating range and multiple chime options. It is suitable for homes, offices, and classrooms.

Image: The CACAZI Wireless Doorbell Kit, featuring two black plug-in receivers and two black push-button transmitters, each with a prominent blue LED ring.
Key features include:
- Waterproof push button (IP44 rated).
- Up to 1000 feet (300 meters) operating range in open areas.
- 60 selectable chimes/melodies.
- 5 adjustable volume levels (20 – 110 dB).
- LED flash indicator on receiver.
- Easy installation with included accessories.
3. Package Contents
Verify that all items are present in your package:
- 2 x Wireless Transmitters (Push Buttons)
- 2 x Plug-in Receivers
- 2 x 12V 23A Alkaline Batteries (for transmitters)
- 2 x Double-sided Adhesive Tapes
- 2 x Screws and Anchors
- 1 x User Manual
- 1 x "Please Ring Bell" Sticker

Image: The accessory kit, showing the user manual, a bag of screws, double-sided adhesive tape, and a "Please Ring Bell" sticker.
4. Setup and Installation
4.1. Transmitter Battery Installation
- Gently pry open the back cover of the transmitter using a small flat-head screwdriver or similar tool.
- Insert the included 12V 23A alkaline battery, ensuring correct polarity (+/-).
- Close the back cover securely.
4.2. Receiver Placement
Plug the receiver into a standard electrical outlet (AC 100-240V) in a location where the chime can be easily heard throughout your desired area. Consider placing receivers in different parts of your home or office for optimal coverage.
4.3. Transmitter Mounting
Choose a suitable location for the push button, such as near your front door. Ensure the surface is clean and dry.

Image: Two methods for mounting the doorbell push button: using double-sided adhesive tape or using screws and anchors for a more permanent fixture.
There are two primary installation methods:
- Using Double-sided Adhesive Tape:
Peel off one side of the adhesive tape and stick it firmly to the back of the transmitter. Peel off the other side and press the transmitter firmly onto the desired mounting surface for at least 30 seconds.
- Using Screws and Anchors:
Open the back cover of the transmitter. Mark the positions for drilling holes using the screw holes on the transmitter's back plate as a guide. Drill the holes, insert the anchors (if necessary), and then secure the transmitter's back plate with the provided screws. Snap the front part of the transmitter back onto the secured plate.
Tip: Increased obstructions like thick walls or metal doors may shorten the operating range. For optimal performance, avoid placing the button directly on metal surfaces if possible.
5. Operating Instructions
5.1. Pairing Transmitters and Receivers (Learning Code)
The units are typically pre-paired from the factory. If re-pairing is needed or if you are adding more transmitters/receivers:
- Plug in the receiver.
- Press and hold the volume button on the receiver for approximately 5 seconds until you hear a "ding" sound and the LED indicator flashes rapidly. The receiver is now in learning mode.
- Immediately press the push button on the transmitter. The receiver will chime, indicating successful pairing.
- To pair additional transmitters, repeat steps 2 and 3 for each transmitter.

Image: Diagram illustrating the "Learning Code" process, showing how multiple receivers can be paired with multiple push buttons to meet various family needs, supporting up to 100 receivers and 20 buttons.
5.2. Changing Chimes/Melodies
To select a different melody:
- Press the "Music" button (often indicated by a musical note icon) on the receiver to cycle through the available 60 melodies.
- Once you find your desired melody, press the push button on the transmitter to set it. The receiver will play the selected melody.
5.3. Adjusting Volume
To adjust the volume level:
- Press the "Volume" button (often indicated by a speaker icon) on the receiver to cycle through the 5 available volume levels (20 dB to 110 dB).
- Select the desired volume level. The receiver will play a short sound at the chosen volume.

Image: Visual representation of the 6 adjustable volume levels, ranging from 0dB (silent) to 110dB (loud), with examples of suitable environments for different volume settings, such as a quiet setting for a sleeping baby.
6. Features
- Extended Operating Range: Enjoy a reliable connection up to 1000 feet (300 meters) in open areas, ensuring you never miss a visitor.
- Waterproof Design (IP44): The push button transmitter is built to withstand various weather conditions, making it suitable for outdoor use.
- Multiple Chimes: Choose from 60 distinct melodies to personalize your doorbell sound.
- Adjustable Volume: With 5 levels of volume control, from silent (0dB) to very loud (110dB), you can set the perfect sound for any environment.
- LED Indicator: The receiver features an LED light that flashes when the doorbell rings, providing a visual alert, especially useful for the hearing impaired.
- Expandable System: Easily add more transmitters or receivers to customize your doorbell system for larger homes or multiple entry points.

Image: Illustration of the launcher's waterproof design (IP44 standard) and its wide operating temperature range from -20°C (-4°F) to 60°C (140°F), showing resistance to rain and snow.

Image: Depiction of the 300-meter (1000 feet) long operating range in an open area, with a note indicating that increased obstructions will shorten the effective distance.
7. Maintenance
- Cleaning: Wipe the doorbell units with a soft, dry cloth. Do not use abrasive cleaners or solvents.
- Battery Replacement: The transmitter battery (12V 23A alkaline) has an average life of 2 years. If the doorbell button stops working or its range decreases significantly, replace the battery.
- Environmental Conditions: While the transmitter is waterproof (IP44), extreme temperatures outside the -30°C to 70°C range should be avoided.
8. Troubleshooting
| Problem | Possible Cause | Solution |
|---|---|---|
| Doorbell does not ring. | Receiver not plugged in or powered off. Transmitter battery is dead. Units are not paired. | Ensure receiver is plugged into a live outlet. Replace transmitter battery. Re-pair the transmitter and receiver (refer to Section 5.1). |
| Short operating range. | Too many obstructions (walls, metal structures). Low transmitter battery. Interference from other devices. | Relocate receiver or transmitter to reduce obstructions. Replace transmitter battery. Try moving the doorbell away from other electronic devices. |
| Chime sound is distorted or too low/high. | Volume setting is incorrect. | Adjust the volume level on the receiver (refer to Section 5.3). |
| Receiver LED flashes but no sound. | Volume set to 0dB (silent mode). | Increase the volume level on the receiver. |
9. Specifications
| Feature | Detail |
|---|---|
| Model Number | A10 |
| Operating Voltage (Receiver) | AC 100 – 240 V |
| Transmitter Battery Type | 12 V 23A Alkaline Battery |
| Operating Range | Up to 1000 feet (300 meters) in open area |
| Melodies | 60 selectable chimes |
| Volume Levels | 5 levels (20 – 110 dB) |
| Waterproof Grade (Transmitter) | IP44 |
| Operating Temperature | -30°C to 70°C (-22°F to 158°F) |
| Transmitter Dimensions | 75 x 51 x 20 mm (2.9 x 2.0 x 0.8 inches) |
| Receiver Dimensions | 95 x 65 x 24 mm (3.7 x 2.5 x 0.9 inches) |
| Material | ABS plastic |
| Color | Black |
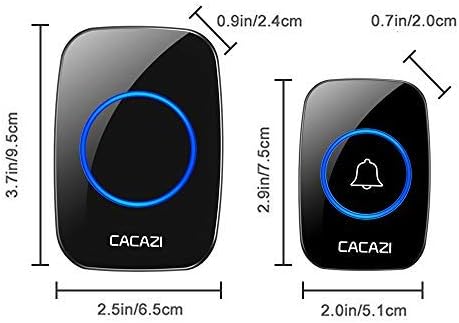
Image: Detailed dimensions of both the larger receiver unit (3.7in/9.5cm height, 2.5in/6.5cm width, 0.9in/2.4cm depth) and the smaller transmitter unit (2.9in/7.5cm height, 2.0in/5.1cm width, 0.7in/2.0cm depth).
10. Warranty and Support
For warranty information and customer support, please refer to the contact details provided on the product packaging or contact the manufacturer directly. Keep your purchase receipt as proof of purchase.
Manufacturer: CHAOXINGLI
Brand: CACAZI
Related Documents - A10
 |
A10 True Wireless Earphone User Manual User manual for the A10 True Wireless Earphone, including component list, wearing method, function description, charging case usage, LED indicators, pairing instructions, specifications, and safety rules. |
 |
A10 Wireless Guitar System Instruction Manual Comprehensive instruction manual for the A10 Wireless Guitar System, detailing setup, operation, features, specifications, and FCC compliance for wireless audio transmission. |
 |
A10 Car Smart Screen User Manual Comprehensive user manual for the A10 Car Smart Screen, detailing installation, connection methods, features like Apple CarPlay and Android Auto, troubleshooting tips, product specifications, and optional dashcam/reverse camera functions. |
 |
CACAZI A10 Wireless Doorbell External Photos Detailed external photographs of the CACAZI A10 Wireless Doorbell, showcasing its design, dimensions, and branding from various angles. |
 |
Audio Ltd. A10-TX Digital Transmitter User Guide Comprehensive user guide for the Audio Ltd. A10-TX Digital Transmitter, covering setup, operation, features, specifications, and troubleshooting. Learn about frequency selection, audio input, recording, firmware updates, and more. |
 |
A10-TX Digital Transmitter User Guide - Sound Devices Comprehensive user guide for the Sound Devices A10-TX Digital Transmitter, covering setup, operation, features, specifications, and troubleshooting. |