Graigar AR844
Smart Sensor AR844 Digital Sound Level Meter User Manual
Model: AR844 | Brand: Graigar
1. Introduction
Thank you for choosing the Graigar Smart Sensor AR844 Digital Sound Level Meter. This device is designed to measure sound levels accurately and efficiently, providing reliable data for various applications. It features a wide measuring range, high accuracy, and the ability to connect to a PC for data analysis and recording. Please read this manual thoroughly before operating the device to ensure proper use and to maximize its lifespan.
2. Safety Information
- Do not attempt to disassemble or modify the device. This may cause damage and void the warranty.
- Avoid exposing the device to extreme temperatures, high humidity, or corrosive environments.
- Keep the microphone clean and free from obstructions to ensure accurate measurements.
- Use only the specified power source (9V battery or DC 9V 100mA adapter).
- Remove batteries if the device will not be used for an extended period to prevent leakage.
- Handle the device with care to prevent drops or impacts.
3. Product Overview
The Smart Sensor AR844 Digital Sound Level Meter is a compact and robust instrument. Below are key components and views of the device.


4. Setup
4.1 Battery Installation
- Locate the battery compartment on the back of the device (refer to Figure 3.2).
- Slide the battery compartment cover downwards to open it (refer to Figure 3.4).
- Insert a 9V battery into the compartment, ensuring correct polarity (+/-).
- Close the battery compartment cover by sliding it back into place until it clicks securely.
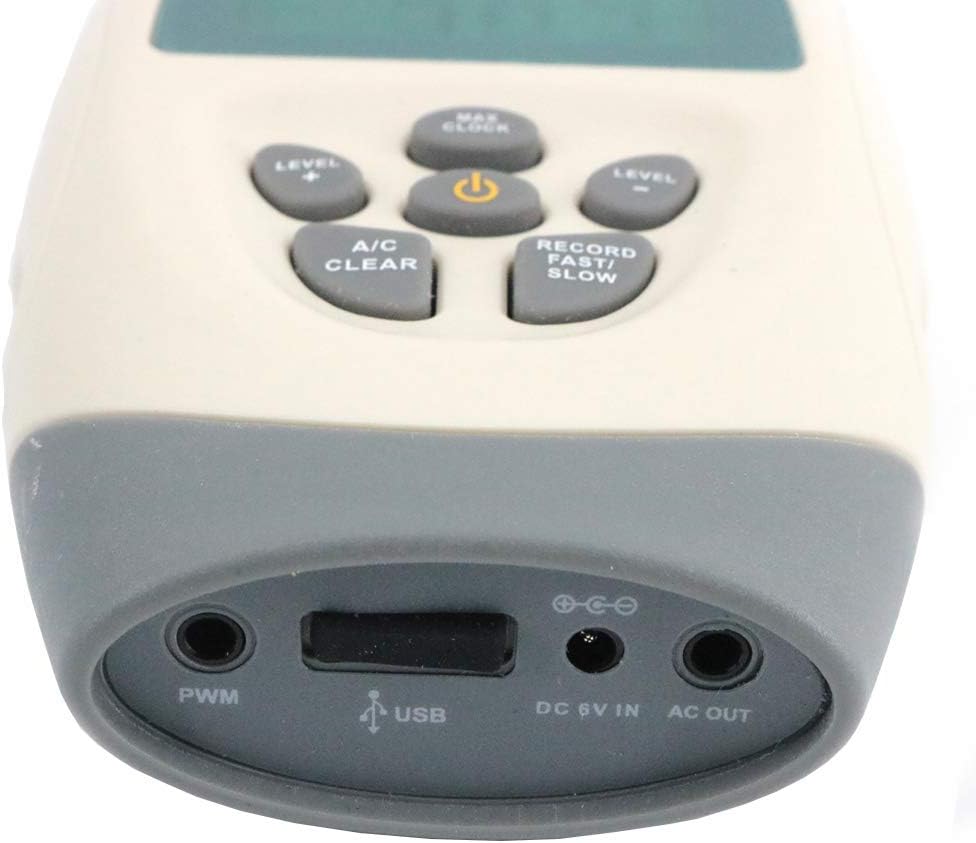
Alternatively, the device can be powered by a DC 9V 100mA external power supply connected to the DC 6V IN port (refer to Figure 3.5).
4.2 Initial Self-Calibration
Upon turning on the device, it will perform a self-calibration for approximately 10 seconds. Ensure the microphone is clear during this process.
5. Operating Instructions
5.1 Power On/Off
- To power on the device, press the Power button (center button).
- To power off, press and hold the Power button until the display turns off. The device also features an auto power-off function after 10 minutes of inactivity.
5.2 Taking Measurements
- Ensure the microphone foam cover is properly installed to reduce wind noise.
- Point the microphone towards the sound source.
- The current sound level will be displayed on the screen in decibels (dB).
5.3 Frequency Weighting (A and C)
The AR844 supports both A and C frequency weighting. Use the A/C Clear button to switch between A-weighting (dBA) and C-weighting (dBC).
- A-weighting (dBA): Simulates the human ear's response to sound, commonly used for environmental noise measurements.
- C-weighting (dBC): Provides a flatter response, suitable for measuring peak sound levels or noise from machinery.
5.4 Dynamic Characteristic (FAST/SLOW)
The device allows selection between FAST and SLOW response times. Press the Record Fast/Slow button to toggle between them.
- FAST: (High speed) For capturing rapidly changing noise levels.
- SLOW: (Low speed) For measuring average noise levels over time.
5.5 Data Recording and PC Connection
The AR844 can store up to 4700 data records and connect to a PC via USB for data downloading and real-time analysis.
- Data Record: Press the Record Fast/Slow button (short press) to initiate or stop data recording. The display will indicate recording status.
- PC Connection: Connect the device to your computer using the provided USB cable via the USB port (refer to Figure 3.5). Install the necessary software (included with the product) to download recorded data, perform real-time sampling analysis, and print graphs and data.
5.6 Max/Min Hold Function
To view the maximum or minimum sound level recorded during a measurement session, press the Max/Clock button. Pressing it repeatedly will cycle through MAX, MIN, and current readings.
5.7 Level Range Adjustment
The device has 4 level ranges: 30-80dB, 50-100dB, 60-110dB, and 80-130dB. Use the Level + and Level - buttons to adjust the measurement range for optimal accuracy based on the expected sound level.
5.8 Official Product Video
This video provides a visual overview of the Smart Sensor AR844 Digital Sound Level Meter, demonstrating its features and basic operation. It shows the device being unboxed, powered on, and displaying sound level readings, highlighting its frequency range and measuring capabilities.
6. Maintenance
- Cleaning: Wipe the device with a soft, dry cloth. Do not use abrasive cleaners or solvents.
- Storage: Store the device in its protective case (refer to Figure 3.7) in a cool, dry place when not in use. Remove batteries for long-term storage.
- Microphone Care: Keep the microphone clean and protect it from dust and moisture. Always use the foam cover to prevent wind noise and protect the microphone element.
7. Troubleshooting
| Problem | Possible Cause | Solution |
|---|---|---|
| Device does not power on. | Low or dead battery; incorrect battery installation; no external power. | Replace the 9V battery; check battery polarity; ensure DC 9V 100mA adapter is properly connected. |
| Inaccurate readings. | Microphone obstructed or dirty; incorrect frequency weighting (A/C); incorrect dynamic characteristic (FAST/SLOW); device not calibrated. | Clean the microphone; ensure foam cover is clean; select appropriate A or C weighting; adjust FAST/SLOW response; allow 10 seconds for self-calibration after power on. |
| "OVER" or "UNDER" displayed. | Sound level is outside the current measurement range. | Adjust the level range using the Level + or Level - buttons to match the expected sound level. |
| Cannot connect to PC or download data. | USB cable not properly connected; PC software not installed or outdated; driver issues. | Ensure USB cable is securely connected to both device and PC; install the latest version of the PC software; check device manager for driver issues. |
8. Specifications
| Parameter | Value |
|---|---|
| Measuring Range | 30~130 dBA, 35~130 dBC |
| Accuracy | ±1.5dB |
| Frequency Range | 31.5Hz to 8.5K Hz |
| Resolution | 0.1dB |
| Frequency Weighting | A and C |
| Digital Display | 4 digits |
| Analogy Bar Graph | 1dB or 1 bar graph |
| Sample Rate | 20 times / second |
| Microphone | 1/2 inch polarization capacitance microphone |
| Standard Compliance | According to IEC651 TYPE 2 & ANSIS1.4 TYPE 2 |
| Dynamic Range | 50dB/100dB |
| Level Ranges | 30-80dB; 50-100dB; 60-110 dB; 80-130dB |
| Overload Indication | OVER / UNDER |
| AC Signal Output | 4Vrms/full bar graph, output impedance is about 600 ohm |
| PWM Signal Output | Duty cycle=0.01xdb value/3.3 x 100% |
| Dynamic Characteristic | FAST (high speed)/ SLOW(low speed) |
| Calendar Accuracy | +-30 seconds/day |
| Data Storage Quantity | 4700 |
| Maximum Value Holding | MAX |
| Auto Power Off | V (after no operation for 10 minutes) |
| Level Range Bar Graph | V |
| Range Selection | 4 modes |
| Range Over Indication / Battery Indication | V |
| Backlight Display / Max & Min Hold Function | V |
| External Power Supply | V |
| Self Calibration Time | 10 secs (every turn on) |
| Operating Condition Temperature | 0-40°C |
| Operating Condition Humidity | 10% to 80%RH |
| Storage Condition Temperature | -10 to 60°C |
| Storage Condition Humidity | 10% to 70% RH |
| Power | 9V battery or DC 9V 100mA |
| Product Net Weight | 147.50G |
| Product Size | 67*30*183mm (2.64 x 1.18 x 7.2 inches) |
| Material | ABS Plastic |
| Item Weight | 2.2 pounds |
| Manufacturer | Graigar |
| Country of Origin | China |
| Date First Available | October 17, 2018 |
9. Warranty and Support
The Graigar Smart Sensor AR844 Digital Sound Level Meter comes with a standard manufacturer's warranty. For specific warranty terms and conditions, please refer to the warranty card included in your product packaging or contact Graigar customer support.
For technical assistance, troubleshooting not covered in this manual, or service inquiries, please contact the manufacturer or your authorized dealer. Keep your purchase receipt as proof of purchase for warranty claims.
Ask a question about this manual
Ask about setup, troubleshooting, compatibility, parts, safety, or missing instructions. Manuals+ will review the question and use this page’s manual context to help answer it.