
1. Introduction and Overview
The Model 306010 1-Channel Key Ring Transmitter is a compact device designed for use with automatic door and gate operators. This transmitter operates as a single-channel unit, sending a signal to the receiver when its pushbutton is pressed. It features a red test/operate indicator and is powered by a 12-volt battery. A molded-in hole in the case allows for attachment to a key ring for convenience. The Model 306010 is compatible with 300 MHz Multi-Code receivers, including Models 109950 and 302850.
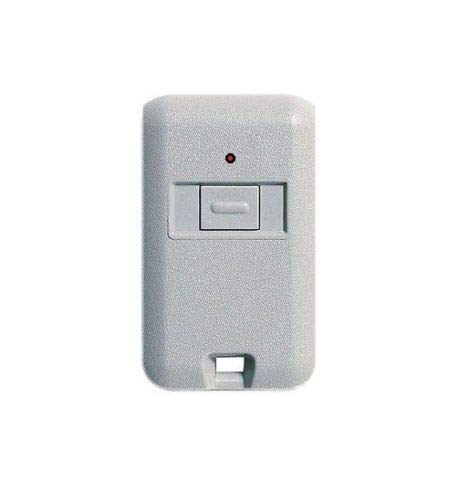
Image: The MultiCode 3060 1-Channel Key Ring Transmitter, a compact remote for garage door and gate operators.
This manual provides instructions for opening the transmitter, accessing and setting the dip switches, and matching them with a compatible Multi-Code receiver.
2. Setup and Programming
2.1. Opening the Transmitter
To access the internal components of the MultiCode remote, including the dip switches and battery, you will need to carefully open its casing. The visor clip, if available, can be used as a tool for this purpose.
- Remove the visor clip from the transmitter.
- Insert the end of the visor clip into the seam of the transmitter casing.
- Gently pry open the casing. Be cautious to avoid damaging the internal components.
- Note that a small tab inside the cover can accidentally change the dip switch settings if opened incorrectly. Open the cover by lifting it away from the dip switches to prevent this.
Important: Avoid forcing the casing open, as this may damage the internal dip switches. Ensure the cover is lifted carefully to prevent accidental changes to the settings.
2.2. Accessing the Receiver
The MultiCode receiver is typically located within your gate operator system. To access its dip switches, you will need to open its casing.
- Locate the tabs on the sides of the receiver casing.
- Gently squeeze these tabs to release the cover.
- Lift the cover to reveal the internal circuit board and dip switches.
2.3. Matching Dip Switch Settings
For your transmitter to communicate with the receiver, their dip switch settings must be identical. The dip switches have two positions: ON or OFF (up or down).
- Observe the current settings of the dip switches on your MultiCode receiver.
- Using a small screwdriver or a pen, adjust the dip switches on your MultiCode transmitter to exactly match the settings of the receiver.
- Ensure each switch on the transmitter is in the same ON or OFF position as its corresponding switch on the receiver.
Note: The exact pattern of ON/OFF settings creates a unique code. Both devices must share the same code to function together.
2.4. Programming Video Guide
For a visual demonstration of the programming process, please refer to the video below:
Video: How to Program a Linear Multicode 3060 3089 4120 remote transmitters. This video demonstrates the steps for opening the remote and receiver, and matching the dip switch settings for proper operation.
3. Operating Instructions
Once the dip switches on your MultiCode 3060 Transmitter are matched with your receiver, the device is ready for operation.
- Point the transmitter towards your automatic door or gate operator.
- Press the single pushbutton on the transmitter.
- The red test/operate indicator light on the transmitter will illuminate, indicating that a signal is being sent.
- The door or gate operator should respond by opening or closing.
Note: Ensure there are no obstructions between the transmitter and the receiver for optimal signal transmission.
4. Maintenance
4.1. Battery Replacement
The MultiCode 3060 Transmitter is powered by a 12-volt battery. If the red test/operate indicator light does not illuminate or the range of the transmitter decreases significantly, the battery may need replacement.
- Open the transmitter casing as described in Section 2.1.
- Carefully remove the old 12-volt battery.
- Insert a new 12-volt battery, ensuring correct polarity.
- Close the transmitter casing securely.
Caution: Dispose of old batteries responsibly according to local regulations.
5. Troubleshooting
- Transmitter not working:
- Check if the red indicator light illuminates when the button is pressed. If not, replace the battery (see Section 4.1).
- Verify that the dip switch settings on the transmitter exactly match those on the receiver (see Section 2.3).
- Ensure the transmitter is within range of the receiver and there are no signal obstructions.
- Reduced operating range:
- Replace the battery in the transmitter.
- Check for any new sources of interference (e.g., new electronic devices) near the receiver or transmitter.
- Intermittent operation:
- Re-check dip switch settings on both devices.
- Ensure the battery connections are secure.
- Inspect for any physical damage to the transmitter or receiver.
6. Specifications
| Model | 306010 (MultiCode Remote Garage Door Mini Transmitter) |
| Channels | 1-Channel |
| Frequency | 300 MHz |
| Power Source | 12-volt battery (not included) |
| Compatibility | 300 MHz Multi-Code receivers (e.g., Models 109950, 302850) |
| Features | Red test/operate indicator, key ring attachment hole |
Note: Batteries are not included with this product.
7. Warranty and Support
For warranty information or technical support, please refer to the documentation provided with your purchase or contact the manufacturer directly. Keep your proof of purchase for warranty claims.