Dgakcvb BT-S3
Dgakcvb BT-S3 Bluetooth 5.0 Motorcycle Helmet Intercom Headset User Manual
Model: BT-S3
1. Product Overview
The Dgakcvb BT-S3 is a Bluetooth 5.0 motorcycle helmet intercom headset designed for clear communication and entertainment during various activities. It features full-duplex intercom capabilities, advanced noise reduction, hands-free calling, and wireless music streaming.

Image: Dgakcvb BT-S3 Dual Pack Bluetooth Headsets, showcasing two units and their associated microphones and speakers.
Key Features:
- 1000m Bluetooth Communication: Utilizes CSR Bluetooth Chip for full-duplex intercom up to 1000m (without obstacles) at speeds of 80-120km/h.
- Excellent Noise Reduction & Clear Audio: Advanced DSP echo cancellation and noise suppression technology for clear voice quality.
- Bluetooth Hands-free and Wireless Streaming Music (A2DP): Supports answering/rejecting calls, redialing last call, automatic answering, music playback control, and FM radio (76-108MHz).
- Convenient & Widely Compatible: Suitable for full-face and most half-face helmets. Compatible with smartphones and BT-S series headsets. Features large, glove-friendly buttons and buckle-type connection for easy assembly/disassembly.
- Excellent Waterproof: Made of waterproof silicone material for use in rainy or snowy conditions.

Image: Diagram highlighting Bluetooth 5.0 benefits (louder, clearer, more stability) and key features like 1000m intercom, DSP noise reduction, Hi-Fi stereo, 3-way intercom, mobile phone connectivity, waterproof, full-duplex, FM radio, GPS, and music.
2. Package Contents
Verify that all items listed below are included in your package:
- BT-S3 Main Unit(s)
- Headset with Speakers and Microphone (boom or soft wire)
- Helmet Clamp
- Adhesive Mount
- USB Charging Cable
- Velcro Pads for Speakers
- User Manual
- Allen Wrench (for clamp installation)

Image: A visual representation of the BT-S3 package contents, including two main units, microphones, speakers, mounting hardware, and cables.
3. Setup and Installation
Proper installation ensures optimal performance and comfort. Follow these steps to install your BT-S3 headset on your helmet.
3.1 Choosing Your Mount: Clamp vs. Adhesive
The BT-S3 comes with two mounting options: a metal clamp and an adhesive mount. Choose the option that best suits your helmet type and preference.
- Clamp Mount: Ideal for helmets with a suitable edge where the clamp can securely attach without obstruction.
- Adhesive Mount: Suitable for helmets where the clamp cannot be used or for a more permanent attachment. Ensure the helmet surface is clean and dry before applying. Peel off the protective film from the adhesive mount and firmly press it onto the helmet surface for at least 30 seconds. Allow 24 hours for the adhesive to fully cure before attaching the main unit.
3.2 Headset Installation Steps
- Attach the Mount:
- For Clamp Mount: Loosen the screws on the clamp. Position the clamp on the left side of your helmet, ensuring it's secure. Tighten the screws with the provided Allen wrench.
- For Adhesive Mount: Clean the desired area on the left side of your helmet with an alcohol swab and let it dry completely. Peel off the protective film from the adhesive mount and firmly press it onto the helmet surface for at least 30 seconds. Allow 24 hours for the adhesive to fully cure before attaching the main unit.
- Install Speakers:
- Remove the cheek pads and headliner from your helmet if possible.
- Attach the Velcro pads (soft side) to the inside of the helmet's ear pockets.
- Attach the speakers (hard side of Velcro) to the installed Velcro pads, ensuring they are centered over your ears for optimal audio.
- Route the speaker wires neatly under the helmet lining to avoid discomfort. The shorter wire is for the left ear, and the longer wire is for the right ear (which also acts as the FM antenna).
- Install Microphone:
- Choose between the boom microphone (for open-face/modular helmets) or the soft-wire microphone (for full-face helmets).
- Attach the microphone's Velcro pad to the inside of the helmet's chin bar (for soft-wire mic) or near the left cheek pad (for boom mic).
- Position the microphone close to your mouth, ensuring the yellow triangle on the boom mic points towards your mouth for best voice pickup.
- Route the microphone cable neatly along the helmet's interior.
- Connect Main Unit:
- Slide the BT-S3 main unit onto the installed mount until it clicks securely into place.
- Connect the speaker and microphone cables to the corresponding ports on the main unit.
- Reassemble Helmet: Carefully reinsert the helmet's headliner and cheek pads, ensuring no wires are pinched or cause discomfort.
Installation Visual Guide:
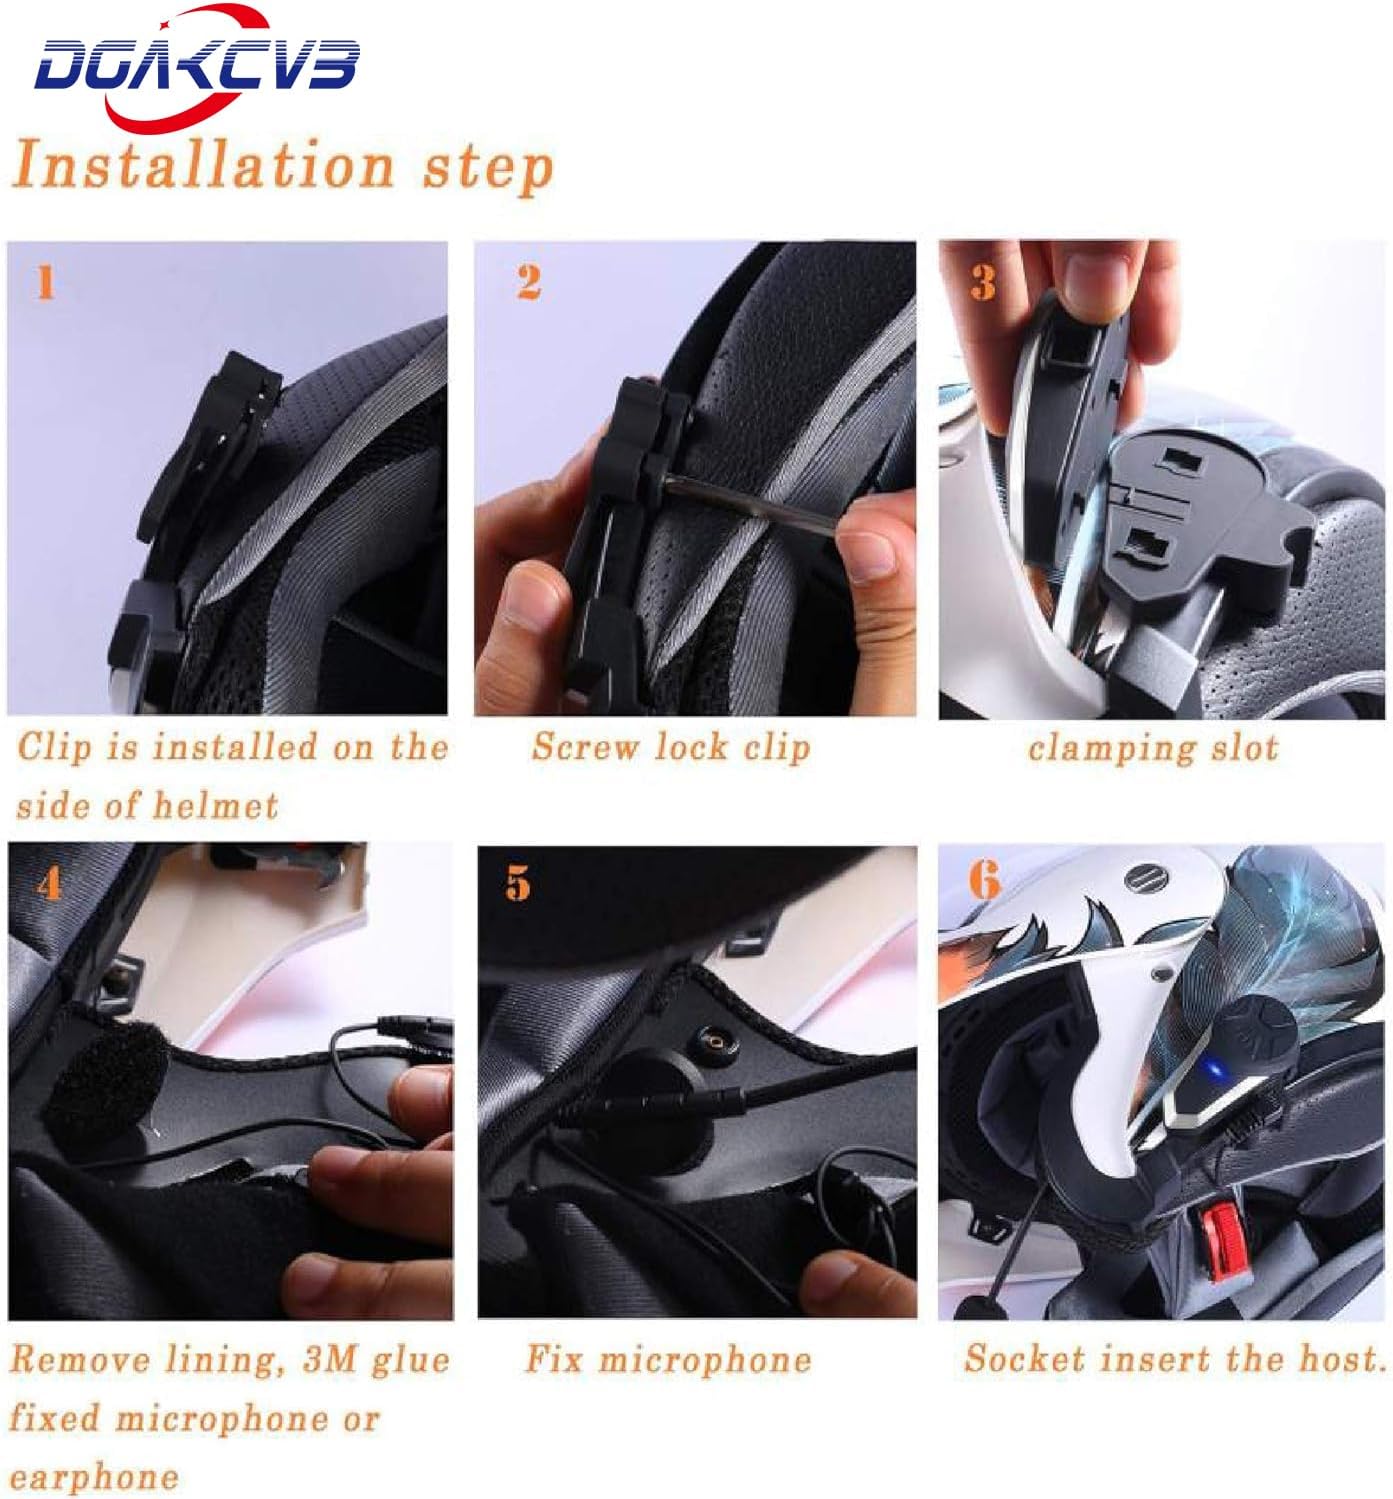
Image: A step-by-step diagram illustrating the physical installation of the BT-S3 headset components into a helmet, from attaching the clip to connecting the main unit.
Installation Video:
Video: A detailed guide on how to install the headset components into a motorcycle helmet, demonstrating each step visually.
4. Operating Instructions
4.1 Power On/Off and Bluetooth Pairing
- Power On: Press and hold the Power button for 2 seconds.
- Power Off: Press and hold the Power button for 5 seconds.
- Bluetooth Pairing:
- With the unit off, press and hold the Power button until the LED indicator flashes red and blue alternately, indicating pairing mode.
- On your smartphone, enable Bluetooth and search for "BT-S3" (or similar).
- Select "BT-S3" to connect. The LED will flash blue slowly once paired.
4.2 Intercom Communication
The BT-S3 supports full-duplex intercom for up to 3 riders, with 2 riders able to talk simultaneously.
- Pairing Intercom Units:
- Ensure both BT-S3 units are off.
- On both units, press and hold the Power button until the LED flashes red and blue alternately.
- Short press the Power button on one of the units. It will search for the other unit.
- Once paired, both LEDs will flash blue slowly. Repeat for a third unit if desired.
- Start/End Intercom: Short press the Intercom button to start or end intercom conversation.
- Switch Intercom (for 3 riders): Short press the Intercom button to cycle between paired riders.

Image: A diagram illustrating rider-to-rider and rider-to-pillion intercom communication, showing a range of 800-1000m.
4.3 Music and Call Functions
- Play/Pause Music: Short press the Power button.
- Next Song: Long press the Volume Up (+) button.
- Previous Song: Long press the Volume Down (-) button.
- Volume Up/Down: Short press the Volume Up (+) or Volume Down (-) buttons.
- Answer Call: Short press the Power button when a call comes in.
- End Call: Short press the Power button during a call.
- Reject Call: Long press the Power button when a call comes in.
- Redial Last Number: Double press the Power button.
- Voice Assistant (Siri/Google Assistant): Supports voice commands for phone functions.
4.4 FM Radio
- Turn On/Off FM Radio: Short press the FM button.
- Scan Stations: Long press the FM button to automatically scan and save stations.
- Next Station: Short press the Volume Up (+) button.
- Previous Station: Short press the Volume Down (-) button.
Usage Video:
Video: Demonstrates the basic operation of a motorcycle helmet Bluetooth headset, including power on/off, Bluetooth pairing, music playback, volume control, and call handling.
5. Maintenance
- Cleaning: Use a soft, damp cloth to clean the main unit and speakers. Avoid harsh chemicals or abrasive cleaners.
- Water Resistance: The unit is water-resistant, but avoid submerging it in water. Ensure the charging port cover is securely closed when not charging.
- Charging: Charge the unit fully before first use and after each long ride. Use the provided USB charging cable. Charging time is approximately 3 hours.
- Storage: Store the unit in a cool, dry place when not in use for extended periods.
6. Troubleshooting
- No Power: Ensure the unit is fully charged. Try charging for at least 30 minutes before attempting to power on again.
- No Sound/Low Volume:
- Check if the speakers are correctly positioned over your ears.
- Ensure the speaker and microphone cables are securely plugged into the main unit.
- Increase the volume using the (+) button on the unit.
- Check the volume settings on your connected smartphone.
- Intercom Disconnection:
- Ensure units are within the specified range (up to 1000m line of sight).
- Obstacles (buildings, terrain) can reduce range. Try re-pairing the units.
- Bluetooth Disconnection:
- Ensure your smartphone's Bluetooth is enabled and the unit is within range.
- Try unpairing and re-pairing the device from your smartphone's Bluetooth settings.
- Microphone Not Working:
- Ensure the microphone is securely plugged in.
- Check if the microphone is positioned correctly (yellow triangle facing mouth for boom mic).

Image: Visual tips for optimal speaker placement and microphone connection to ensure clear audio and proper function.
7. Specifications
| Feature | Detail |
|---|---|
| Model Name | BT-S3 |
| Brand | Dgakcvb |
| Connectivity Technology | Wireless (Bluetooth) |
| Bluetooth Version | 5.0 |
| Intercom Distance | 800-1000m (ideal conditions) |
| Max Speed for Intercom | 80-120km/h |
| Noise Control | Active Noise Cancellation, DSP Echo Cancellation |
| Water Resistance Level | Water Resistant (silicone material) |
| Battery Life | 10 Hours (Intercom), 20 Hours (Phone time) |
| Charging Time | 3 Hours |
| Standby Time | 300 Hours |
| Material | Plastic |
| Item Weight | 12 Ounces |

Image: Details on Type-C charging and battery life: 20H phone time, 10H intercom time, 3H charge time, 300H standby time.
8. Warranty and Support
For warranty information, technical support, or any inquiries regarding your Dgakcvb BT-S3 headset, please contact the manufacturer directly. Refer to the product packaging or the official Dgakcvb website for contact details.
Ask a question about this manual
Ask about setup, troubleshooting, compatibility, parts, safety, or missing instructions. Manuals+ will review the question and use this page’s manual context to help answer it.