1. Introduction
This instruction manual provides essential information for the safe and efficient installation, operation, and maintenance of the Square D Magnetic Motor Starter, NEMA Size 0, with a 120VAC coil. Please read this manual thoroughly before attempting any installation or operation to ensure proper function and to prevent potential hazards. Retain this manual for future reference.
2. Safety Information
WARNING: Electrical equipment should be installed, operated, serviced, and maintained only by qualified personnel. Failure to observe this precaution could result in severe personal injury or death.
- Always disconnect power before working on the motor starter or associated equipment.
- Ensure proper grounding of the equipment.
- Verify that the supply voltage matches the coil voltage rating of the starter.
- Use appropriate personal protective equipment (PPE) when working with electrical systems.
- Adhere to all local and national electrical codes and regulations.
- Do not operate the starter if any part is damaged or appears to be malfunctioning.
3. Product Overview
The Square D Magnetic Motor Starter (Model 8536SBO2S) is designed for controlling electric motors, providing both starting and stopping functions, as well as overload protection. This NEMA Size 0 starter features a 120VAC coil for control circuit operation and is suitable for three-phase applications.
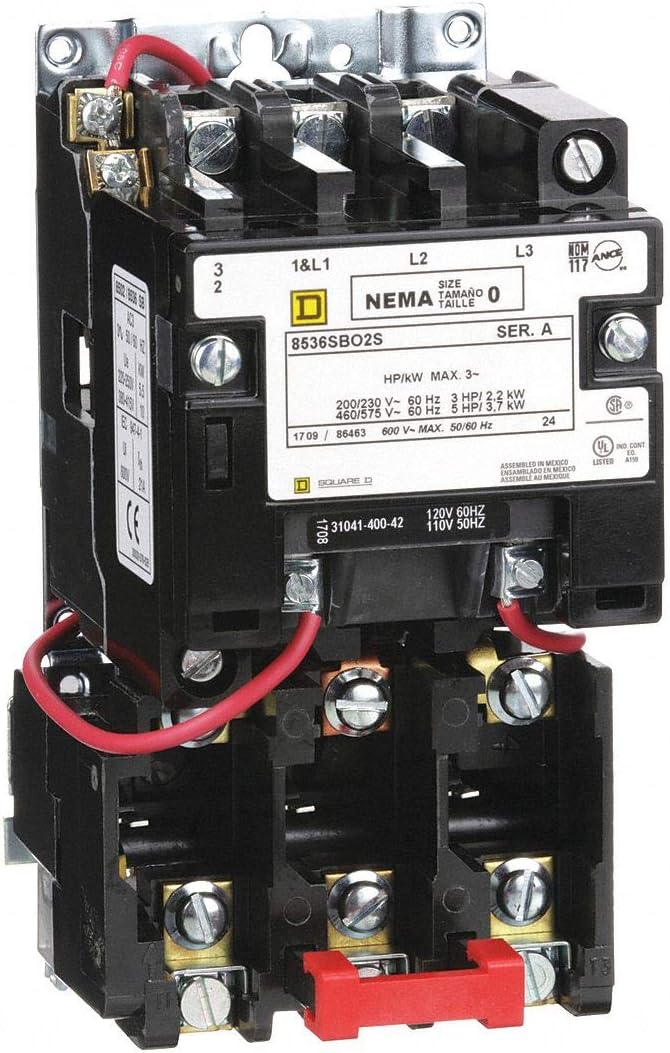
Figure 1: Square D Magnetic Motor Starter (Model 8536SBO2S). This image displays the front view of the motor starter, highlighting its NEMA Size 0 rating, model number 8536SBO2S, and coil voltage of 120V 60Hz / 110V 50Hz. Visible are the main power terminals (L1, L2, L3 at the top, and T1, T2, T3 at the bottom), the control circuit wiring (red wires connected to the coil), and the maximum horsepower/kilowatt ratings for 3-phase operation (e.g., 3 HP / 2.2 KW at 200/230V, 5 HP / 3.7 KW at 460/575V). A red reset button is located at the bottom of the unit.
4. Setup and Installation
Installation of this magnetic motor starter should only be performed by a qualified electrician in accordance with all applicable electrical codes.
- Mounting: Securely mount the motor starter in an appropriate enclosure, ensuring adequate ventilation and clearance for wiring and maintenance.
- Power Wiring: Connect the incoming three-phase power supply to the L1, L2, and L3 terminals. Connect the motor leads to the T1, T2, and T3 terminals. Ensure all connections are tight and properly insulated.
- Control Wiring: Connect the 120VAC control circuit to the coil terminals. This typically involves wiring through a start/stop push-button station or other control devices. Refer to your specific control schematic.
- Grounding: Connect the equipment grounding conductor to the designated ground terminal on the starter or enclosure.
- Overload Relay Adjustment: If equipped with an adjustable overload relay, set the current rating according to the motor's full load amperage (FLA) as specified on the motor nameplate.
- Pre-Power Check: Before applying power, visually inspect all wiring for correctness, tightness, and absence of shorts.
5. Operating Instructions
Once properly installed and wired, the motor starter operates as follows:
- Starting the Motor: Press the 'START' button (or activate the control device). This energizes the starter coil, closing the main contacts and applying power to the motor.
- Stopping the Motor: Press the 'STOP' button (or deactivate the control device). This de-energizes the starter coil, opening the main contacts and removing power from the motor.
- Overload Trip: In the event of an overload condition, the integrated overload relay will trip, opening the control circuit and stopping the motor to prevent damage.
- Resetting After Overload: After an overload trip, allow the motor and starter to cool down. Identify and rectify the cause of the overload. Then, manually press the red reset button on the overload relay to reset the starter. Do not repeatedly reset without addressing the underlying issue.
6. Maintenance
Regular maintenance ensures reliable operation and extends the lifespan of the motor starter. Always disconnect power before performing any maintenance.
- Periodic Inspection: Visually inspect the starter for signs of wear, damage, discoloration, or loose connections. Check for dust or debris accumulation.
- Cleaning: Use a dry, clean cloth or compressed air to remove dust and dirt from the starter components. Do not use liquids.
- Terminal Tightness: Periodically check and re-tighten all power and control wiring terminals to ensure good electrical contact.
- Contact Inspection: If accessible, inspect the main contacts for excessive pitting or burning. Severely worn contacts may require replacement by a qualified technician.
- Overload Relay Test: Periodically test the overload relay's trip function if a test button is provided.
7. Troubleshooting
Refer to the following table for common issues and their potential solutions.
| Problem | Possible Cause | Solution |
|---|---|---|
| Motor does not start when 'START' button is pressed. | No control voltage; Blown fuse/tripped breaker; Loose wiring; Faulty 'START' button; Overload tripped. | Check control circuit power; Inspect fuses/breakers; Verify all wiring connections; Test 'START' button; Reset overload relay. |
| Motor hums but does not start. | Single-phasing (one power line lost); Motor issue; Mechanical binding. | Check all three phases of power supply; Inspect motor windings; Check for mechanical obstructions. |
| Motor starter trips frequently. | Motor overload; Incorrect overload setting; Low voltage; Imbalance in phases; Faulty motor. | Verify motor load; Adjust overload relay to motor FLA; Check supply voltage; Test motor for faults. |
| Starter coil does not energize. | No control voltage; Open circuit in control wiring; Faulty coil. | Check control power supply; Trace control circuit for breaks; Test coil resistance (replace if open). |
8. Specifications
| Feature | Specification |
|---|---|
| Brand | CAI - SQUARE D |
| Model Number | 8536SBO2S |
| NEMA Size | 0 |
| Coil Voltage | 120 Volts AC (60Hz), 110 Volts AC (50Hz) |
| Phase Type | Three Phase |
| Maximum Horsepower (3-Phase, 60Hz) | 3 HP @ 200/230V, 5 HP @ 460/575V |
| Maximum Kilowatt (3-Phase, 60Hz) | 2.2 KW @ 200/230V, 3.7 KW @ 460/575V |
| Amperage | 18 Amps |
| Material | Metal |
| UPC | 696333794107 |
9. Warranty and Support
For specific warranty information, please refer to the documentation provided with your purchase or contact CAI - SQUARE D directly. For technical support or inquiries, please reach out to the manufacturer's customer service department. Always provide the model number (8536SBO2S) and UPC (696333794107) when seeking support.