1. Introduction
Thank you for choosing the SPTA Mini Air Sander ASOSS3SET. This versatile pneumatic tool is designed for precision sanding, grinding, and polishing tasks on various surfaces, including automotive bodywork, furniture, and wood. Its compact design and 90-degree angle head make it ideal for working in narrow or confined areas. This manual provides essential information for the safe and effective operation, maintenance, and troubleshooting of your new air sander.
2. Safety Instructions
Always observe the following safety precautions to prevent personal injury and damage to the tool or workpiece:
- Eye Protection: Always wear ANSI-approved safety goggles or a face shield when operating this tool.
- Hearing Protection: Wear hearing protection to prevent noise-induced hearing loss.
- Respiratory Protection: Use a dust mask or respirator in dusty environments.
- Air Supply: Ensure the air supply pressure does not exceed 90 PSI (6.2 bar). Use clean, dry, regulated compressed air.
- Disconnect Air: Always disconnect the air supply before changing accessories, performing maintenance, or when the tool is not in use.
- Secure Workpiece: Secure the workpiece firmly to prevent movement during operation.
- Ventilation: Work in a well-ventilated area to disperse dust and fumes.
- Personal Attire: Do not wear loose clothing, jewelry, or long hair that could get caught in moving parts.
- Keep Clear: Keep hands, body parts, and bystanders away from the rotating pad and sanding surface.
- Inspect Tool: Before each use, inspect the tool for any damage or loose parts. Do not use a damaged tool.
- Proper Use: Use the tool only for its intended purpose. Do not modify the tool.
3. Package Contents
Verify that all items are present in your package:
- SPTA Mini Air Sander Unit (90° Angle Head)
- 3 Backing Plates (25mm, 50mm, 80mm)
- 36 Mixed Grit Sanding Discs (various grits)
- Wrench for backing plate attachment
4. Product Overview
The SPTA Mini Air Sander features a robust, lightweight aluminum housing and a compact design for ease of use. Key components include:
- 90° Angle Head: Allows access to tight spaces.
- Metallic Body: Durable and lightweight construction.
- Paddle Switch: Ergonomic control for activation and deactivation.
- Backing Plate: Hook and loop surface for attaching sanding discs.

Image 4.1: Overview of the SPTA Mini Air Sander components. The image highlights the 90-degree angle head, metallic body, and the paddle switch. Although labels are in French, the visual representation clearly shows the main parts of the tool.

Image 4.2: Detail of the comfortable paddle switch, designed for enhanced control and easy operation. The image shows the trigger mechanism and its ergonomic placement on the tool's body.
5. Setup
Follow these steps to prepare your air sander for use:
- Connect Air Supply: Attach your air hose to the tool's air inlet. Ensure a secure connection. It is recommended to use an in-line air filter/lubricator to ensure clean, lubricated air.
- Attach Backing Plate: Select the desired backing plate (25mm, 50mm, or 80mm) and thread it onto the spindle of the sander. Use the provided wrench to tighten it securely.
- Attach Sanding Disc: Choose the appropriate grit sanding disc for your task. The backing plates feature a hook and loop surface. Simply align the sanding disc with the backing plate and press firmly to attach.
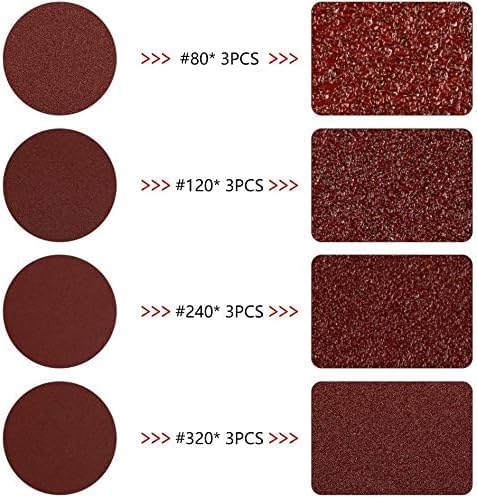
Image 5.1: This image illustrates the hook and loop system for attaching sanding discs to the backing plate. The disc is easily pressed onto the pad for a secure fit and removed when worn or when changing grits.
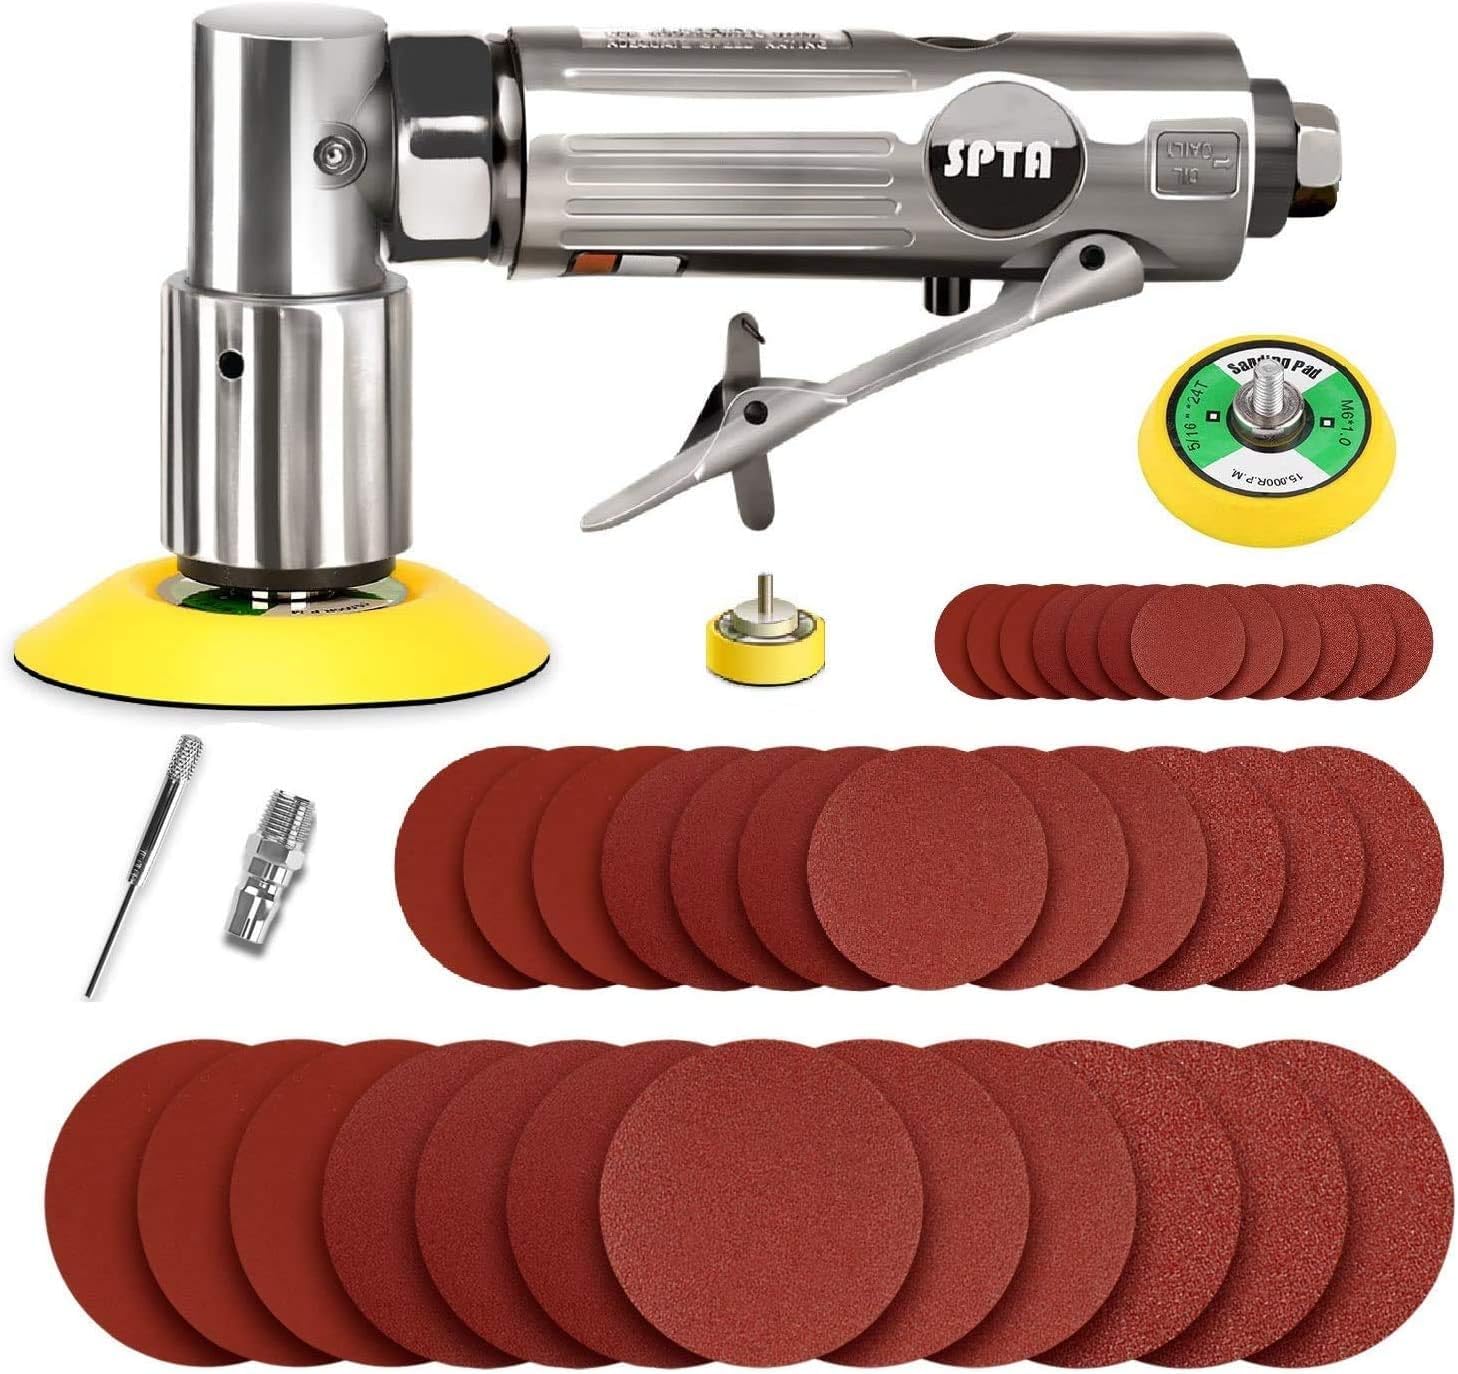
Image 5.2: An assortment of sanding discs showing different grit levels (e.g., #80, #120, #240, #320). Each grit is suitable for different stages of sanding, from coarse material removal to fine finishing.
6. Operating Instructions
To achieve optimal results and ensure safety, follow these operating guidelines:
- Hold Firmly: Grip the sander firmly with one hand, ensuring a stable and comfortable hold.
- Start Before Contact: Activate the paddle switch to start the sander before bringing the sanding disc into contact with the workpiece.
- Apply Light, Even Pressure: Allow the tool to do the work. Apply only light, even pressure. Excessive pressure can reduce efficiency, damage the disc, and potentially harm the tool or workpiece.
- Consistent Movement: Move the sander in overlapping circular or elliptical patterns across the surface to ensure even material removal and a smooth finish.
- Stop After Lifting: Lift the sander from the workpiece before releasing the paddle switch to stop the tool.
- Grit Selection: Begin with a coarser grit for heavy material removal and progressively move to finer grits for smoothing and finishing.
- Ergonomics: The tool's lightweight and compact design allows for comfortable one-hand operation, reducing fatigue during extended use.

Image 6.1: A hand demonstrating the proper grip and handling of the SPTA Mini Air Sander, highlighting its suitability for one-hand operation and control.
7. Maintenance
Regular maintenance ensures the longevity and optimal performance of your air sander:
- Disconnect Air: Always disconnect the air supply before performing any maintenance.
- Clean Tool: After each use, wipe down the tool with a clean, dry cloth to remove dust and debris. Use compressed air to blow out any dust from vents and moving parts.
- Lubrication: Apply a few drops of air tool oil into the air inlet before and after each use, or after every hour of continuous operation. This lubricates internal components and prevents corrosion.
- Inspect for Wear: Regularly inspect the backing plate, sanding discs, and air hose for signs of wear or damage. Replace worn or damaged parts immediately.
- Storage: Store the tool in a clean, dry environment, away from direct sunlight and extreme temperatures.
8. Troubleshooting
Refer to this section for common issues and their solutions:
| Problem | Possible Cause | Solution |
|---|---|---|
| Tool not starting or low power | Insufficient air pressure; kinked air hose; lack of lubrication; clogged air inlet. | Check air compressor pressure (ensure 90 PSI); straighten air hose; apply air tool oil; clean air inlet. |
| Poor sanding performance | Worn sanding disc; incorrect grit for task; excessive pressure. | Replace sanding disc; select appropriate grit; reduce applied pressure. |
| Excessive vibration | Loose backing plate; damaged sanding disc; internal wear. | Tighten backing plate; replace sanding disc; if problem persists, contact customer support. |
| Air leakage | Loose fittings; damaged O-rings or seals. | Tighten all air fittings; inspect and replace damaged seals or O-rings. |
9. Specifications
Technical details for the SPTA Mini Air Sander ASOSS3SET:
| Feature | Detail |
|---|---|
| Brand | SPTA |
| Model Number | OASOSS3SET-1/4 |
| Power Source | Compressed Air |
| Maximum Rotational Speed | 15000 RPM |
| Product Dimensions (L x W x H) | 6.49" x 3" x 3.54" (165mm x 75mm x 90mm) |
| Item Weight | 1.76 pounds (800 Grams) |
| Grit Type | Mixed (Coarse to Fine) |
| Included Components | Mini Air Sander, 3 Backing Plates, 36 Sanding Discs |
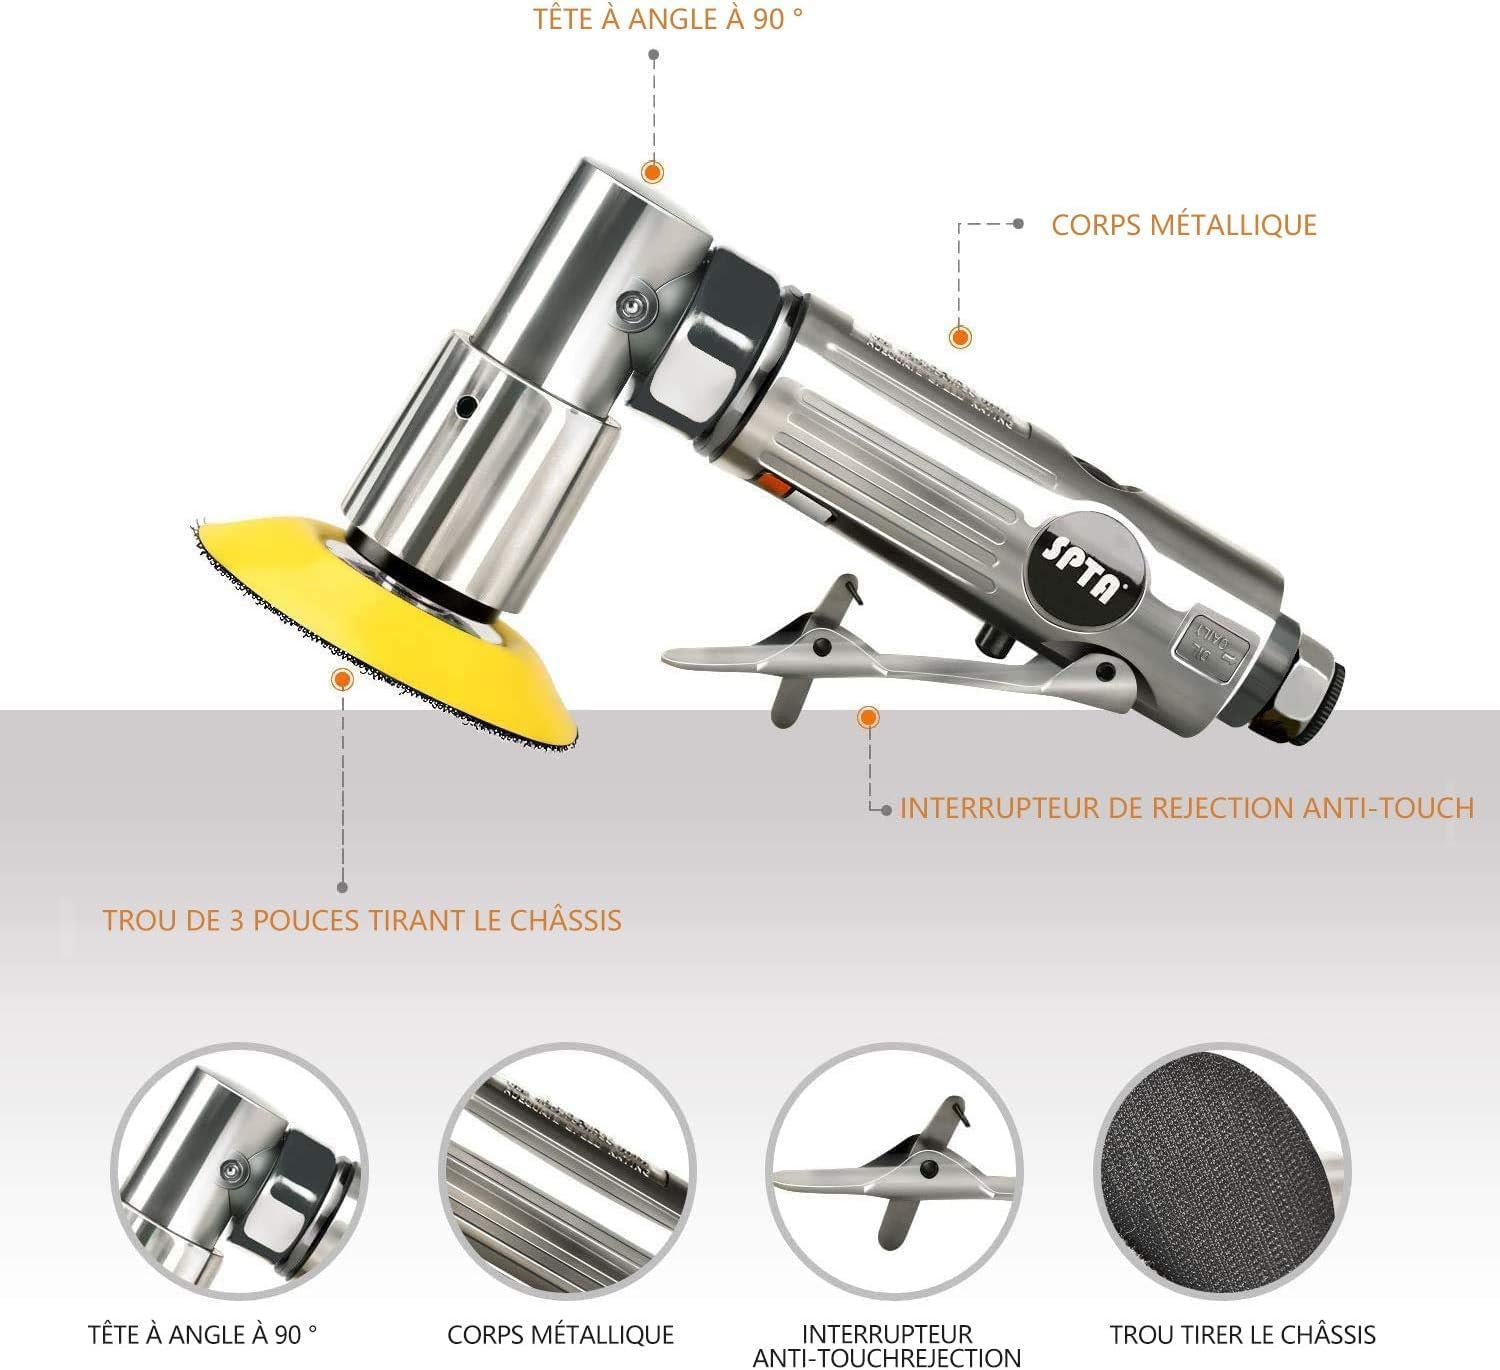
Image 9.1: This image provides a clear visual representation of the key dimensions of the SPTA Mini Air Sander, including its length (6.49 inches / 165mm), width (3 inches / 75mm), and height (3.54 inches / 90mm).
10. Warranty and Support
Specific warranty information for the SPTA Mini Air Sander ASOSS3SET is not provided within this manual. For warranty details, technical support, or service inquiries, please refer to the product packaging or contact SPTA customer service directly through their official website or the retailer where the product was purchased.