Introduction
This manual provides essential information for the safe and efficient operation, maintenance, and adjustment of your New Holland Haybine 469 Sickle Mower. Adhering to the guidelines within this document will help ensure optimal performance and extend the lifespan of your equipment. Please read this manual thoroughly before operating the machine.
Safety Information
Your safety and the safety of others are paramount. Always follow these safety precautions when operating or maintaining the Haybine 469.
BE CAREFUL
- Do not clean, lubricate, or make any adjustments on the HAYBINE while it is in motion.
- Do not start the HAYBINE until you know that everyone is clear of the machine and have made sure that no tools are lying on the machine.
- Do not work around the unit in loose clothing that might catch in any of the moving parts.
- Do not attempt to pull material from any part of the HAYBINE while it is in operation.
- Do not get off the tractor while the HAYBINE is in operation.
Refer to the full manual for a complete list of safety warnings and instructions.

Image: A page from the operator's manual displaying the table of contents and a critical 'BE CAREFUL' section outlining five key safety rules for operating the Haybine.
Setup and Attachment
Attaching to the Tractor
Proper attachment of the Haybine 469 to your tractor is crucial for safe and effective operation. Ensure the tractor's Power Take-Off (PTO) is compatible and correctly aligned. Follow these steps:
- Position the tractor to align with the Haybine hitch.
- Connect the PTO shaft, ensuring it is securely latched.
- Attach the hydraulic cylinder to the tractor's hydraulic system.
- Verify all connections are secure before proceeding.
Hydraulic Cylinder Connection
The remote hydraulic lift cylinder should be mounted as shown in Figure 2 and 4B. Ensure all hydraulic lines are properly connected and free from leaks. The cylinder controls the height and position of the Haybine during operation and transport.

Image: A manual page detailing the 'OPERATION' section, including diagrams and instructions for attaching the Haybine to a tractor and connecting the hydraulic cylinder.
Operating Procedures
Haybine Positions
The Haybine has three operating positions: Transport, Field, and Storage. Use the hydraulic cylinder to adjust between these positions. Always ensure the machine is in the correct position for the task at hand.
Field Adjustments
- Conditioning: Adjust the conditioning rolls for optimal crop processing.
- Crop Dividers and Push Bar: Set these components to manage crop flow effectively.
- Cutting Height: Adjust the cutter bar height to achieve the desired stubble length.
- Header Flotation: Ensure the header floats properly over uneven terrain.
- Reel Position and Speed: Adjust the reel to feed crop smoothly into the cutter bar.
- Swath Gate and Tine Pitch: Configure for proper windrow formation.
Maintenance and Adjustments
Regular maintenance and precise adjustments are vital for the longevity and performance of your Haybine 469.
Guard Alignment
Proper guard alignment is essential for clean cutting. Install new guards or straighten bent ones. The guard alignment should be checked regularly. The clearance between the top of the guard and the bottom of the knife should not exceed 0.030 inches. Replace worn or dull guards promptly. A guard should be replaced when the corners of the ledger surface become rounded or dull.
Knife Clips
Knife hold-down clips ensure the knives are held correctly. Adjust them to allow the knife to move without binding, while maintaining a clearance of 0.005 to 0.020 inches between the clips and sections.
Reel Drive Chain
The reel drive chain must be kept adequately tight to avoid jerky operation of the reel. Refer to Figure 24 for proper adjustment. Lubricate regularly.
Sickle Drive Belt
Ensure the sickle drive belt is properly adjusted and free from wear. A correctly tensioned belt prevents slippage and ensures efficient power transfer to the sickle.
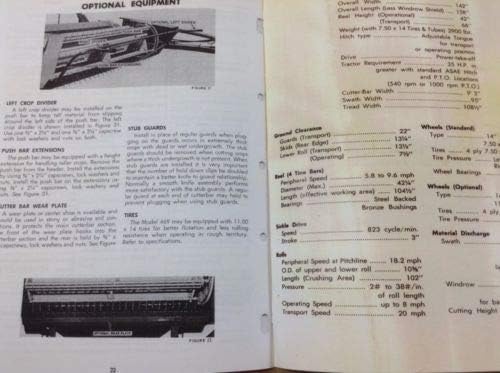
Image: A manual page providing detailed instructions for 'GUARD ALIGNMENT', 'REEL DRIVE CHAIN', 'SICKLE DRIVE BELT', and 'KNIFE CLIPS', essential for Haybine maintenance.
Optional Equipment
The New Holland Haybine 469 can be equipped with various optional accessories to enhance its functionality.
- Left Crop Divider: This accessory helps to separate standing crop from the cut swath, improving efficiency.
- Stub Guards: These guards protect the cutter bar and improve cutting performance in certain conditions.
- Push Bar Extensions: Extend the push bar for better crop handling, especially in heavy crops.
- Cutter Bar Wear Plate: Provides additional protection and extends the life of the cutter bar in abrasive conditions.

Image: A manual page illustrating various 'OPTIONAL EQUIPMENT' components and a section detailing the machine's 'SPECIFICATIONS'.
Specifications
The following table provides key specifications for the New Holland Haybine 469.
| Feature | Measurement |
|---|---|
| Overall Width (Less Windrow Shield) | 142 inches |
| Overall Length (Transport) | 138 inches |
| Weight (with 7.50 x 14 Tires & Tubes) | 2900 lbs |
| Hitch Type | Adjustable Tongue |
| Tractor Requirement | 25 horsepower (minimum) |
| Cutter Bar Width | 100 inches |
| Swath Width | 90 inches |
| Tread Width | 108 inches |
| Ground Clearance (Transport) | 22 inches |
| Reel Peripheral Speed | 18.2 mph |
| Reel O.D. of Upper and Lower Roll | 10 inches |
| Reel Length (Crushing Area) | 102 inches |
| Sickle Drive Speed | 823 cycles/min. |
Troubleshooting
This operator's manual focuses on routine operation and maintenance. For detailed troubleshooting procedures, complex repairs, or overhaul instructions, please consult a dedicated service manual for the New Holland Haybine 469. Always ensure the machine is turned off and disengaged from the tractor before attempting any inspection or repair.


