
GTW 02-080
GTW Light Kit for Yamaha G29/Drive Golf Cart Models
Model: 02-080
Brand: GTW
Introduction
This manual provides comprehensive instructions for the installation, operation, and maintenance of your GTW Halogen Headlight & LED Taillight Kit, designed specifically for Yamaha G29/Drive golf cart models manufactured between 2007 and 2016. This kit enhances visibility and updates the aesthetic of your golf cart.
Safety Information
- Always disconnect the golf cart's battery before beginning any electrical installation or maintenance to prevent electrical shock or short circuits.
- Wear appropriate personal protective equipment, including safety glasses and gloves, during installation.
- Ensure all wiring connections are secure and properly insulated to prevent fire hazards.
- For electric golf carts, a voltage converter or reducer is required for 12-volt applications to prevent damage to the light kit.
- Halogen headlights can become very hot during operation. Avoid touching them immediately after use.
- If you are unsure about any step of the installation process, consult a qualified technician.
Package Contents
Verify that all components listed below are present in your package before beginning installation:
- Halogen Headlights (2 units)
- LED Taillights (2 units)
- Basic Wiring Harness
- On/Off Rocker Switch
- Mounting Hardware
- Step-by-Step Installation Instructions (refer to manufacturer's provided document)
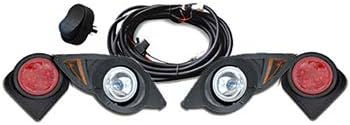
Figure 1: Overview of the GTW Light Kit components. This image displays the two halogen headlights, two LED taillights, the main wiring harness, and a small black switch or relay.
Setup and Installation
This light kit is designed for a factory fit, meaning the housing dimensions are similar to OEM light kits, requiring minimal trimming if replacing an existing factory kit. For new installations, some cutting of the golf cart body will be necessary.
Tools Required (Not Included):
- Drill
- Rotary Tool (e.g., Dremel) for cutting openings
- Wire Strippers/Crimpers
- Basic Hand Tools (screwdrivers, wrenches)
- Multimeter (recommended for electrical checks)
Installation Steps:
- Prepare the Golf Cart: Disconnect the golf cart's battery. Clean the areas where the lights will be installed.
- Cut Openings (if necessary): Use the provided templates (if included with your kit) to mark and carefully cut the openings for the headlights and taillights. A rotary tool is highly recommended for precise cuts.
- Install Headlights: Insert the halogen headlights into the prepared front openings. Secure them using the provided mounting hardware.
- Install Taillights: Insert the LED taillights into the prepared rear openings. Secure them using the provided mounting hardware.
- Route Wiring Harness: Carefully route the basic wiring harness from the front to the rear of the golf cart, ensuring it is secured away from moving parts and heat sources.
- Connect Lights to Harness: Connect the headlight and taillight wires to the corresponding connectors on the main wiring harness. Ensure a firm connection.

Figure 5: A close-up of one of the red three-pin connectors used for connecting the lights to the harness.

Figure 6: A detailed view of a white multi-pin connector, part of the main wiring harness.
- Install On/Off Rocker Switch: Mount the rocker switch in a convenient location on the dashboard or control panel. Connect the switch wires to the harness as per the manufacturer's instructions.
- Connect to Power: For electric golf carts, connect the wiring harness to a 12-volt power source via a voltage converter or reducer (sold separately). For gas golf carts, connect directly to the 12-volt battery. Ensure correct polarity.
- Test Functionality: Reconnect the golf cart battery. Test the headlights and taillights using the rocker switch. Verify that all lights illuminate correctly.

Figure 2: Rear view of the headlights, showing the wiring connections and quality control stickers. Note the different connector types for each light.
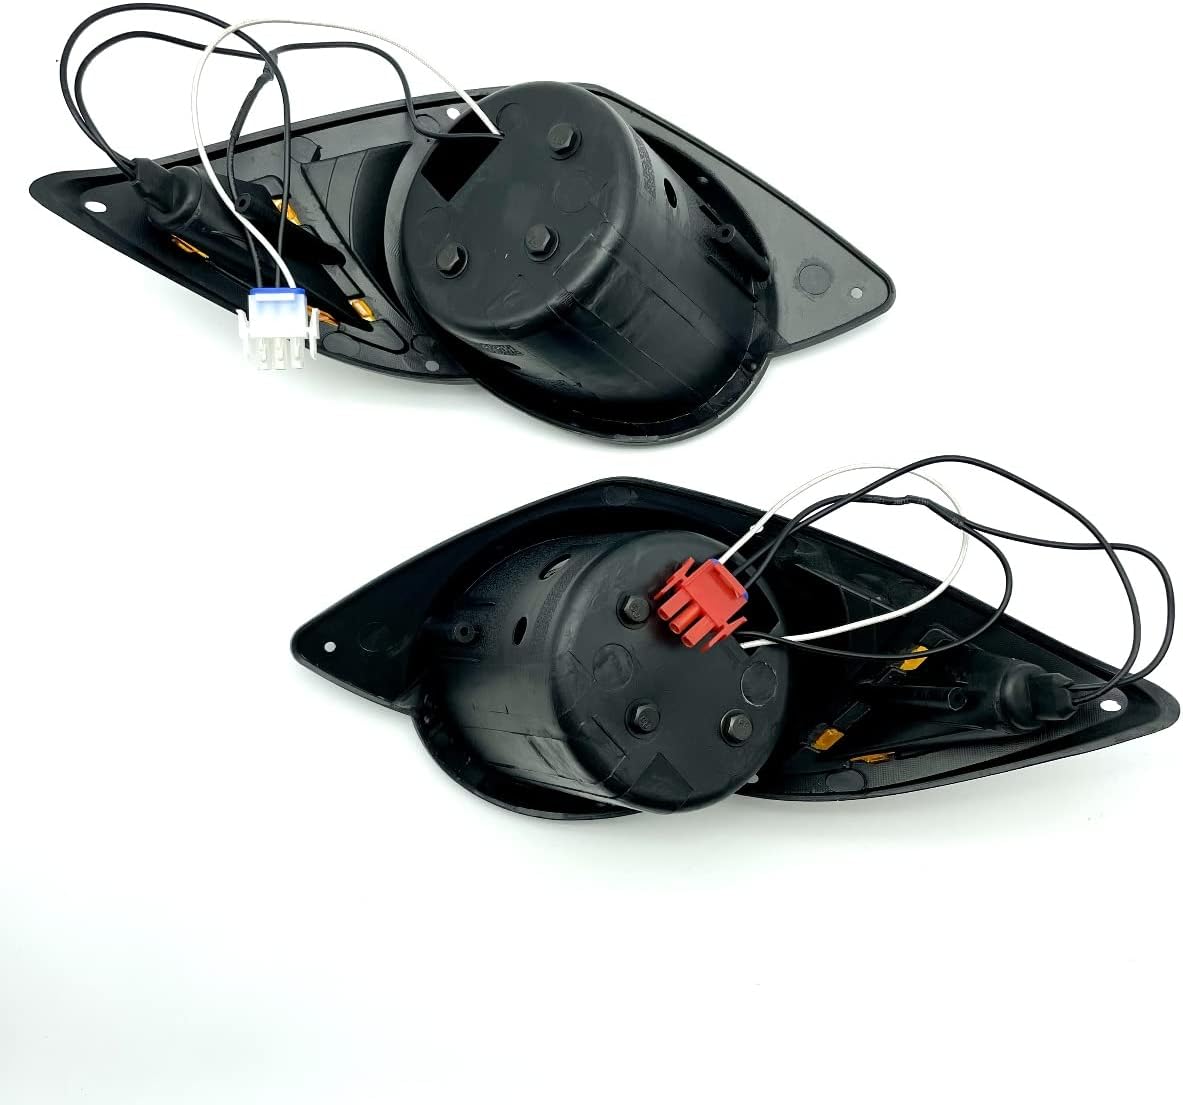
Figure 3: Rear view of the taillights, illustrating the wiring and connectors. One light has a white connector, the other a red.

Figure 4: The unrolled wiring harness, showing its full length and various connection points, including a fuse holder.
Note: The headlights illuminate in the center ONLY. The side lights are designed for turn signal indicators and will only function when connected to a GTW Turn Signal Switch Upgrade kit (sold separately).
Operating Instructions
- Turning Lights On/Off: Use the installed On/Off rocker switch to activate or deactivate the light kit.
- Headlight Function: The halogen headlights provide forward illumination for driving in low-light conditions.
- Taillight Function: The LED taillights provide rear visibility.
- Turn Signal Function (Optional): If you have installed the GTW Turn Signal Switch Upgrade kit, operate the turn signals as per that kit's instructions. The side sections of the headlights will flash as indicators.
Maintenance
- Cleaning: Clean the light lenses regularly with a soft cloth and mild soap solution to maintain optimal light output. Avoid abrasive cleaners.
- Bulb Replacement (Headlights): If a halogen headlight bulb burns out, replace it with a compatible 12-volt halogen bulb. Ensure the golf cart's power is off before replacement.
- Wiring Inspection: Periodically inspect all wiring and connections for signs of wear, fraying, or corrosion. Secure any loose connections.
- Waterproof Feature: The kit is designed to be waterproof, but avoid direct high-pressure washing of the light assemblies.
Troubleshooting
| Problem | Possible Cause | Solution |
|---|---|---|
| Lights do not turn on. |
|
|
| Headlights are dim. |
|
|
| Only one light works. |
|
|
Specifications
| Feature | Detail |
|---|---|
| Product Name | GTW Light Kit for Yamaha G29/Drive Golf Cart Models |
| Model Number | 02-080 |
| Compatibility | Yamaha G29/Drive Golf Cart Models (2007-2016) |
| Headlight Type | Halogen |
| Taillight Type | LED |
| Voltage Application | 12 Volt (requires converter/reducer for electric carts) |
| Special Feature | Waterproof |
| Auto Part Position | Front (Headlights), Rear (Taillights) |
| Lens Material | Acrylic |
| Item Weight | 5.64 pounds |
| Package Dimensions | 14.6 x 11.6 x 8 inches |
Warranty Information
Specific warranty details for the GTW Light Kit are typically provided by the manufacturer at the time of purchase or included with the product packaging. Please refer to any documentation supplied with your light kit for comprehensive warranty terms and conditions. For further inquiries regarding warranty, please contact GTW directly.
Support
For technical assistance, replacement parts, or additional product information, please visit the official GTW website or contact their customer support. You can also find more information and products from GTW by visiting their Amazon store:
Ask a question about this manual
Ask about setup, troubleshooting, compatibility, parts, safety, or missing instructions. Manuals+ will review the question and use this page’s manual context to help answer it.