1. Product Overview
The JVR Automatic Chicken Coop Door Opener is designed to provide a safe, secure, and convenient solution for managing your poultry. This system features a programmable timer, a durable aluminum door, and a safety sensor to prevent injury to your chickens. It is built to withstand various weather conditions, ensuring reliable operation year-round.

Figure 1.1: Complete JVR Automatic Chicken Coop Door Opener System. This image shows the main components including the control box, linear actuator, and the aluminum door, with a chicken standing near the opening.
2. Safety Information
Please read and understand all safety instructions before installation and operation to prevent injury or damage.
- Always ensure the power adapter is disconnected before performing any maintenance or adjustments.
- Keep hands and loose clothing clear of the moving door and actuator during operation.
- The system includes a safety sensor designed to stop the door if an obstruction is detected. Ensure this sensor is properly installed and calibrated.
- Do not attempt to force the door open or closed manually while the system is powered on, unless using the designated manual control button.
- This product is designed for animal use; keep out of reach of children.

Figure 2.1: Safety Feature. The image highlights the placement of the safety sensor near the bottom of the door opening, designed to detect obstructions and prevent the door from crushing poultry.
3. Package Contents
Verify that all components are present and undamaged upon opening the package:
- JVR Automatic Chicken Coop Door Opener Control Box with integrated timer
- Linear Actuator Motor
- Aluminum Coop Door (two pieces with hinge)
- Safety Sensor
- Power Adapter
- Mounting Hardware (screws, brackets)
- Instruction Manual

Figure 3.1: Package Contents. This image displays all the main components included in the package: the control box, linear actuator, power adapter, safety sensor, and the aluminum door.
4. Specifications
| Feature | Specification |
|---|---|
| Model Number | HM40 |
| Door Dimensions | 11"W x 12"H (27.94 cm W x 30.48 cm H) |
| Material | Aluminum, Metal, Stainless Steel |
| Item Weight | 5 pounds (2.27 kg) |
| Gap Size | 0.6 Inches (1.52 cm) |
| Power Source | Standard 120V AC (via power adapter) |
| Control Box | Weatherproof |
5. Installation
The JVR Automatic Chicken Coop Door Opener is designed for simple, plug-and-play installation without complicated wiring.
5.1 Pre-Installation Checks
- Identify a suitable location on your chicken coop for the door and control box. Ensure the surface is flat and stable.
- Measure and mark the opening for the door. The recommended opening size is approximately 11 inches wide by 12 inches high.
- Ensure there is access to a power outlet within reach of the power adapter cable.

Figure 5.1: Door Dimensions. This diagram illustrates the 11.8-inch width and 12.6-inch height of the aluminum door, indicating the required opening size for installation.
5.2 Mounting the Door and Actuator
- Cut the opening in your coop according to the specified door dimensions (approx. 11"W x 12"H).
- Mount the aluminum door frame securely around the opening using appropriate screws.
- Attach the linear actuator motor above the door opening, ensuring it is aligned to allow the door to slide smoothly up and down.
5.3 Connecting Components
- Mount the weatherproof control box in a convenient location near the door, ensuring it is protected from direct elements.
- Connect the linear actuator motor cable to the designated 'Door Motor' port on the control box.
- Connect the safety sensor cable to the designated sensor port on the control box. Position the sensor at the bottom of the door opening to detect obstructions.
- Plug the power adapter into the control box, then plug the adapter into a standard 120V AC power outlet.
6. Setup and Programming
The control box features a large screen and intuitive buttons for easy programming.
6.1 Initial Power-Up
- Once powered on, the display on the control box should illuminate. If the display is blank, refer to the Troubleshooting section.
- The system may perform an initial calibration cycle. Allow the door to fully open and close once.
6.2 Setting the Timer
The integrated timer allows you to set specific opening and closing times for the door.
- Press the 'SET' button to enter programming mode.
- Use the arrow buttons (▲ / ▼) to navigate through the time settings (hour, minute, day).
- Adjust the desired open and close times for each day of the week. You can set multiple open/close cycles if needed.
- Press 'SET' again to confirm and save your settings.
- The system will automatically operate based on the programmed schedule.
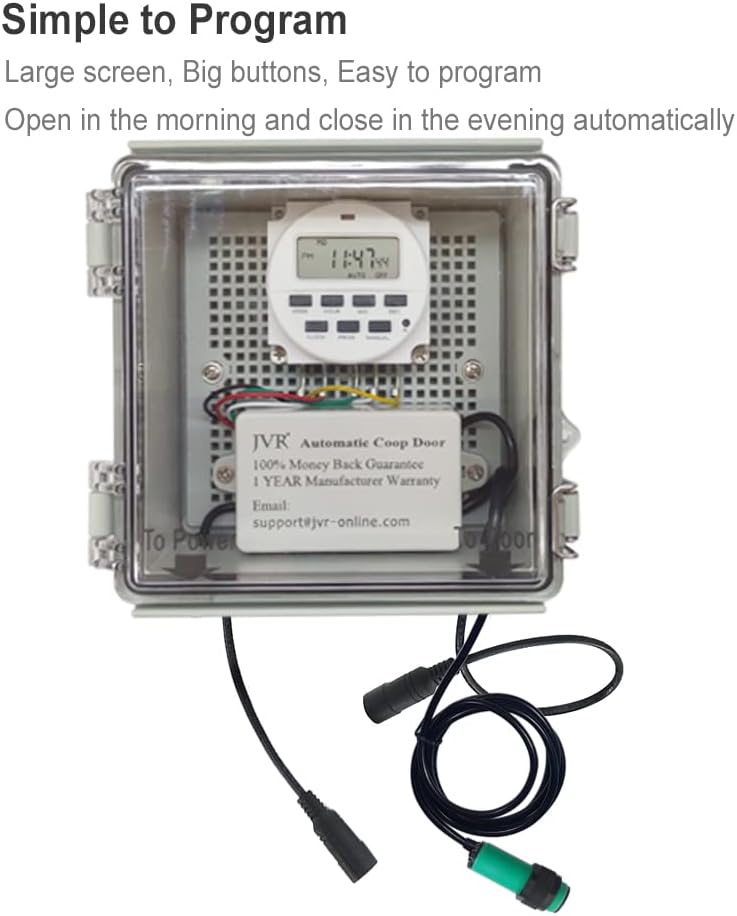
Figure 6.1: Simple Programming. This image shows the control box with its digital display and buttons, indicating its ease of programming for automatic operation.
7. Operation
7.1 Automatic Mode
Once programmed, the door will automatically open and close at the set times. The system is designed for consistent, reliable operation.
7.2 Manual Control
For situations requiring immediate action, the door can be operated manually:
- Locate the manual control button on the control box.
- Pressing this button will toggle the door's state (open if closed, closed if open).
- Manual operation overrides the programmed timer until the next scheduled event.
7.3 Safety Sensor Operation
The safety sensor is a crucial feature for protecting your poultry:
- During the closing cycle, if the sensor detects an obstruction (e.g., a chicken), the door will stop moving to prevent crushing.
- The door will then typically reverse slightly or pause, allowing the obstruction to clear.
- Ensure the sensor is clean and unobstructed for optimal performance.
8. Maintenance
Regular maintenance ensures the longevity and optimal performance of your JVR Automatic Chicken Coop Door Opener.
- Cleaning: Periodically clean the aluminum door and the tracks to remove dirt, debris, or feathers that could impede smooth operation. Use a damp cloth; avoid harsh chemicals.
- Sensor Check: Regularly inspect the safety sensor for any blockages or damage. Keep its lens clean.
- Actuator Inspection: Check the linear actuator for any signs of wear or damage. Ensure it is securely mounted.
- Weather Protection: While the control box is weatherproof, ensure it is not submerged in water and that its seals are intact, especially after extreme weather.
- Power Cord: Inspect the power cord and adapter for any fraying or damage. Replace if necessary.

Figure 8.1: Weatherproof Control Box. This image shows the robust design of the control box with its secure buckle latches, highlighting its weather protection features.
9. Troubleshooting
Refer to the table below for common issues and their solutions.
| Problem | Possible Cause | Solution |
|---|---|---|
| Control box display is blank. | No power, internal battery issue, or power adapter fault. | Check power outlet and adapter connection. If still blank, contact customer support for battery reset instructions or replacement. |
| Door does not open/close at programmed times. | Incorrect time settings, manual override active, or power interruption. | Verify programmed times. Ensure manual control is not active. Check for power outages. |
| Door stops or reverses during closing. | Safety sensor activated by obstruction, or sensor misalignment. | Clear any obstructions from the door path. Clean the sensor lens. Adjust sensor alignment if necessary. |
| Door operation is sluggish or noisy. | Debris in tracks, actuator wear, or lack of lubrication. | Clean door tracks. Inspect actuator for damage. Apply a silicone-based lubricant to moving parts if recommended by manufacturer (consult support). |
| Door does not move at all. | Power issue, motor connection loose, or motor failure. | Check power supply and motor cable connection. If problem persists, contact customer support. |
10. Warranty and Customer Support
JVR stands behind the quality of its products. The JVR Automatic Chicken Coop Door Opener comes with a 1-year manufacturer's warranty from the date of purchase.
This warranty covers defects in materials and workmanship under normal use. It does not cover damage caused by misuse, accident, unauthorized modification, or improper installation.
For technical assistance, troubleshooting, warranty claims, or any other inquiries, please contact JVR Customer Service:
- Email: support@jvr-online.com
- Online Store: Visit the JVR Store on Amazon
Please have your model number (HM40) and purchase date ready when contacting support to expedite assistance.


