Giantex HW59053
Giantex Wall Mounted Storage Cabinet User Manual
Model: HW59053 | Brand: Giantex
1. Introduction
Thank you for choosing the Giantex Wall Mounted Storage Cabinet. This manual provides important information regarding the assembly, installation, operation, and maintenance of your new cabinet. Please read it thoroughly before beginning assembly and keep it for future reference.
This space-saving storage hutch offers 4 ample cubical display and storage shelves, making it suitable for various rooms such as the kitchen, living room, home office, or bathroom. Its elegant appearance and sturdy construction ensure long-lasting use.
2. Safety Information
Please observe the following safety precautions to prevent injury or damage to the product:
- Always assemble the product on a clean, flat, and soft surface to prevent scratches.
- Ensure all parts are present and undamaged before assembly. Do not use damaged parts.
- Two-person assembly and installation are highly recommended due to the size and weight of the cabinet.
- For wall mounting, it is crucial to secure the cabinet to wall studs or use appropriate heavy-duty anchors suitable for your wall type (e.g., solid brick, concrete, wooden walls). Do not mount directly into drywall/gypsum wall without proper stud support or heavy-duty anchors.
- Verify the wall's structural integrity before mounting. If unsure, consult a qualified professional.
- Do not overload the cabinet. Refer to the "Specifications" section for weight capacities.
- Keep small parts and packaging materials away from children and pets.
3. Parts List
Before starting assembly, ensure all components are accounted for. While a detailed list is not provided, the cabinet typically includes:
- Main cabinet panels (top, bottom, sides, back)
- Internal shelves/dividers
- Two cabinet doors
- Door hinges and handles
- Mounting hardware (screws, anchors, brackets)
- Assembly fasteners (dowels, cam locks, screws)
If any parts are missing or damaged, please contact Giantex customer service for assistance.
4. Assembly Instructions
Follow these general steps for assembly. Refer to the included detailed instruction manual for specific diagrams and step-by-step guidance.
- Unpack and Identify Parts: Lay out all components on a soft, clean surface. Identify each part using the provided diagrams in your specific instruction manual.
- Assemble the Main Frame: Connect the top, bottom, and side panels using the provided fasteners (e.g., dowels, cam locks, screws). Ensure all connections are secure.
- Install Internal Shelves/Dividers: Insert the internal shelves and dividers into their designated slots or attach them with fasteners.
- Attach Door Hinges: Secure the hinges to the cabinet doors and then to the main cabinet frame.
- Install Handles: Attach the silver metal handles to the cabinet doors.
- Install Back Panels: Secure the back panels to the cabinet frame. Some models may include reinforced back buckle panels for added stability.
Tip: Some users recommend using wood glue on dowels during assembly for added strength, especially if the cabinet will hold heavy items.
5. Installation (Wall Mounting)
Proper installation is critical for the stability and safety of your wall-mounted cabinet. This section provides general guidelines. Always refer to your specific instruction manual for precise mounting hardware and methods.

Figure 5.1: Suitable Wall Types for Mounting
This image illustrates the types of walls suitable for mounting the cabinet, emphasizing the need for proper support. Solid brick, concrete, and wooden walls are ideal. Cavity walls require specific anchors, and gypsum walls (drywall) are generally unsuitable without locating studs or using heavy-duty anchors.
- Choose Location: Select a wall location that can support the weight of the cabinet and its contents. Consider the height and accessibility.
- Locate Wall Studs: Use a stud finder to locate wall studs. Mounting directly into studs provides the most secure installation. If studs do not align with the cabinet's mounting points, you may need to install a wooden ledger board across multiple studs first, then attach the cabinet to the ledger board.
- Mark Drilling Points: With the help of a second person, hold the assembled cabinet against the wall at the desired height. Use a pencil to mark the exact locations for drilling the mounting holes. Ensure the cabinet is level before marking.
- Drill Pilot Holes: Drill pilot holes at the marked locations. The drill bit size should match the recommendations for your specific mounting hardware (screws and anchors).
- Install Anchors (if necessary): If not mounting into studs, insert appropriate heavy-duty wall anchors into the pilot holes. The anchors provided with the cabinet may be sufficient for some applications, but for heavier loads or less robust walls, consider purchasing stronger anchors (e.g., 50lb drywall anchors).
- Mount the Cabinet: With assistance, carefully lift the cabinet and align its mounting points with the drilled holes/anchors. Insert and tighten the mounting screws until the cabinet is securely fastened to the wall. Ensure it is stable and does not wobble.
Important: The cabinet weighs approximately 33 lbs (Net Weight). When fully loaded, its weight will increase significantly. Ensure your mounting method can safely support the total weight.
6. Operation and Usage
Your Giantex Wall Mounted Storage Cabinet is designed for versatile storage and display. It features two open shelves and two compartments with doors.

Figure 6.1: Ample Storage Space
This image demonstrates the cabinet's capacity for various items, including books, decorative objects, framed photos, and small potted plants, highlighting its functional design.
- Open Shelves: Ideal for displaying decorative items, books, photos, or frequently accessed items.
- Closed Compartments: The two doors provide privacy and keep items neatly stored away, preventing them from falling. The metal handles allow for convenient opening and closing.
- Top Surface: The top board can also be used for additional display or storage, with a weight capacity of 22 lbs.

Figure 6.2: User-Friendly Design Features
This image highlights key design elements such as the easy-to-clean surface, ergonomic handles, durable metal hinges, and reinforced back buckle panels, all contributing to the cabinet's user-friendly nature.
7. Maintenance and Care
To ensure the longevity and appearance of your cabinet, follow these simple maintenance tips:
- Cleaning: The smooth surface is waterproof and scratch-resistant. Wipe clean with a soft, damp cloth. Avoid abrasive cleaners or harsh chemicals that could damage the finish.
- Dusting: Regularly dust the cabinet with a dry, soft cloth to prevent dust buildup.
- Hardware Check: Periodically check all screws and fasteners to ensure they remain tight. Retighten if necessary to maintain stability.
- Avoid Excessive Moisture: While the surface is water-resistant, avoid prolonged exposure to excessive moisture. Wipe up spills immediately.
- Sunlight Exposure: Avoid placing the cabinet in direct sunlight for extended periods, as this can cause fading or discoloration over time.
8. Troubleshooting
Here are some common issues and their potential solutions:
| Problem | Possible Cause | Solution |
|---|---|---|
| Cabinet feels wobbly or unstable after mounting. | Insufficient wall support; screws not fully tightened; incorrect anchors used. | Ensure mounting screws are fully tightened. Verify that the cabinet is mounted into wall studs or using appropriate heavy-duty anchors for your wall type. If necessary, reinforce the mounting area (e.g., with a ledger board). |
| Doors do not close properly or are misaligned. | Hinges are loose or improperly adjusted. | Check that hinge screws are tight. Most hinges allow for minor adjustments (up/down, left/right, in/out) using the screws on the hinge plate. Refer to hinge adjustment guides if needed. |
| Cabinet appears flimsy or weak. | Assembly fasteners not fully secured; missing parts; excessive weight. | Double-check all assembly connections (dowels, cam locks, screws) are tight. Ensure all parts are installed as per the assembly manual. Do not exceed the specified weight capacities. |
| Surface finish chips easily. | Rough handling; impact damage. | Handle the cabinet with care, especially during assembly and installation. Avoid impacts with hard objects. Minor chips can sometimes be touched up with furniture repair pens. |
9. Specifications
| Feature | Detail |
|---|---|
| Brand | Giantex |
| Model Number | HW59053 |
| Color | Black |
| Product Dimensions | 42.5"W x 13"D x 12"H (108cm W x 33cm D x 30.5cm H) |
| Material | Chipboard (Engineered Wood) |
| Mounting Type | Wall Mount |
| Number of Compartments | 4 (2 open, 2 with doors) |
| Weight Capacity of Top Board | 22 lbs (10 kg) |
| Weight Capacity of Each Shelf | 11 lbs (5 kg) |
| Net Weight | 33 lbs (15 kg) |
| Assembly Required | Yes |
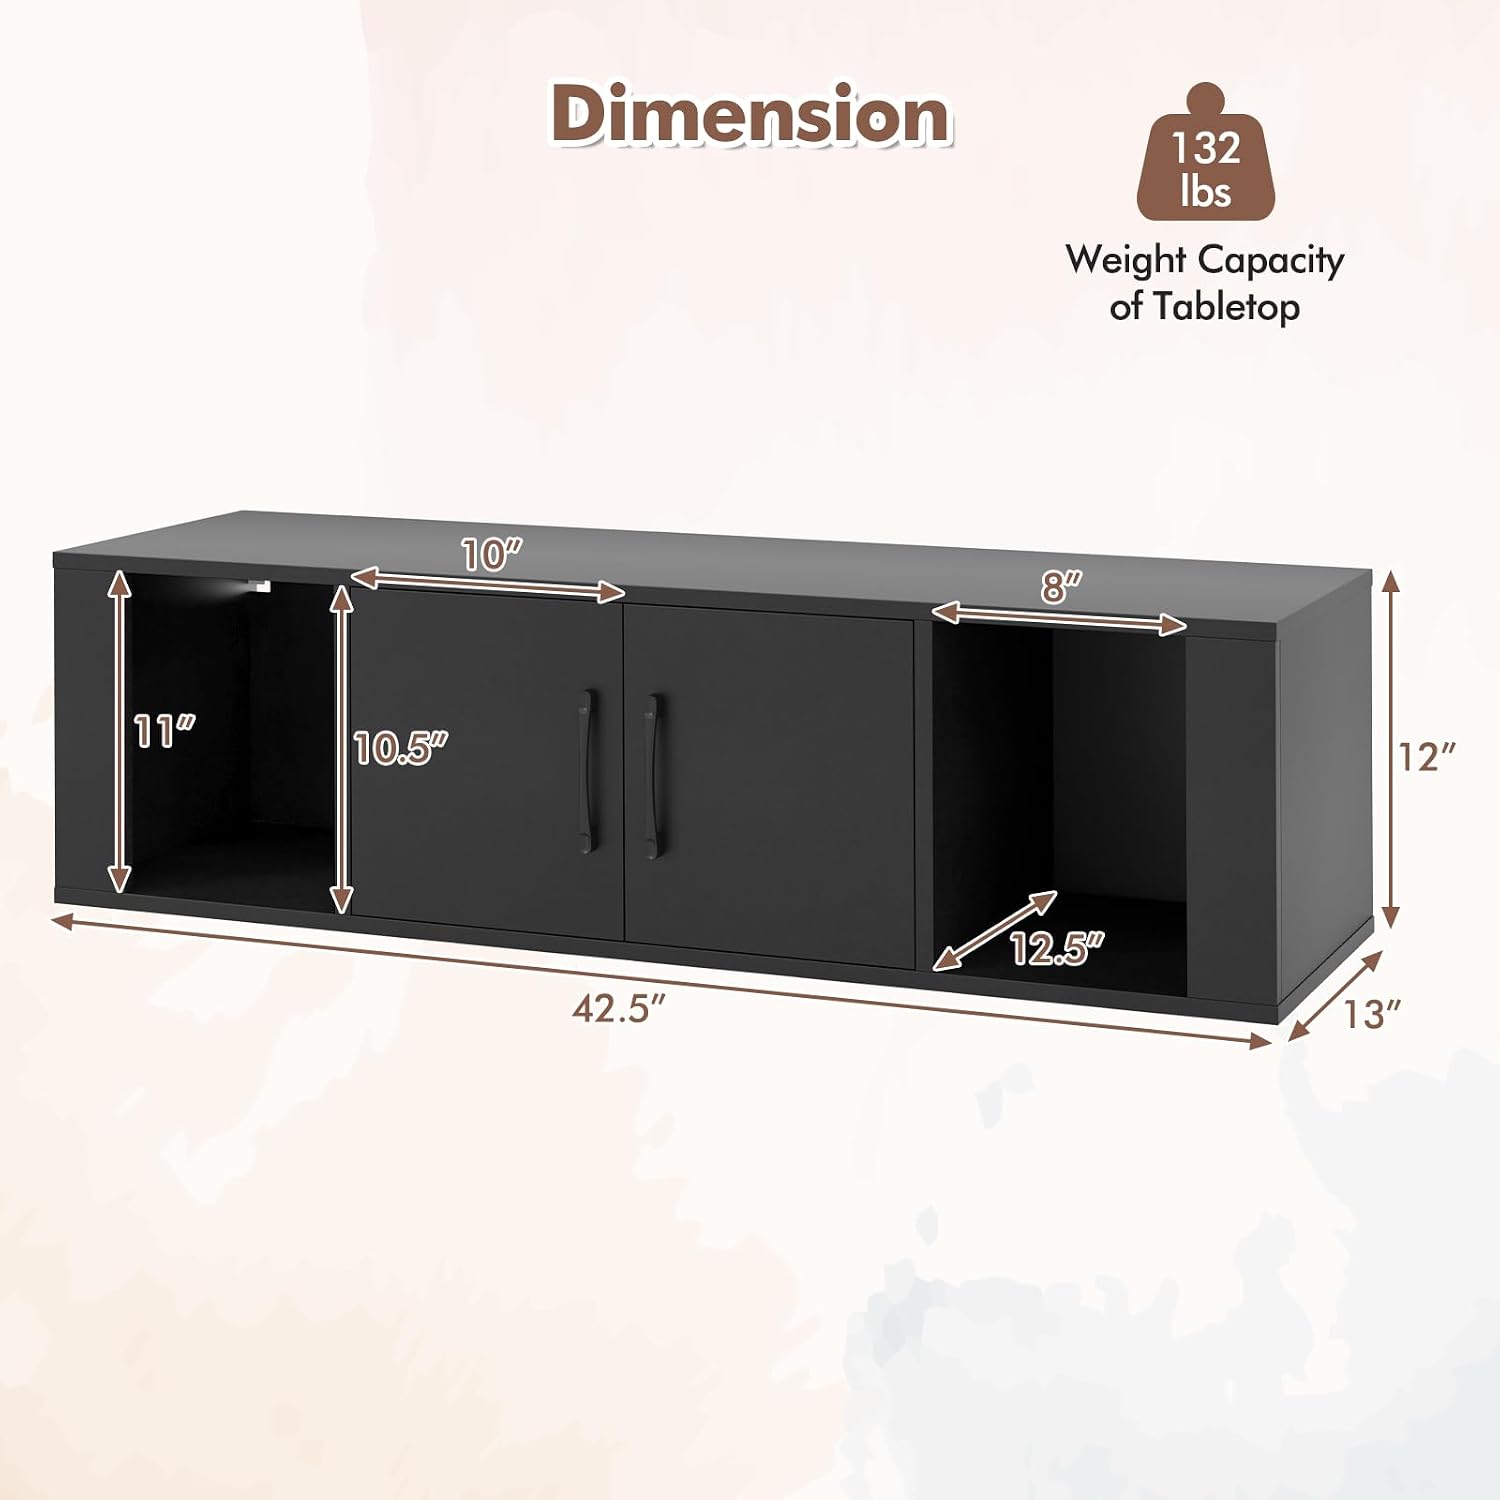
Figure 9.1: Product Dimensions
This diagram provides a visual representation of the cabinet's overall dimensions and the approximate internal heights of its compartments.
10. Warranty and Support
For warranty information, missing parts, or technical support, please contact Giantex customer service directly. Refer to the contact information provided with your purchase or visit the official Giantex website.
Please have your model number (HW59053) and purchase details ready when contacting support.
Ask a question about this manual
Ask about setup, troubleshooting, compatibility, parts, safety, or missing instructions. Manuals+ will review the question and use this page’s manual context to help answer it.