Introduction
The Verve Electronic Timer is designed to automate your watering schedule, providing convenience and efficient water management for your garden or lawn. This manual provides detailed instructions for the setup, operation, maintenance, and troubleshooting of your electronic timer.
Setup
1. Battery Installation
- Locate the battery compartment on the back of the timer.
- Open the compartment cover.
- Insert two (2) AA alkaline batteries, ensuring correct polarity (+/-).
- Close the battery compartment cover securely.
2. Connecting the Timer
- Screw the timer's inlet (top connector) onto a standard outdoor faucet. Hand-tighten only to prevent damage.
- Connect your garden hose to the timer's outlet (bottom connector). Ensure a tight connection to prevent leaks.
3. Setting Current Time
- Press the TIME button or navigate to the 'TIME' option using the arrow keys.
- Use the UP/DOWN arrow keys to adjust the hour and minute.
- Press the OK button to confirm each setting and move to the next.

Image: Front view of the Verve Electronic Timer, showing the display and control buttons with menu labels such as TIME, START WATER, HOW LONG, WATER EVERY, PROGRAM, and MANUAL.
Operating Instructions
1. Understanding the Display
The LCD screen displays the current time, watering schedule settings, and battery status. Use the arrow keys to navigate through the menu options and the OK button to select or confirm.
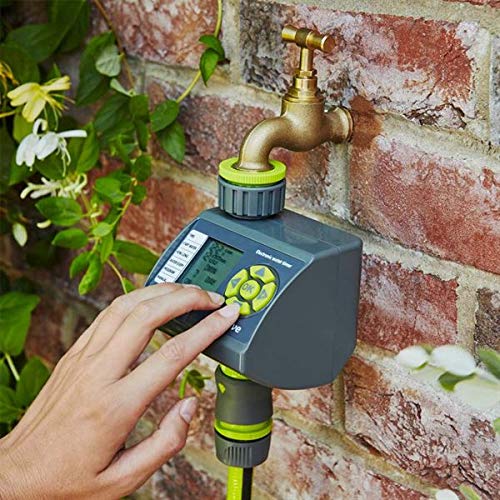
Image: Close-up of the Verve Electronic Timer's display, showing '12:03 AM' for current time, '0 MIN' for watering duration, '4 HRS' for frequency, and 'ON/OFF' status, along with a battery indicator.
2. Programming a Watering Schedule (6 Settings)
The timer allows for up to 6 different watering programs. Follow these steps to set a program:
- Navigate to the PROGRAM option using the arrow keys and press OK.
- Select a program number (e.g., P1, P2) using the arrow keys and press OK.
- Set START WATER: Use arrow keys to set the desired start time for watering. Press OK.
- Set HOW LONG: Use arrow keys to set the duration of watering (e.g., 5 minutes, 1 hour). Press OK.
- Set WATER EVERY: Use arrow keys to set the frequency (e.g., every 12 hours, every 24 hours, every 2 days). Press OK.
- Ensure the program is set to ON.
3. Manual Operation
To water manually outside of the programmed schedule:
- Navigate to the MANUAL option.
- Press OK.
- Use the arrow keys to set the desired manual watering duration.
- Press OK to start manual watering. The timer will automatically shut off after the set duration.
- To stop manual watering prematurely, navigate to MANUAL again and select OFF or press OK to cycle through options until it stops.
4. Battery Indicator
A battery icon on the display indicates the current battery level. When the icon shows low battery, replace the batteries promptly to ensure continuous operation.
Maintenance
1. Cleaning
- Wipe the exterior of the timer with a soft, damp cloth.
- Do not use abrasive cleaners or solvents, as these can damage the display or casing.
2. Battery Replacement
Replace batteries when the low battery indicator appears on the display. Refer to the 'Battery Installation' section under Setup for detailed steps.
3. Winter Storage
Before the first frost, disconnect the timer from the faucet and hose. Remove the batteries and store the timer indoors in a dry, frost-free location. This prevents damage from freezing water.
Troubleshooting
- Timer not turning on or display is blank:
Check battery installation. Ensure batteries are inserted with correct polarity. Replace with fresh AA alkaline batteries. - Water not flowing or timer not activating:
Ensure the faucet is fully open. Check that the hose is securely connected to the timer. Verify that the program is set to 'ON' and the start time has passed. Check battery level. - Timer leaks from connections:
Ensure all connections (faucet to timer, timer to hose) are hand-tightened. Check for damaged washers and replace if necessary. - Incorrect watering schedule:
Review your programmed settings for START WATER, HOW LONG, and WATER EVERY. Ensure the current time is set correctly.
Specifications
| Brand | Verve |
| Model Number | B07HMQZ9D7 |
| Number of Settings | 6 |
| Package Dimensions | 12.8 x 10.6 x 10 cm |
| Item Weight | 320 grams |
| Manufacturer | Koçtaş |
| First Available Date | September 24, 2018 |
Warranty and Support
For warranty information or technical support, please refer to the documentation provided at the time of purchase or contact your retailer. Keep your proof of purchase for any warranty claims.


