1. Important Safety Instructions
Read all instructions carefully before using this treadmill. Keep this manual for future reference.
- Always consult your physician before starting any exercise program.
- Keep children and pets away from the treadmill during operation.
- Place the treadmill on a solid, level surface with at least 2 meters (6.5 feet) of clear space behind it and 0.6 meters (2 feet) on each side.
- Ensure the safety key is properly attached to your clothing before starting the treadmill.
- Do not operate the treadmill if it has a damaged cord or plug, or if it is not working properly.
- Wear appropriate exercise clothing and athletic shoes. Avoid loose clothing that could get caught.
- Do not use the treadmill outdoors or in areas of high humidity.
- Always hold the handrails when starting or stopping the treadmill.
- Do not step on or off the treadmill while the belt is moving.
- Unplug the treadmill from the power outlet when not in use and before cleaning or servicing.
2. Package Contents
Carefully unpack the box and verify that all the following parts are present:
- Treadmill Base Frame
- Console Assembly
- Upright Posts (Left and Right)
- Handrails
- Hardware Kit (bolts, washers, nuts, Allen wrenches)
- Safety Key
- Power Cord
- Lubricant (silicone oil)
- User Manual
3. Assembly Instructions
Assembly typically requires two people. Follow these general steps. Refer to the included assembly diagram for specific bolt locations.
- Unpack Components: Remove all parts from the packaging and lay them out on a clear, flat surface.
- Attach Upright Posts: Secure the left and right upright posts to the treadmill base frame using the provided bolts and washers. Do not fully tighten yet.
- Mount Console Assembly: Carefully lift and attach the console assembly to the top of the upright posts. Connect any pre-attached cables. Secure with bolts.
- Attach Handrails: If separate, attach the handrails to the upright posts or console assembly.
- Tighten All Hardware: Once all components are in place, go back and securely tighten all bolts and nuts.
- Connect Power: Plug the power cord into the treadmill and then into a grounded electrical outlet.
- Insert Safety Key: Place the safety key into its designated slot on the console.
- Test Operation: Before first use, stand on the side rails and start the treadmill at a low speed to ensure proper function.
4. Product Overview
Familiarize yourself with the key components of your Aerofit AF 513 treadmill.
4.1 Console Display and Controls

Image: The main console of the Aerofit AF 513 treadmill, showing the digital display for speed, time, distance, and calories, along with program selection buttons (P1-P12), quick speed buttons (3, 6, 9), Start, Stop, and Mode buttons, and the safety key slot.
The console features an LCD display that shows your workout data, including speed, time, distance, and calories burned. It also includes buttons for starting/stopping the treadmill, adjusting speed, selecting pre-set programs, and a safety key slot.
4.2 Heart Rate Sensors

Image: Close-up view of the metallic heart rate sensors integrated into the handrails of the Aerofit AF 513 treadmill, designed to measure pulse during exercise.
Integrated into the handrails are metallic sensors that detect your pulse. Grip these sensors firmly with both hands to display your heart rate on the console.
4.3 Transport Wheels and Kick Down Mechanism

Image: View of the base of the Aerofit AF 513 treadmill, highlighting the transport wheel for easy relocation and the kick-down mechanism used to fold or unfold the treadmill deck.
The treadmill is equipped with transport wheels at the front for easy relocation. A kick-down mechanism allows for folding the treadmill deck upwards to save space when not in use.
4.4 Running Belt Construction
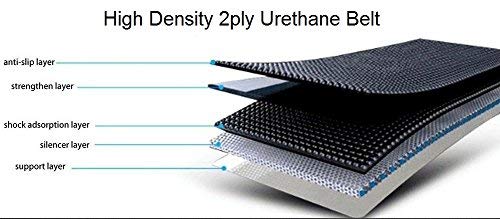
Image: Diagram illustrating the multi-layered construction of the high-density 2-ply urethane running belt, showing the anti-slip, strengthen, shock absorption, silencer, and support layers.
The running belt is constructed with multiple layers, including an anti-slip layer, strengthen layer, shock absorption layer, silencer layer, and a support layer, designed for durability and user comfort.
4.5 Motor System

Image: Internal view of the treadmill's motor, highlighting its components and features such as all-bronze heart, electricity saving, 1-year warranty, and low noise operation (less than 65db).
The treadmill is powered by a 1.5 HP motor designed for efficient and quiet operation. It features a robust construction for longevity.
5. Operating Instructions
5.1 Getting Started
- Power On: Ensure the treadmill is plugged into a grounded outlet and the main power switch (usually located near the front of the treadmill base) is in the "ON" position.
- Attach Safety Key: Clip the safety key to your clothing and insert the other end into the designated slot on the console. The display will illuminate.
- Stand on Side Rails: Always stand on the side rails before starting the treadmill.
5.2 Manual Mode
- Start: Press the START button. The belt will begin moving at a low speed (e.g., 1.0 km/h) after a short countdown.
- Adjust Speed: Use the SPEED + or SPEED - buttons on the console or handrails to increase or decrease the speed. Quick speed buttons (e.g., 3, 6, 9) can also be used for instant speed changes.
- Stop: Press the STOP button to gradually bring the treadmill to a halt. Alternatively, pull the safety key to stop the treadmill immediately in an emergency.
5.3 Program Mode
- Select Program: From standby mode, press the MODE button repeatedly to cycle through the pre-set programs (P1-P12).
- Start Program: Once your desired program is displayed, press the START button. The treadmill will begin the program, automatically adjusting speed according to the program's profile.
- End Program: The program will automatically stop when completed. You can also press STOP at any time to end the program prematurely.
5.4 Heart Rate Monitoring
To measure your heart rate, grip the metallic heart rate sensors on the handrails with both hands. Hold steady for a few seconds until your pulse reading appears on the display. Ensure your hands are clean and dry for accurate readings.
6. Maintenance
Regular maintenance ensures the longevity and optimal performance of your treadmill.
- Cleaning: Wipe down the console and other surfaces with a damp cloth after each use. Do not use abrasive cleaners or solvents.
- Belt Lubrication: The running belt requires periodic lubrication (typically every 3-6 months, depending on usage). Lift the edge of the belt and apply silicone lubricant evenly to the center of the deck. Refer to the specific instructions provided with your lubricant.
- Belt Tension: Check the belt tension regularly. If the belt slips or feels loose, adjust the rear roller bolts evenly, turning them clockwise in small increments (e.g., quarter turns) until the tension is correct.
- Belt Alignment: If the belt drifts to one side, adjust the corresponding rear roller bolt. If it drifts left, tighten the left bolt slightly. If it drifts right, tighten the right bolt slightly. Run the treadmill at a low speed to check alignment.
- Motor Cover: Periodically vacuum dust from under the motor cover to prevent overheating. Ensure the treadmill is unplugged before removing the cover.
7. Troubleshooting
Refer to this section for common issues and their solutions.
| Problem | Possible Cause | Solution |
|---|---|---|
| Treadmill does not power on. | Power cord not plugged in; main power switch off; safety key not inserted. | Check power cord connection; turn on main power switch; ensure safety key is fully inserted. |
| Running belt slips or hesitates. | Belt too loose; belt needs lubrication. | Adjust belt tension (see Maintenance); lubricate the running deck (see Maintenance). |
| Belt drifts to one side. | Belt alignment issue. | Adjust belt alignment (see Maintenance). |
| Unusual noise during operation. | Loose hardware; motor cover rubbing; worn components. | Check and tighten all assembly bolts; inspect for obstructions; contact customer support if noise persists. |
| Heart rate reading is inaccurate or absent. | Hands not properly placed; hands are dry or sweaty; sensor malfunction. | Ensure firm, consistent grip on both sensors; moisten hands slightly if too dry; contact support if issue persists. |
8. Specifications
| Feature | Detail |
|---|---|
| Brand | Aerofit |
| Model | AF 513 |
| Motor Horsepower | 1.5 HP |
| Maximum Speed | 16 Kilometers per Hour |
| Display Type | LCD |
| Metrics Measured | Distance |
| Material | Alloy Steel (Frame) |
| Colour | Black |
| Special Feature | Portable |
| Assembly Required | Yes |
| Power Source | Corded Electric |
| Input Power | 100 Watts |
9. Warranty & Support
Your Aerofit AF 513 treadmill comes with a 1-year warranty on the motor from the date of purchase. This warranty covers manufacturing defects under normal use conditions.
For warranty claims, technical support, or replacement parts, please contact Aerofit customer service. Keep your proof of purchase for all warranty-related inquiries.
Contact information for Aerofit customer support can typically be found on the Aerofit website or on your purchase receipt.