1. Introduction
This manual provides detailed instructions for the installation, operation, and maintenance of your MSI MPG Z390M Gaming Edge AC motherboard. Designed for Intel 8th and 9th Generation processors, this Micro ATX motherboard offers robust performance and a comprehensive feature set for building a high-performance gaming PC.
Please read this manual thoroughly before proceeding with installation to ensure proper setup and optimal performance.

Figure 1: MSI MPG Z390M Gaming Edge AC Motherboard with its retail packaging.
2. Product Overview
The MSI MPG Z390M Gaming Edge AC motherboard is built to support the latest Intel processors and high-speed components. Key features include:
- Supports 9th i9 9900k, i7 9700k, i5 9600k and 8th Generation Intel Core/ Pentium gold/ Celeron Processors for LGA 1151 socket.
- Supports dual channel DDR4 Memory, up to 4500(OC) MHz.
- Features 2x Turbo M.2 slots, Intel Optane Memory Ready, and Turbo USB 3.1 Gen2.
- Integrated Mystic Light with 16.8 million colors and 29 effects, allowing connection of RGB or rainbow LED strips.
- Designed for high-performance gaming with an extended heatsink and Micro ATX (Matx) form factor, ready for Multi GPU configurations.
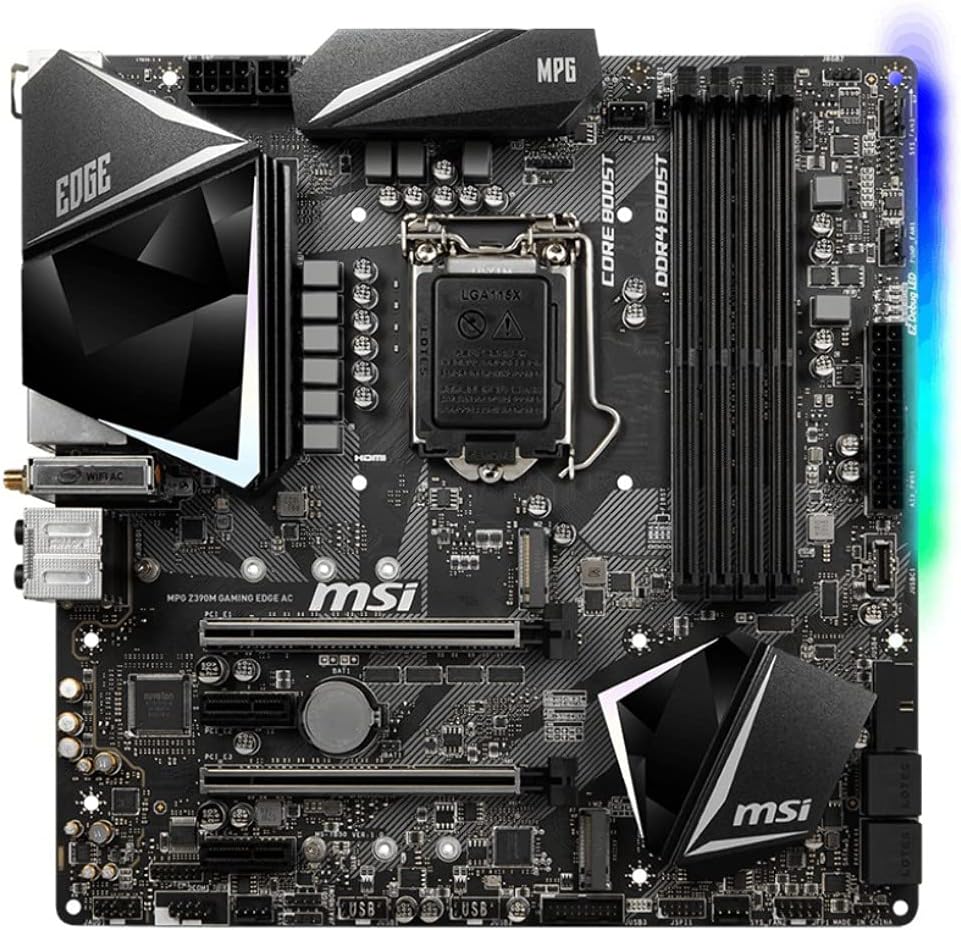
Figure 2: Top-down view highlighting the LGA 1151 socket, DDR4 slots, and M.2 slots.
Product Overview Video
Video 1: An official product overview providing a visual guide to the motherboard's features and design.
3. Setup and Installation
Follow these steps for proper installation of your motherboard and components:
- Prepare the Case: Install the I/O shield into your PC case. Ensure proper alignment.
- Install the Motherboard: Carefully place the motherboard into the case, aligning the screw holes. Secure it with screws.
- Install the CPU: Open the CPU socket lever, align the CPU with the triangular mark on the socket, and gently place it. Close the lever to secure the CPU.
- Install the CPU Cooler: Attach your chosen CPU cooler according to its specific instructions.
- Install RAM: Open the clips on the DDR4 memory slots. Align the memory modules with the notches and press firmly until the clips snap into place. For dual-channel performance, refer to the motherboard manual for recommended slot configurations.
- Install Storage Devices:
- M.2 SSDs: Locate the M.2 slots. Insert the M.2 SSD at an angle and secure it with the provided screw.
- SATA Drives: Connect SATA data cables from the motherboard to your SSDs/HDDs and connect power cables from your power supply.
- Install Graphics Card (GPU): Open the PCIe slot latch. Insert the graphics card firmly into the primary PCIe x16 slot until it clicks. Secure it with a screw to the case.
- Connect Power Supply: Connect the 24-pin ATX power connector and the 8-pin (or 4+4-pin) CPU power connector from your power supply to the motherboard. Connect additional power cables to your GPU if required.
- Connect Front Panel Cables: Connect the power button, reset button, USB ports, audio jacks, and LED indicators from your case to the corresponding headers on the motherboard. Refer to the detailed motherboard diagram for exact pin locations.
- Connect Peripherals: Connect your monitor, keyboard, mouse, and other peripherals to the rear I/O panel.

Figure 3: Angled view showing various headers and slots for component installation.

Figure 4: The rear I/O panel with various ports for external device connections.
4. Operating Instructions
First Boot and BIOS/UEFI Setup
Upon first power-on, the system will typically enter the BIOS/UEFI setup utility. Here you can configure essential settings:
- Boot Order: Set the boot priority for your operating system installation media (USB drive or DVD).
- Date and Time: Adjust system date and time.
- Overclocking (OC): The MSI BIOS/UEFI provides intuitive options for CPU and RAM overclocking. Exercise caution and research appropriate settings for your components.
- Fan Control: Configure fan curves for optimal cooling and noise levels.
- Save and Exit: Save your changes and exit the BIOS/UEFI to proceed with OS installation.
Operating System Installation
Insert your Windows 10 64-bit installation media and follow the on-screen prompts to install the operating system on your chosen storage device.
Driver Installation
After OS installation, install the necessary drivers for your motherboard components (chipset, audio, LAN, Wi-Fi, etc.) from the included driver DVD or MSI's official website. Installing the latest drivers ensures system stability and performance.
MSI Mystic Light
Utilize the MSI Mystic Light software to customize the RGB lighting on your motherboard and any connected compatible LED strips. Choose from 16.8 million colors and 29 effects to personalize your system's aesthetic.
5. Maintenance
Regular maintenance helps prolong the life and performance of your motherboard and PC components.
- Dust Removal: Periodically clean dust from inside your PC case, especially from fans, heatsinks, and ventilation areas, using compressed air. Ensure the system is powered off and unplugged before cleaning.
- BIOS/UEFI Updates: Check MSI's official website for the latest BIOS/UEFI updates. Updates can improve compatibility, stability, and performance.
Caution: BIOS updates may reset custom settings, including fan curves and overclocking profiles. It is advisable to record your current settings before performing an update and reconfigure them afterward.
- Driver Updates: Keep your drivers updated to ensure optimal performance and compatibility with new software and hardware.
- Cable Management: Ensure cables are neatly routed to improve airflow and prevent interference.
6. Troubleshooting
If you encounter issues, consider the following troubleshooting steps:
- No Power/No POST:
- Verify all power cables (24-pin ATX, 8-pin CPU, GPU) are securely connected.
- Ensure the power supply is switched on.
- Check front panel connections (power button).
- Try booting with only essential components (CPU, one RAM stick, GPU if no integrated graphics) to isolate the issue.
- System Instability/Crashes:
- Check CPU and GPU temperatures. Overheating can cause instability.
- Ensure RAM is properly seated and compatible. Test memory with diagnostic tools.
- Update drivers and BIOS/UEFI to the latest versions.
- If overclocked, revert to default settings to check for stability.
- No Display:
- Ensure monitor is connected to the graphics card (or motherboard if using integrated graphics) and powered on.
- Check if the graphics card is properly seated and has adequate power.
- Try a different display cable or monitor.
- Peripheral Issues (USB, Audio, LAN):
- Install or update relevant drivers.
- Check physical connections.
- Test with different peripherals to rule out device failure.
7. Specifications
Detailed technical specifications for the MSI MPG Z390M Gaming Edge AC motherboard:
| Feature | Specification |
|---|---|
| Brand | MSI |
| Model Name | MPG Z390M GAMING EDGE AC |
| CPU Socket | LGA 1151 |
| Compatible Processors | 8th Generation Intel Core, Intel Celeron, Intel Pentium Gold |
| Chipset Type | Intel Z390 |
| RAM Memory Technology | DDR4 |
| Memory Speed | Up to 4500(OC) MHz |
| Wireless Type | 802.11a/b/g/n/ac (Wi-Fi) |
| USB 2.0 Ports | 4 |
| Product Dimensions (LxWxH) | 9.6 x 9.6 x 1.2 inches |
| Item Weight | 2.3 pounds |
| Operating System Support | Windows 10 64-bit |
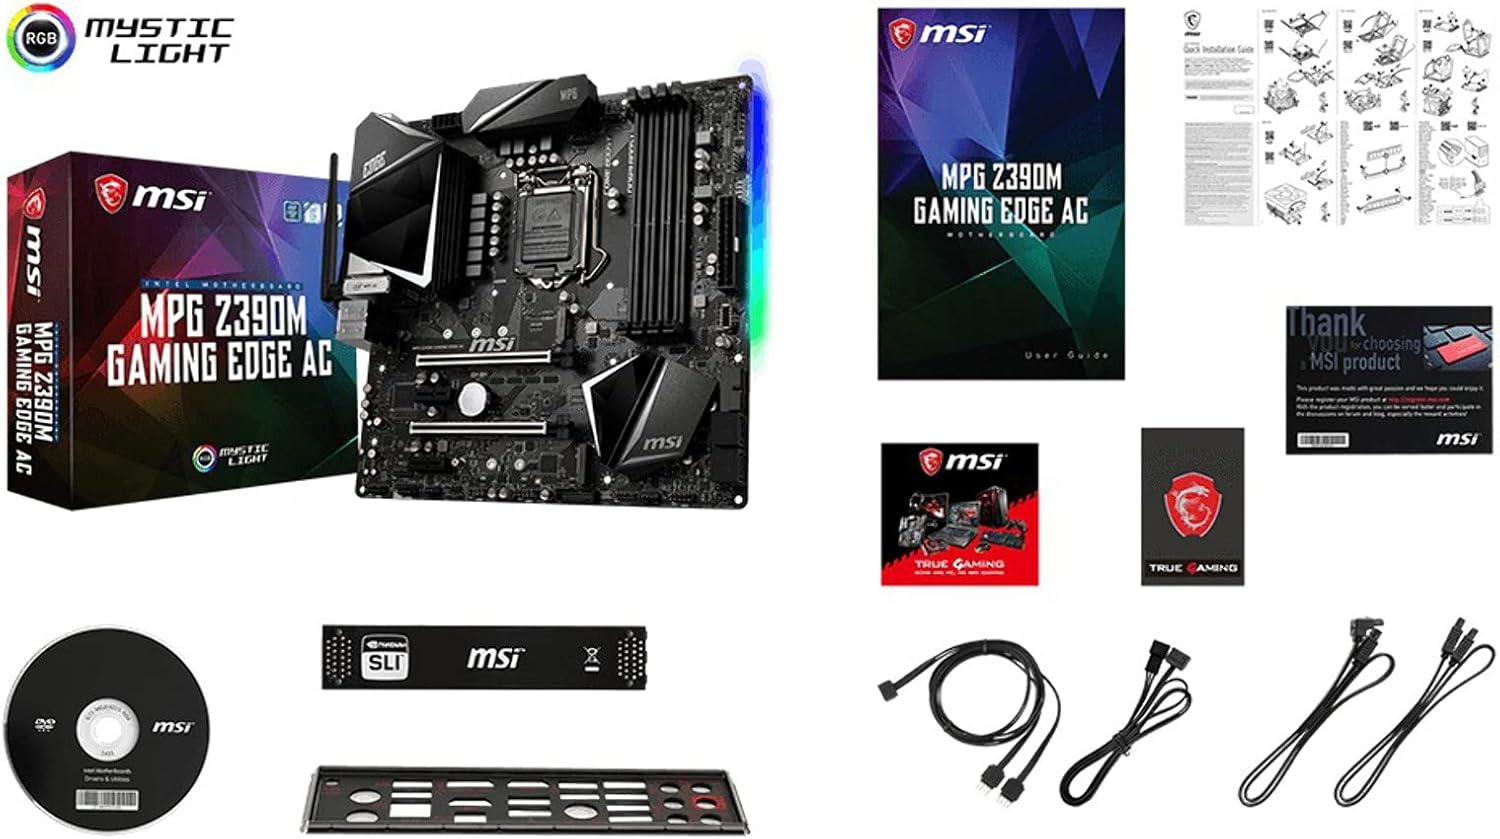
Figure 5: Included accessories: motherboard, cables, connectors, and quick setup guide.
8. Warranty and Support
For warranty information, technical support, or further assistance, please visit the official MSI website or contact MSI customer service. Keep your proof of purchase for warranty claims.
Official MSI Website: www.msi.com


