1. Product Overview
The MSI MEG Z390 ACE is an ATX gaming motherboard designed to support Intel 8th and 9th Generation Core, Pentium Gold, and Celeron processors for the LGA 1151 socket. It features advanced technologies for enhanced performance, stability, and connectivity, catering to enthusiast gamers and prosumers.
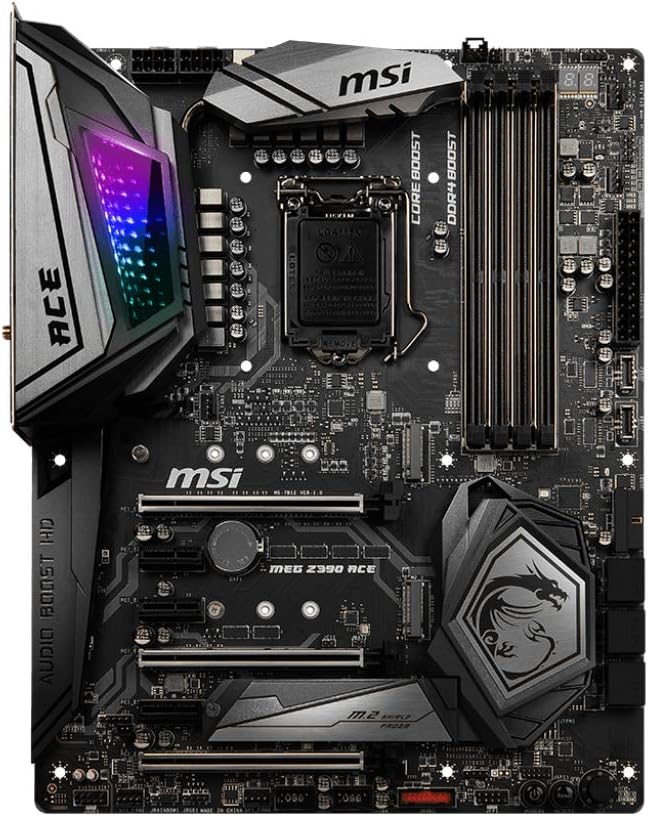
Figure 1: Top-down view of the MSI MEG Z390 ACE motherboard.
Key Features:
- Supports 9th i9-9900k, i7-9700k, i5-9600k and 8th Generation Intel Core/ Pentium gold/ Celeron Processors for LGA 1151 socket.
- Supports dual channel DDR4 memory, up to 4600(OC) MHz.
- Killer E2500 LAN, Intel 802.11AC Wi-Fi, Turbo U.2, 3x Turbo M.2 with M.2 Shield Frozr, Dual front USB 3.1 Gen2 Type-C.
- Mystic Light Infinity: 16.8 million colors/ 29 effects. Connect RGB or rainbow LED strips with addressable headers and create an RGB Gaming PC. Control Mystic Light Sync enabled products.
- Built for hardcore gaming and extreme overclocking.
2. Setup and Installation
Proper installation is crucial for optimal performance and system stability. Follow these general guidelines for setting up your MSI MEG Z390 ACE motherboard.
2.1 Unboxing and Initial Inspection
Carefully remove the motherboard from its packaging. Inspect for any visible damage or missing components. Ensure all accessories listed in the 'What's in the Box' section are present.
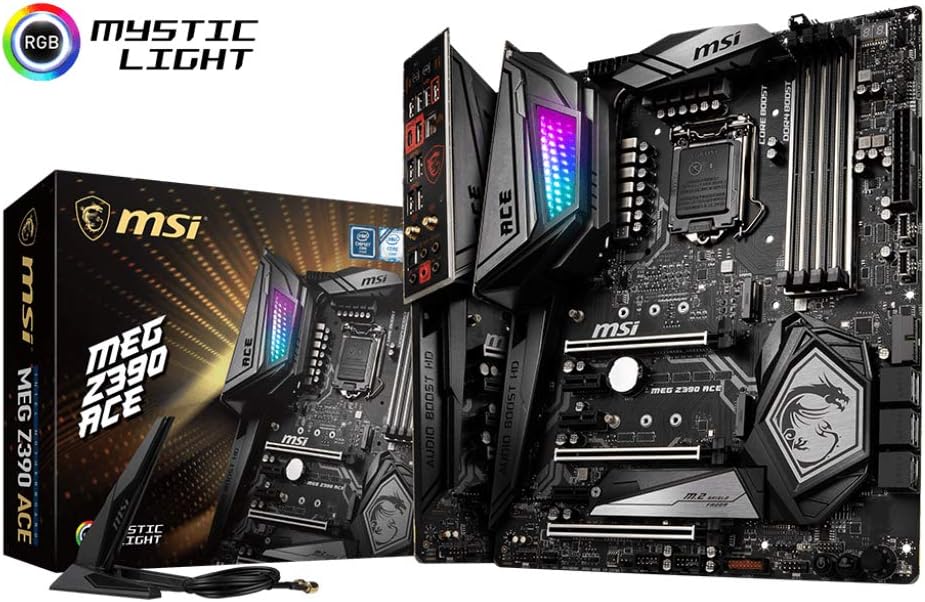
Figure 2: MSI MEG Z390 ACE Motherboard and included accessories.
2.2 Component Installation
- CPU Installation: Carefully open the CPU socket lever. Align the triangular mark on your Intel LGA 1151 processor with the mark on the socket. Gently place the CPU into the socket without forcing it. Close the lever to secure the CPU.
- RAM Installation: Open the clips on both ends of the DDR4 DIMM slots. Align the notch on the memory module with the key in the slot. Press down firmly on both ends until the clips snap into place. For dual-channel performance, install memory modules in the recommended slots (refer to the motherboard manual for specific slot configurations).
- M.2 SSD Installation: The motherboard features 3x Turbo M.2 slots with M.2 Shield Frozr. Remove the M.2 Shield Frozr heatsink. Insert the M.2 SSD into the slot at an angle, then gently push it down and secure it with the provided screw or latch mechanism. Reattach the M.2 Shield Frozr for optimal cooling.
- Graphics Card (GPU) Installation: Open the retention clip on the PCIe x16 slot. Align your graphics card with the slot and press down firmly until it is seated correctly and the clip locks. Secure the card to your PC case with screws.
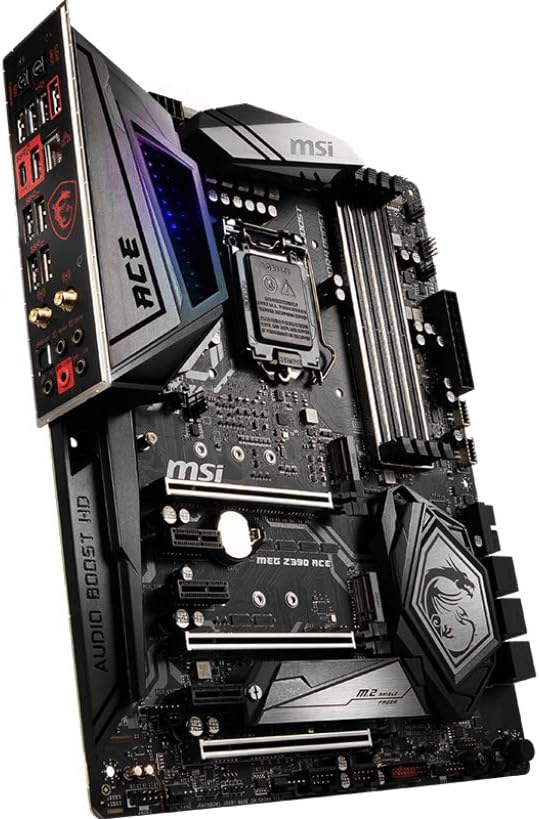
Figure 3: Angled view of the motherboard with integrated I/O shield.
3. Operating Instructions
Once all components are installed and connected, you can power on your system. The motherboard's BIOS (Basic Input/Output System) allows for configuration of hardware settings.
3.1 BIOS Access and Navigation
To enter the BIOS setup, press the DEL key repeatedly during system startup. Use the arrow keys to navigate and Enter to select options. The MSI Click BIOS 5 offers an intuitive graphical interface.
3.2 Mystic Light Customization
Utilize the MSI Mystic Light utility to customize the motherboard's RGB lighting. This software allows you to select from 16.8 million colors and 29 effects, and synchronize lighting with other Mystic Light Sync compatible products.

Figure 4: Bluetooth connectivity logo.
4. Connectivity and Ports
The MSI MEG Z390 ACE offers a comprehensive array of connectivity options for various peripherals and network access.
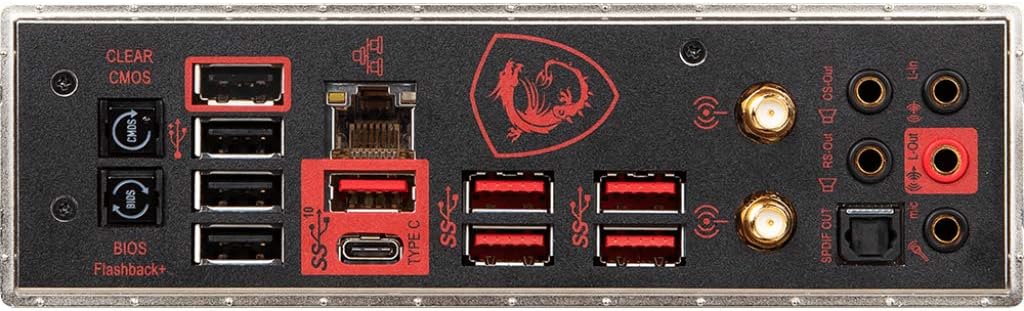
Figure 5: Rear I/O Panel of the MSI MEG Z390 ACE.
Rear I/O Panel:
- USB Ports: Multiple USB 3.1 Gen2 (Type-A and Type-C) and USB 3.1 Gen1 ports for high-speed data transfer and peripheral connections.
- Network: Killer E2500 Gigabit LAN for stable wired network connections.
- Wireless: Intel 802.11AC Wi-Fi and Bluetooth for wireless connectivity.
- Audio: Gold-plated audio jacks with Audio Boost 5 HD for high-fidelity sound output.
- Display Outputs: HDMI and DisplayPort for integrated graphics output (if using a compatible CPU).
- Clear CMOS Button: Allows resetting BIOS settings to default.
- BIOS Flashback+ Button: Enables updating BIOS without a CPU, RAM, or GPU installed.
5. Maintenance
Regular maintenance helps ensure the longevity and stable operation of your motherboard.
- Keep Clean: Periodically clean dust from the motherboard and components using compressed air. Ensure proper airflow within your PC case.
- Driver Updates: Keep your motherboard drivers and BIOS firmware updated to the latest versions available on the MSI official website.
- Software Updates: Ensure the Killer Network software and MSI utilities (like Mystic Light) are up-to-date for optimal functionality.
6. Troubleshooting
If you encounter issues, consider the following troubleshooting steps:
- No Power/No Display: Double-check all power connections (24-pin ATX, 8-pin CPU, PCIe power for GPU). Ensure the monitor is connected to the correct display output.
- System Instability/Crashes: Verify RAM modules are seated correctly. Test memory stability using diagnostic tools. Check CPU and GPU temperatures to ensure they are within safe operating limits.
- Network Connectivity Issues: Ensure network cables are securely connected. Update Killer E2500 LAN drivers. For Wi-Fi, ensure antennas are properly attached and drivers are updated.
- BIOS Issues: If the system fails to boot due to incorrect BIOS settings, use the Clear CMOS button on the rear I/O panel. For BIOS updates, utilize the BIOS Flashback+ feature if necessary.
7. Specifications
| Category | Specification |
|---|---|
| Brand | MSI |
| Model Name | MEG Z390 ACE |
| CPU Socket | LGA 1151 |
| Compatible Processors | 9th and 8th Generation Intel Core / Pentium Gold / Celeron |
| Chipset Type | Intel Z390 |
| RAM Memory Technology | DDR4 |
| Memory Clock Speed | Up to 4600 MHz (OC) |
| Wireless Type | 802.11a/b/g/n/ac (Intel Wi-Fi) |
| LAN | Killer E2500 Gigabit LAN |
| USB Ports | USB 3.1 Gen2, USB 3.1 Gen1, USB 2.0 |
| Product Dimensions | 12 x 9.6 x 1.2 inches (ATX Form Factor) |
| Item Weight | 3.3 pounds |
8. What's in the Box
- MSI MEG Z390 ACE Gaming Motherboard
- Cables and Connectors (e.g., SATA cables, RGB extension cables)
- Wi-Fi Antenna
- Quick Setup Guide / User Manual
- Driver CD/USB (may vary by region/package)
9. Official Product Video
Watch this official product overview to learn more about the MSI MEG Z390 ACE motherboard's features and design.
An official product overview video demonstrating the key features and design elements of the MSI MEG Z390 ACE motherboard.
10. Warranty and Support
MSI products typically come with a manufacturer's warranty. For specific warranty terms, technical support, and service, please refer to the official MSI website or contact MSI customer support directly. Keep your proof of purchase for warranty claims.


