DC HOUSE D52-F
DC HOUSE 52CC 1800W Gas Powered Earth Auger Post Hole Digger Instruction Manual
Model: D52-F
1. Important Safety Information
Always read and understand this manual before operating the earth auger. Failure to follow instructions can result in serious injury or death. This product is designed for digging holes in soil. Do not use for any other purpose.
- Personal Protective Equipment (PPE): Always wear safety glasses, hearing protection, heavy-duty gloves, and sturdy footwear. Avoid loose clothing that could get caught in moving parts.
- Work Area: Ensure the work area is clear of bystanders, pets, and obstacles. Maintain a safe distance from underground utilities (cables, pipes).
- Fuel Handling: Handle gasoline and oil with extreme care. Store fuel in approved containers in a well-ventilated area away from ignition sources. Do not refuel while the engine is running or hot.
- Engine Exhaust: The engine produces carbon monoxide, a colorless, odorless, poisonous gas. Operate only in well-ventilated outdoor areas.
- Two-Person Operation: For optimal control and safety, this auger is designed to be operated by one or two people. When operating with two people, ensure clear communication.
- EPA Certified Engine: This auger features an EPA-certified engine, ensuring reduced emissions and environmental protection.

Image: U.S. Environment Protection Agency (EPA) Certified logo, emphasizing benefits like harmless to human body, low-air pollution, and authority certification.
2. Package Contents
Verify all components are present and undamaged upon receipt. The standard package includes:
- 52CC 1800W Gas Powered Earth Auger Power Head
- 6-inch Drill Bit
- 10-inch Drill Bit
- 3 Extension Rods (8", 12", 20")
- Fuel Mixing Bottle
- Spark Plug Wrench
- Instruction Manual (this document)

Image: A complete view of the DC HOUSE earth auger, including the power head, 6-inch and 10-inch drill bits, three extension rods, a fuel mixing bottle, and a spark plug wrench.

Image: Illustration showing that the product may arrive in multiple packages (main engine and drill bits) due to size and weight, ensuring safe transit.
3. Assembly and Setup
Follow these steps to assemble your earth auger:
- Lift the motor unit.
- Connect the desired drill bit (or extension rod first, then the drill bit) to the drive shaft of the motor unit. Ensure the shaft is fully inserted.
- Insert the bolt through the aligned holes in the drive shaft and the drill bit/extension rod.
- Secure the bolt with the provided set pin to lock it in place. Ensure it is firmly secured before operation.

Image: Four-step visual guide demonstrating the assembly process: 1. Lifting the motor, 2. Connecting the drive shaft, 3. Inserting the bolt, and 4. Securing with the set pin.
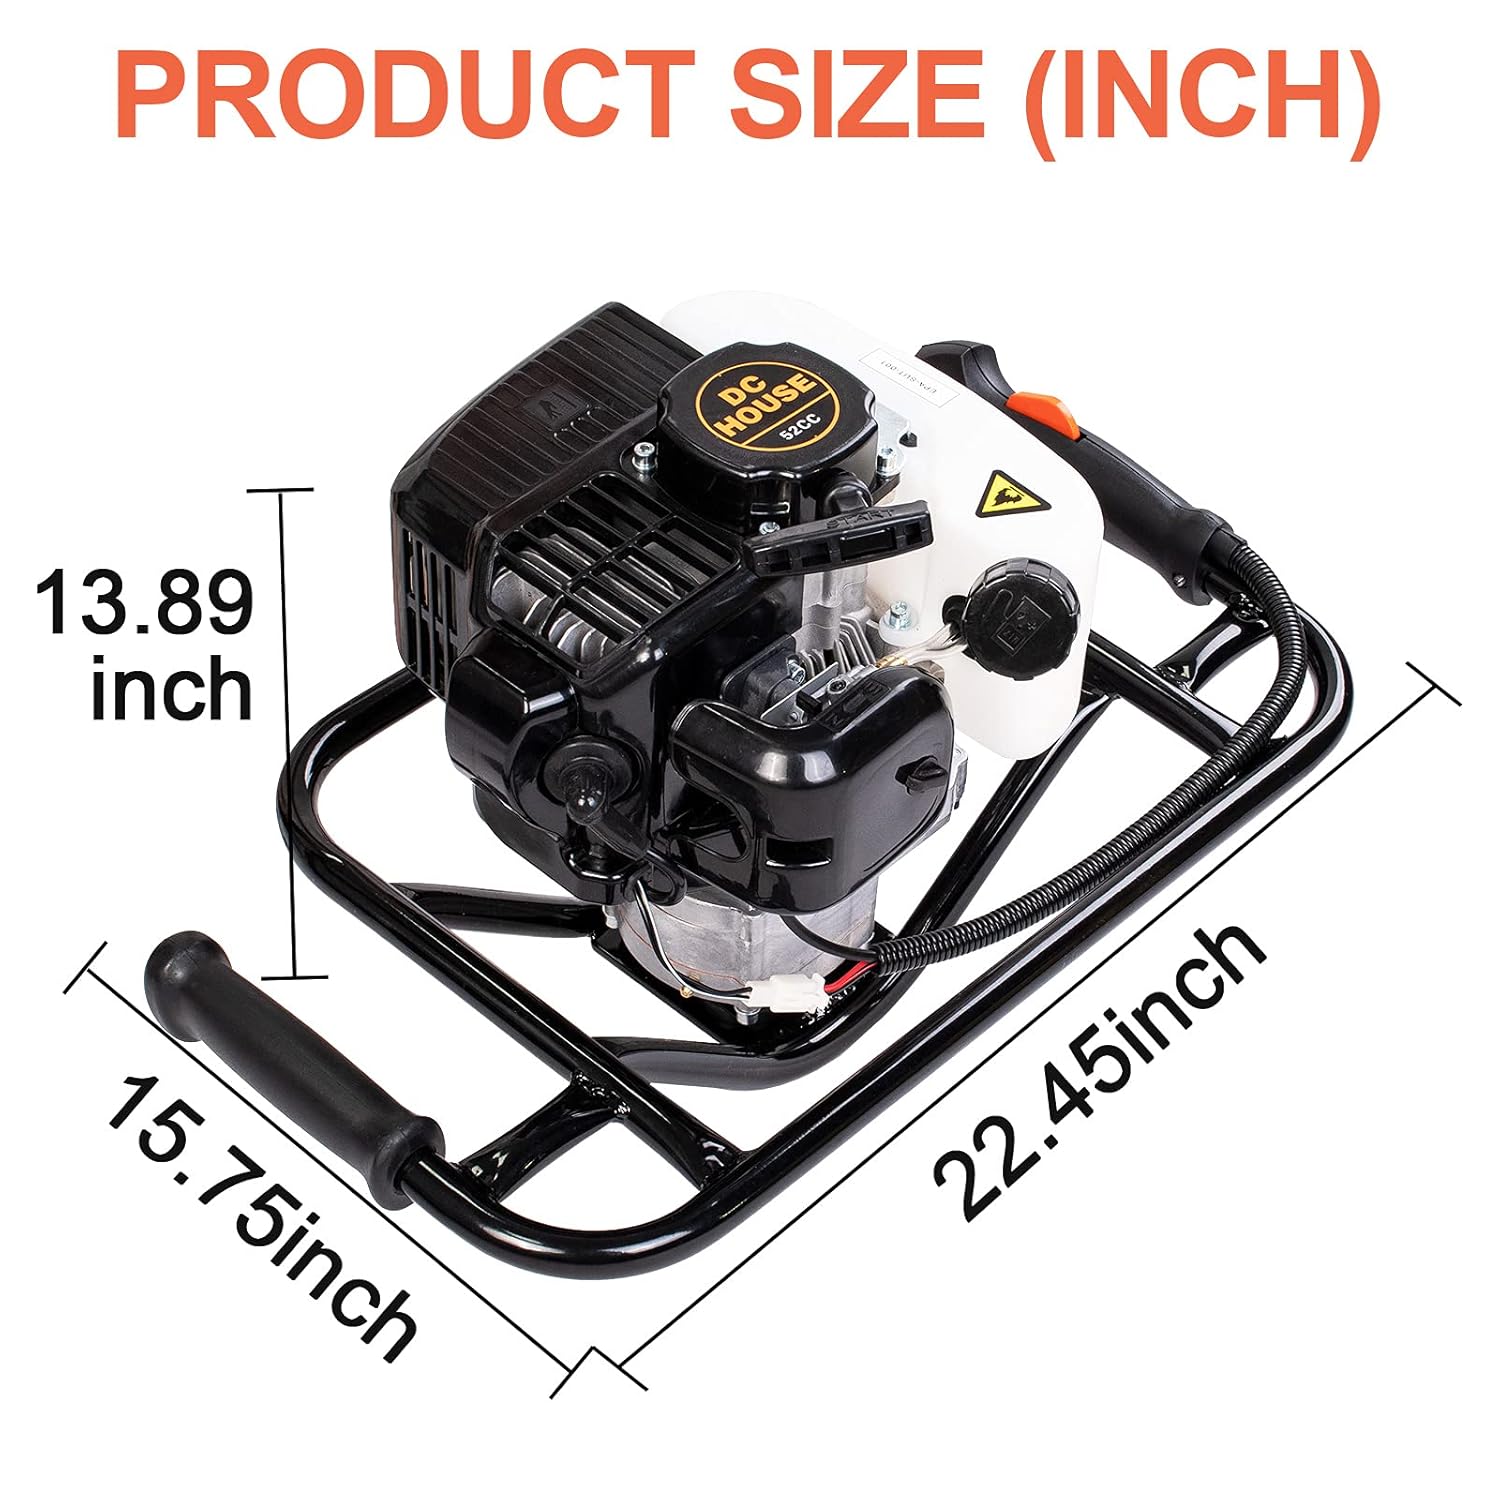
Image: Comparison showing the auger's digging depth without an extension (31.5 inches / 80cm) versus with an extension (55.1 inches / 140cm), illustrating the benefit of using extension rods.
4. Fuel Mixing
This auger uses a 2-stroke engine and requires a specific gasoline-oil mixture. Use unleaded gasoline with an octane rating of 87 or higher and a high-quality 2-stroke engine oil.
Mixing Ratio: 30:1 (Gasoline : 2-Stroke Oil)
- Using the provided mixing bottle, first add the required amount of 2-stroke oil.
- Then, add the corresponding amount of gasoline to achieve the 30:1 ratio.
- Securely close the bottle and shake it thoroughly to ensure the fuel and oil are completely mixed.
- Carefully pour the mixed fuel into the auger's fuel tank (1.2L capacity).

Image: Diagram illustrating the 30:1 gasoline to engine oil mixing ratio for the 2-stroke engine, showing separate addition and then shaking for proper hybrid mixture.
5. Starting the Engine
Ensure the auger is on a stable, level surface before starting.
Cold Start (First start of the day or after prolonged storage)
- Press the fuel primer bulb 8 times until fuel is visible in the return line.
- Switch the engine ON/OFF switch to the "I" (ON) position.
- Move the choke lever all the way down to the OFF (closed) position.
- Pull the recoil starter cord gently 1-4 times until the engine "pops" or attempts to start.
- Immediately switch the choke lever all the way up to the ON (open) position.
- Pull the recoil starter cord again until the engine starts.
- Allow the engine to run at idle speed for 2-3 minutes to warm up before engaging the auger.
Warm Start (Engine is already warm)
- Switch the engine ON/OFF switch to the "I" (ON) position.
- Ensure the choke lever is in the ON (open) position.
- Pull the recoil starter cord until the engine starts.
Video: Official DC HOUSE 52cc Post Hole Digger demonstration, showing assembly, fuel filling, priming, choke operation, and starting procedures. This video provides a visual guide to the starting process.
6. Operating Instructions
Once the engine is running and warmed up, you can begin digging.
- Positioning: Hold the auger firmly with both hands on the ergonomic butterfly handles. Position the drill bit over the desired digging spot.
- Engaging: Slowly press the throttle trigger to engage the auger bit. Allow the bit to dig into the soil under its own weight. Do not force the auger down.
- Digging: As the auger digs, periodically lift it slightly to clear soil from the hole and allow the bit to bite into fresh ground. This also helps prevent the auger from getting stuck.
- Soil Types: The auger is suitable for various soil types including clay, frozen soil, and super hard soil. Adjust pressure and technique based on soil resistance.
- Depth: The maximum depth using a single bit is approximately 2.6 feet. Use extension rods for deeper holes.
- Stopping: To stop the auger, release the throttle trigger. To stop the engine, switch the ON/OFF switch to the "O" (OFF) position. The emergency stop switch is conveniently located on the handle for quick shutdown.

Image: The DC HOUSE earth auger in operation, demonstrating its use for digging post holes in various soil conditions.

Image: Close-up of the auger's drive shaft, highlighting its high torque and strong power, with a speed range of 110-280 RPM due to its high-speed alloy gearbox.
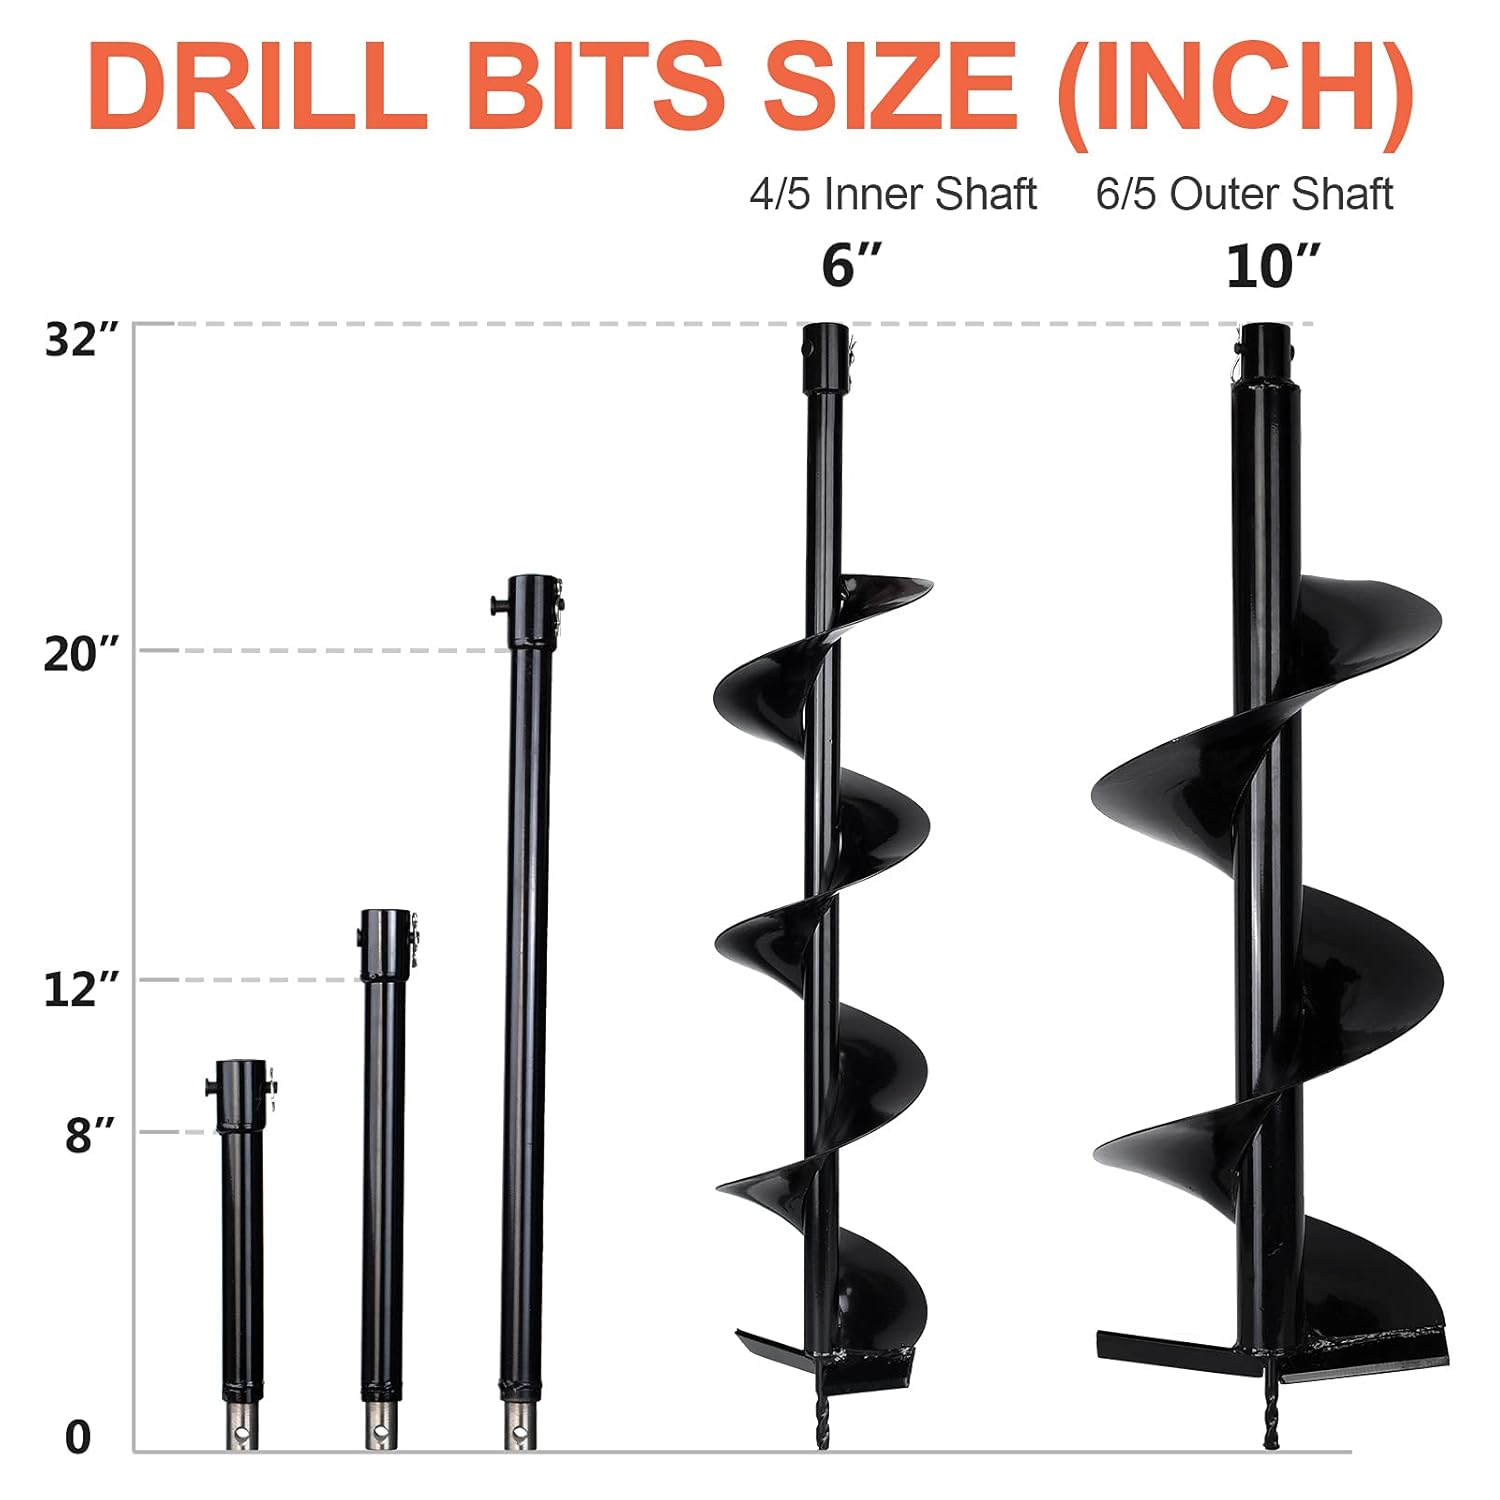
Image: Visual representation of the included drill bit sizes (6" and 10" diameters) and extension rods (8", 12", 20"), showing their relative lengths and how they can be combined for different digging depths.
7. Maintenance
Regular maintenance ensures optimal performance and extends the life of your earth auger.
- Cleaning: After each use, clean the auger bit and power head thoroughly to remove soil, debris, and grass. Use a damp cloth and mild detergent. Do not use high-pressure water directly on the engine.
- Air Filter: Check and clean the air filter regularly, especially in dusty conditions. A clogged air filter can reduce engine performance.
- Spark Plug: Inspect the spark plug periodically. Clean or replace if it is fouled or worn.
- Fuel System: For long-term storage, drain the fuel tank and run the engine until it stops to clear the carburetor. This prevents fuel degradation issues.
- Lubrication: Check and lubricate moving parts as indicated in the detailed service manual (if applicable).
- Storage: Store the auger in a clean, dry, and well-ventilated area, away from direct sunlight and extreme temperatures.
8. Troubleshooting
If you encounter issues, refer to the following common problems and solutions:
| Problem | Possible Cause | Solution |
|---|---|---|
| Engine won't start | No fuel or incorrect fuel mixture | Check fuel level and ensure correct 30:1 gasoline-oil mixture. |
| Engine won't start | Choke in wrong position | Adjust choke according to cold/warm start procedure. |
| Engine won't start | Spark plug fouled or loose | Clean or replace spark plug; ensure it is tightened. |
| Loss of power during operation | Clogged air filter | Clean or replace air filter. |
| Loss of power during operation | Incorrect fuel mixture | Verify fuel mixture is 30:1. |
| Auger bit gets stuck | Hitting a rock or root | Lift the auger slightly to clear debris. If stuck, turn off engine and manually remove obstruction. |
9. Specifications
- Model Number: D52-F
- Engine Type: Single Cylinder, 2-stroke, Air-cooled
- Engine Displacement: 52CC
- Power: 1.8KW / 8000rpm
- Fuel Mixing Ratio: 30:1 (2 Cycle Oil / Gasoline)
- Tank Capacity: 1.2L
- Transmission Components: Ball bearing shafts and alloy gears
- Starting System: Easy starting system (cord starter)
- Clutch Type: Centrifugal clutch
- Product Dimensions (L x W x H): 19.85 x 10.6 x 42.78 inches
- Item Weight: 40.4 Pounds
- Material: Aluminum
- Cutting Diameter: 6 inches, 10 inches (with included bits)
- Shank Type: Straight

Image: Detailed diagram showing the dimensions of the power head unit: 13.89 inches height, 15.75 inches width, and 22.45 inches length.
10. Warranty and Support
For warranty information, technical support, or replacement parts, please contact DC HOUSE customer service. Refer to your purchase documentation for specific warranty terms and contact details.
You can also visit the official DC HOUSE Store for more information and product support.
Ask a question about this manual
Ask about setup, troubleshooting, compatibility, parts, safety, or missing instructions. Manuals+ will review the question and use this page’s manual context to help answer it.