1. Introduction
The TOPCHANCES KPS1203D is a single-output, high-precision, double LED display switch DC power supply. Designed for various applications requiring stable and adjustable DC power, this unit features complete operating protection functions, high performance, low ripple, high stability, and a compact, lightweight design. Its current limiting protection safeguards both the power supply and connected loads from accidental damage. The integrated low-temperature control circuit and cooling fan ensure quiet operation.
2. Safety Instructions
- Always connect the power supply to a grounded outlet.
- Ensure the input voltage selector switch on the rear panel is set correctly (110V or 230V) before connecting to mains power. Incorrect setting can cause severe damage to the unit.
- Do not operate the power supply in wet or damp conditions.
- Do not open the casing of the power supply. There are no user-serviceable parts inside. Refer all servicing to qualified personnel.
- Avoid blocking the ventilation openings to prevent overheating.
- Ensure output terminals are correctly connected to the load. Reverse polarity can damage the load or the power supply.
- Disconnect power before making or changing connections to the output terminals.
3. Product Overview
3.1 Front Panel Controls and Indicators

Image Description: This image displays the front panel of the TOPCHANCES KPS1203D DC Power Supply. Key features visible include:
- LED Displays: Two red digital displays show the output voltage (V) and current (A) simultaneously.
- Voltage Adjustment Knobs: Labeled 'COARSE' and 'FINE' for voltage (V) adjustment, allowing for precise control.
- Current Adjustment Knobs: Labeled 'COARSE' and 'FINE' for current (A) adjustment, enabling precise current limiting.
- Output Terminals: Red (+) and Black (-) terminals for connecting the load.
- Power Switch: A rocker switch to turn the unit ON/OFF.
- Indicator Lights: Small green and red LEDs indicate operational status (e.g., constant voltage (CV) or constant current (CC) mode).
3.2 Rear Panel Features

Image Description: This image shows the rear panel of the power supply. Prominent features include:
- AC Power Input Socket: A standard IEC C14 inlet for connecting the AC power cord.
- Cooling Fan: A circular fan grille for heat dissipation, crucial for maintaining optimal operating temperature.
- Voltage Selector Switch: A red slide switch, clearly labeled "115V" and "230V", used to select the appropriate input voltage for your region. This switch is critical for safe operation.
4. Setup
- Unpacking: Carefully remove the power supply and all accessories from the packaging. Inspect for any signs of damage.
- Placement: Place the power supply on a stable, level surface, ensuring adequate ventilation around the unit, especially the rear cooling fan.
- Input Voltage Selection:
Locate the red voltage selector switch on the rear panel. Using a small screwdriver or similar tool, slide the switch to match your local mains voltage (110V for North America, 230V for most of Europe and other regions). Failure to set this correctly will damage the unit.
Image Description: This image highlights the red voltage selector switch on the rear panel, showing the "115V" and "230V" settings. It is crucial to select the correct voltage before connecting the power supply to the mains.
- Connect Power Cord: Insert the provided AC power cord into the AC power input socket on the rear panel. Do not connect the other end to a wall outlet yet.
- Prepare Output Lines: Connect the provided output lines to the red (+) and black (-) output terminals on the front panel. Ensure a secure connection.
- Connect to Load: Connect the other end of the output lines to your device or circuit (load). Ensure correct polarity: red to positive, black to negative.
5. Operating Instructions
- Initial Power On:
After ensuring all connections are correct and the input voltage is selected, plug the AC power cord into a grounded wall outlet. Turn on the power supply using the front panel power switch. The LED displays should illuminate, showing initial voltage and current readings.
- Adjusting Voltage:
Use the 'COARSE' voltage knob (V) for large adjustments and the 'FINE' voltage knob (V) for precise adjustments. Rotate clockwise to increase voltage, counter-clockwise to decrease. Observe the voltage display (V) to set the desired output voltage.
- Adjusting Current Limit:
The power supply features current limiting protection. To set the current limit:
- Method 1 (Without Load): Short-circuit the output terminals (connect red to black) using a thick wire for a brief moment. The current display will show the maximum current. Adjust the 'COARSE' and 'FINE' current knobs (A) to set the desired current limit. Remove the short circuit.
- Method 2 (With Load): With the load connected, set the voltage to zero. Turn the current knobs (A) to their maximum clockwise position. Slowly increase the voltage until the desired current is drawn by the load. Then, slowly decrease the current knobs (A) until the current display shows the desired limit. The power supply will then operate in Constant Current (CC) mode if the load attempts to draw more current than the set limit.
The green LED indicates Constant Voltage (CV) mode, and the red LED indicates Constant Current (CC) mode.
- Operation with Load:
Once voltage and current limits are set, the power supply will maintain the set voltage unless the load attempts to draw more current than the limit, in which case it will switch to CC mode to protect the load and the power supply.
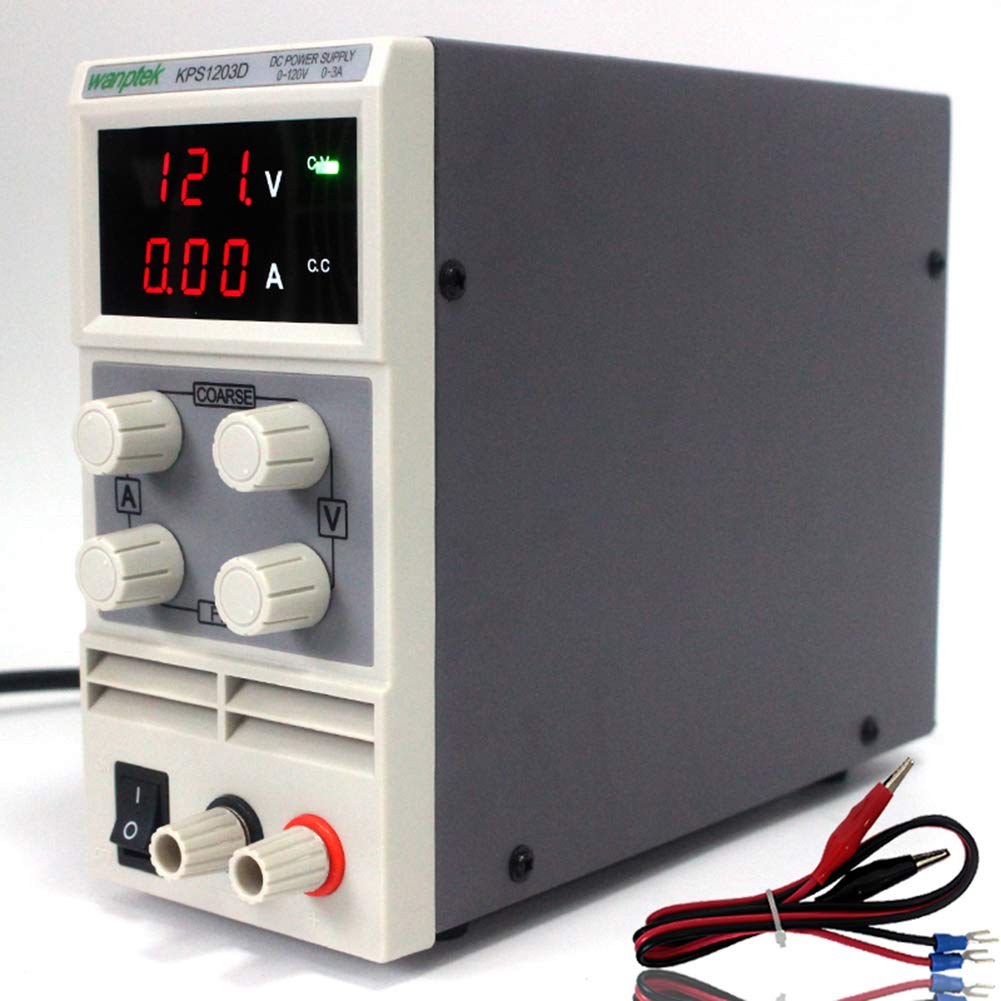
Image Description: This image shows the TOPCHANCES KPS1203D power supply with its red and black output leads connected to the front panel terminals. The leads are terminated with alligator clips and spade connectors, illustrating how to connect the power supply to a circuit or device.
- Shutting Down:
Before turning off the power supply, it is recommended to reduce the output voltage and current to zero. Then, switch off the power supply using the front panel switch and disconnect the AC power cord from the wall outlet.
6. Maintenance
- Cleaning: Use a soft, dry cloth to clean the exterior of the power supply. Do not use abrasive cleaners or solvents.
- Ventilation: Periodically check that the cooling fan and ventilation openings are free from dust and obstructions. A clogged fan can lead to overheating.
- Storage: When not in use for extended periods, store the power supply in a cool, dry place, away from direct sunlight and extreme temperatures.
7. Troubleshooting
| Problem | Possible Cause | Solution |
|---|---|---|
| No power, displays off |
|
|
| No output voltage/current |
|
|
| Incorrect voltage/current reading |
|
|
| Unit overheats |
|
|
8. Specifications
| Parameter | Value |
|---|---|
| Input voltage | AC 110V/50Hz (Switchable to 230V) |
| Output voltage | 0 - 120V |
| Output current | 0 - 3A |
| Voltage resolution | 0.1/1V |
| Current resolution | 0.01A |
| Power effect | CV≤1%+10mV |
| Effect of load | CV≤1%+10mV |
| Ripple and noise | Vp-p≤1% |
| Voltage display precision | 1%+1digits |
| Current display precision | 1%+2digits |
| Operating environment | (-10-45)°C, RH<90% |
| Weight | 2.00Kg |
| Machine size (mm) | 81 (width) × 165 (height) × 220 (length) |

Image Description: This image provides a dimensional view of a similar KPS series power supply (KPS9605D is shown, but dimensions are illustrative for the KPS1203D). It indicates the approximate width (8.4cm), height (16.7cm), and length (21.1cm) of the unit, helping users understand its physical footprint. Note that the model number in the image is KPS9605D, but the dimensions are representative of the compact design of the KPS series.
9. Package Contents
The following items are included in your package:
- 1 x DC Power Supply (TOPCHANCES KPS1203D)
- 1 x Power Cord
- 1 x Output Line (with alligator clips/spade connectors)
- 1 x Instruction Book (this manual)
10. Warranty and Support
For warranty information, technical support, or service inquiries, please refer to the purchase documentation or contact the TOPCHANCES customer support directly. Keep your purchase receipt as proof of purchase.
You can often find support contact details on the manufacturer's official website or through the retailer where the product was purchased.