1. Introduction
This manual provides detailed instructions for the installation, operation, and maintenance of your Pioneer DEH-S5100BT CD Receiver. The DEH-S5100BT is designed to integrate multimedia capabilities into a single-DIN receiver, featuring direct access buttons for navigation and bass boost, and a dual-function volume knob optimized for the Pioneer Smart Sync app. It also includes a USB auto switch feature, allowing the user to choose between using a connected phone as an audio source or solely for charging.
Key Features:
- Android Compatibility: Seamless integration with Android devices.
- Pandora and Spotify Support: Direct control and streaming from popular music services.
- Built-in Bluetooth: For hands-free calling and audio streaming.
- Color Customization: Personalize display illumination colors.
- MIXTRAX: Creates a non-stop mix with DJ-style effects.
2. What's in the Box
Verify that all components are present before proceeding with installation.
- CD Receiver Unit
- Wiring Harness
- Installation Hardware
- Instruction Manual
- Faceplate Case (for removable faceplate)
- Microphone (for hands-free calling)
- Removal Keys (2)
3. Setup and Installation
Proper installation is crucial for optimal performance. If you are unsure about any steps, it is recommended to consult a professional installer.
3.1 Installation Overview
The DEH-S5100BT is designed for single-DIN dashboard openings. Ensure your vehicle's dashboard can accommodate this size. A vehicle-specific wiring harness adapter (sold separately) is highly recommended to simplify wiring connections and avoid cutting factory wires.
- Power Connection: Connect the yellow wire to a constant 12V supply, the red wire to an accessory 12V supply (switched with ignition), and the black wire to ground.
- Speaker Connections: Connect speaker wires according to the wiring diagram provided with the unit and your vehicle's wiring. Ensure correct polarity.
- Antenna Connection: Connect the vehicle's antenna cable to the receiver.
- Microphone Connection: Plug the supplied microphone into the dedicated input jack on the rear of the receiver and route it to a suitable location (e.g., sun visor) for clear hands-free calling.
Refer to the detailed wiring diagram in the separate installation guide for specific connections.
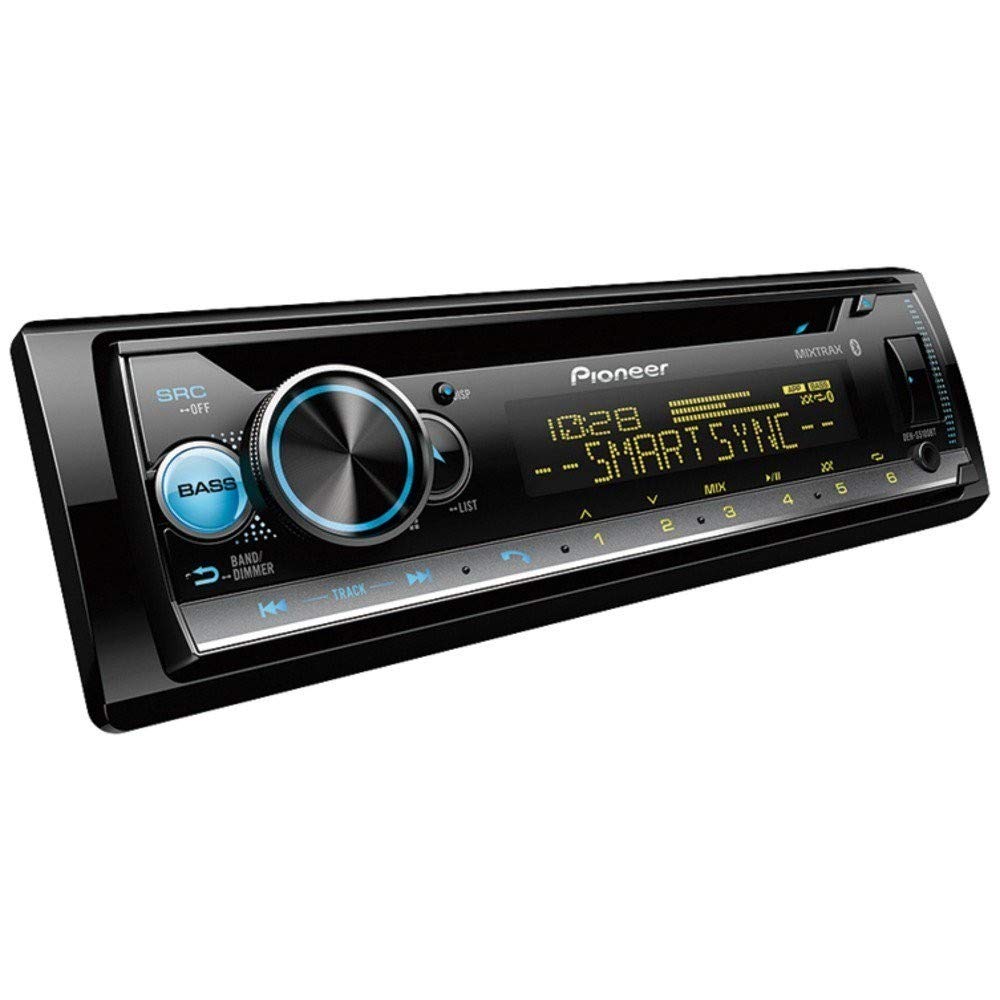
Figure 1: Front view of the Pioneer DEH-S5100BT CD Receiver, showing the display, control knob, and various buttons.
3.2 Initial Power-On and Basic Settings
- After installation, turn on your vehicle's ignition.
- Press the SRC (Source) button to power on the receiver.
- Adjust the volume using the large rotary knob.
- Set the clock and initial audio preferences as prompted or via the system menu.
3.3 Pioneer Smart Sync App Setup
The Pioneer Smart Sync app enhances the receiver's functionality by providing an intuitive interface for controlling audio, navigation, and communication features from your smartphone.
- Download the "Pioneer Smart Sync" app from your smartphone's app store (Google Play Store for Android, Apple App Store for iOS).
- Enable Bluetooth on your smartphone.
- On the DEH-S5100BT, navigate to the Bluetooth pairing menu.
- Select your smartphone from the list of available devices and confirm pairing.
- Launch the Pioneer Smart Sync app on your smartphone. The app will automatically connect to the receiver.
- Once connected, you can use the app to control various receiver functions, including audio settings, source selection, and app-based navigation.
4. Operating Instructions
4.1 Basic Controls
- SRC (Source) Button: Press to cycle through available audio sources (Tuner, CD, USB, Bluetooth Audio, AUX). Press and hold to turn the unit off.
- Volume Knob: Rotate to adjust the volume level. Press to access the main menu for audio settings and system options.
- Band/ESC Button: In tuner mode, press to change radio bands (FM1, FM2, FM3, AM). In menu mode, press to exit the current menu.
- Forward/Reverse Buttons (<< / >>): Skip tracks, fast forward/rewind, or tune radio stations.
- Direct Access Buttons: Dedicated buttons for functions like Navigation (when Smart Sync is active) and Bass Boost.
4.2 Bluetooth Operation
The built-in Bluetooth allows for hands-free calling and wireless audio streaming.
- Pairing: Refer to Section 3.3 for initial pairing. Once paired, the receiver will automatically connect to your phone when in range.
- Hands-Free Calling:
- When a call comes in, the display will show the caller ID.
- Press the PHONE button (or the green call button on the unit) to answer.
- Press the PHONE button (or the red end call button) to end a call.
- Use the volume knob to adjust call volume.
- Bluetooth Audio Streaming:
- Select "Bluetooth Audio" as the source.
- Play music from your paired smartphone.
- Use the receiver's forward/reverse buttons to skip tracks.
4.3 CD Playback
- Insert a CD into the disc slot with the label side up. The receiver will automatically switch to the CD source and begin playback.
- Use the forward/reverse buttons to skip tracks.
- Press the PAUSE button to temporarily stop playback.
- Press the EJECT button to remove the CD.
4.4 USB Device Playback
Connect a USB storage device (e.g., USB flash drive) or a compatible smartphone via the USB port.
- Insert the USB device into the USB port. The receiver will automatically detect it and switch to the USB source.
- If a smartphone is connected, the USB auto switch feature allows you to choose whether to use the phone as a source or just for charging.
- Use the forward/reverse buttons to navigate tracks.
- The receiver supports WAV and WMA audio formats.
4.5 Radio Operation
- Select "Tuner" as the source.
- Press the BAND button to switch between FM1, FM2, FM3, and AM bands.
- Manual Tuning: Press and hold the forward/reverse buttons to manually tune to a station.
- Seek Tuning: Briefly press the forward/reverse buttons to automatically seek the next strong station.
- Preset Stations:
- To store a station: Tune to the desired station, then press and hold one of the preset number buttons (1-6) until you hear a beep.
- To recall a station: Briefly press the corresponding preset number button.
4.6 Audio Settings and MIXTRAX
- Accessing Audio Menu: Press the volume knob to enter the main menu, then navigate to "Audio Settings."
- Equalizer (EQ): Adjust preset EQ curves or customize a user-defined EQ.
- Bass Boost: Use the dedicated direct access button or the audio menu to enhance low frequencies.
- Fader/Balance: Adjust sound distribution between front/rear and left/right speakers.
- Subwoofer Control: If a subwoofer is connected, adjust its output level and crossover frequency.
- MIXTRAX: When playing music from a USB device or CD, activate MIXTRAX to create a non-stop mix with various DJ-style effects and club-like illumination. Press the MIXTRAX button to activate/deactivate.
4.7 Color Customization
The display and button illumination colors can be customized.
- Press the volume knob to enter the main menu.
- Navigate to "System Settings" or "Illumination Settings."
- Select "Color" or "Display Color" to choose from a variety of preset colors or create a custom color.
5. Maintenance
- Cleaning the Unit: Use a soft, dry cloth to wipe the front panel. For stubborn dirt, dampen the cloth with water. Never use abrasive cleaners, waxes, or solvents.
- Cleaning the Disc Slot: Avoid inserting foreign objects into the disc slot. If a disc gets stuck, refer to the troubleshooting section.
- Faceplate Care: When removing the faceplate, store it in the supplied protective case to prevent scratches and damage.
6. Troubleshooting
| Problem | Possible Cause | Solution |
|---|---|---|
| No power | Incorrect wiring; Blown fuse; Vehicle ignition off. | Check power and ground connections. Verify fuse integrity. Ensure vehicle ignition is on. |
| No sound | Volume too low; Mute activated; Incorrect speaker wiring; Fader/Balance settings. | Increase volume. Deactivate mute. Check speaker connections and polarity. Adjust Fader/Balance. |
| Bluetooth connection fails | Smartphone Bluetooth off; Device not paired; Interference. | Ensure smartphone Bluetooth is on. Re-pair the device (see Section 3.3). Move closer to the unit. |
| CD/USB playback issues | Damaged disc/file; Incompatible format; USB device not properly connected. | Try a different disc/file. Ensure files are WAV or WMA. Reconnect USB device. |
| Poor radio reception | Antenna not connected; Weak signal; Environmental interference. | Check antenna connection. Try tuning to a stronger station. |
If problems persist, consult your dealer or an authorized Pioneer service center.
7. Specifications
| Brand | PIONEER |
| Model Number | DEH-S5100BT |
| Item Type Name | CD Receiver |
| Connectivity Technology | Bluetooth |
| Wireless Technology | Bluetooth |
| Compatible Devices | Smartphone |
| Connector Type | 3.5mm Jack, USB |
| Audio Output Mode | Stereo |
| Supported Internet Services | Pandora, Spotify |
| Control Method | App |
| Output Power | 50 Watts (per channel, typical) |
| Wattage (Max Output) | 200 Watts (50W x 4 channels) |
| Number of Channels | 6 (4 speaker channels + 2 RCA pre-outs) |
| Format Support | WAV, WMA |
| Color | Customizable Illumination |
| Item Weight | 3 Pounds (approx.) |
| UPC | 884938403368 |
8. Warranty and Support
8.1 Warranty Information
The Pioneer DEH-S5100BT CD Receiver comes with a ONE YEAR limited warranty from the date of purchase. This warranty covers defects in materials and workmanship under normal use. Please retain your proof of purchase for warranty claims. For full warranty terms and conditions, refer to the warranty card included with your product or visit the official Pioneer website.
8.2 Customer Support
For technical assistance, troubleshooting beyond this manual, or service inquiries, please contact Pioneer customer support or visit their official website:
- Pioneer Official Website: www.pioneerelectronics.com
- Online Support: Access FAQs, software updates, and additional documentation.
When contacting support, please have your model number (DEH-S5100BT) and purchase date readily available.


