1. Introduction
This manual provides detailed instructions for the installation, operation, and maintenance of your Z-Lite 872CH-RF16 6 Light Flush Mount fixture. Please read this manual thoroughly before beginning installation to ensure safe and proper use of the product.
The Z-Lite 872CH-RF16 is a gorgeously airy modern six-light flush mount lighting fixture. It features sleek lines of chrome-finished aluminum that add a contemporary luster, complemented by an unusual crossed and single chrome line shade pattern intertwined with gleaming and glittering lines of polished crystals, creating an elegantly modern style.
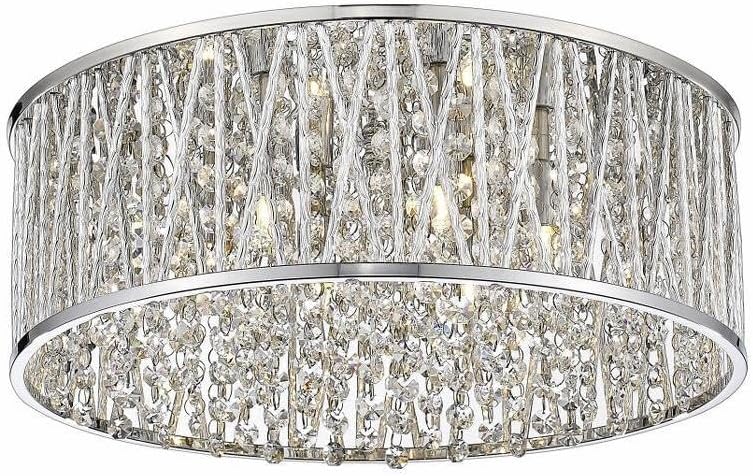
Figure 1.1: Front view of the Z-Lite 872CH-RF16 6 Light Flush Mount fixture, showcasing its chrome finish and crystal details.

Figure 1.2: Side view of the Z-Lite 872CH-RF16 fixture, highlighting the cylindrical shape and crystal arrangement.

Figure 1.3: The Z-Lite 872CH-RF16 flush mount light installed in a living room setting, demonstrating its aesthetic appeal in a residential space.

Figure 1.4: The Z-Lite 872CH-RF16 flush mount light installed in a bedroom setting, illustrating its suitability for various indoor environments.
2. Safety Information
WARNING: RISK OF ELECTRIC SHOCK. Disconnect power at the fuse box or circuit breaker before installing or servicing.
- Read all instructions carefully before installation.
- All electrical connections must be in accordance with local codes, ordinances, or the National Electric Code (NEC).
- Consult a qualified electrician if you are unsure about the installation process.
- Use only UL-listed wire connectors.
- Do not exceed the maximum wattage specified for the bulbs.
- Ensure the fixture is securely mounted to a structural element of the ceiling.
- Wear safety glasses and gloves during installation.
3. Package Contents
Carefully unpack your fixture and check that all parts are included. Keep the packaging materials until you are sure all parts are present and the fixture is working correctly.
- Flush Mount Fixture Body (1)
- Mounting Bracket (1)
- Mounting Screws (2)
- Wire Connectors (3)
- Decorative Crystals/Crystal Strands (Pre-assembled or separate, quantity varies)
- Instruction Manual (This document)
Note: Bulbs are typically not included and must be purchased separately. This fixture requires 6 bulbs.
4. Setup and Installation
Before you begin, ensure the power is turned off at the circuit breaker or fuse box.
- Prepare the Mounting Location: Turn off the power to the junction box at the circuit breaker. Ensure the wall switch is in the OFF position.
- Attach Mounting Bracket: Secure the mounting bracket to the junction box using the provided mounting screws. Ensure the bracket is firmly attached and level.
- Wire the Fixture:
- Connect the bare copper ground wire from the fixture to the green or bare copper ground wire from the junction box using a wire connector.
- Connect the white (neutral) wire from the fixture to the white (neutral) wire from the junction box using a wire connector.
- Connect the black (hot) wire from the fixture to the black (hot) wire from the junction box using a wire connector.
- Ensure all connections are secure and no bare wire is exposed.
- Mount the Fixture: Carefully lift the fixture body and align the holes in the fixture canopy with the screws on the mounting bracket. Secure the fixture to the mounting bracket using the decorative nuts or screws provided.
- Install Bulbs: Insert 6 bulbs (not included) into the sockets. Do not exceed the maximum wattage indicated on the fixture or socket.
- Install Crystals (if separate): If the crystals are not pre-assembled, carefully attach them according to the design. Refer to the product image for guidance on crystal placement.
- Restore Power: Once installation is complete, turn the power back on at the circuit breaker.
5. Operating Instructions
The Z-Lite 872CH-RF16 flush mount light is operated by a standard wall switch connected to the circuit. Ensure the correct type and wattage of bulbs are installed for optimal performance and safety.
- Turning On/Off: Use the wall switch connected to the fixture to turn the lights on or off.
- Bulb Replacement: Before replacing bulbs, ensure the power to the fixture is turned off at the circuit breaker. Allow bulbs to cool completely before touching. Replace with bulbs of the same type and wattage as specified by the fixture.
6. Maintenance
Regular maintenance will help preserve the appearance and functionality of your Z-Lite fixture.
- Cleaning:
- Always turn off the power and allow the fixture to cool before cleaning.
- For the chrome finish, wipe with a soft, dry cloth. Do not use abrasive cleaners, polishes, or any cleaning agents containing alcohol, ammonia, or abrasives, as these can damage the finish.
- For the crystals, gently wipe with a soft, damp cloth. A mild glass cleaner can be used sparingly if needed, applied to the cloth first, not directly to the crystals.
- Bulb Care: Replace bulbs promptly when they burn out. Ensure replacement bulbs match the specified type and wattage.
- Periodic Checks: Periodically check all connections and mounting hardware to ensure they remain secure.
7. Troubleshooting
If you experience issues with your fixture, refer to the following common problems and solutions:
| Problem | Possible Cause | Solution |
|---|---|---|
| Light does not turn on. |
|
|
| Lights flicker. |
|
|
| Fixture hums. |
|
|
If the problem persists after trying these solutions, please contact a qualified electrician or Z-Lite customer support.
8. Specifications
| Feature | Detail |
|---|---|
| Model Number | 872CH-RF16 |
| Brand | Z-Lite |
| Light Fixture Form | Chandelier (Flush Mount) |
| Number of Lights | 6 |
| Installation Type | Flush Mount |
| Color | Chrome |
| Material | Steel/Aluminum, Crystal |
| Style | Modern |
| Diameter | 15.75 Inches |
| Item Weight | 5.5 Pounds |
| Power Source | Corded Electric |
| Indoor/Outdoor Usage | Indoor |
| Assembly Required | No (referring to main fixture assembly, crystal attachment may be needed) |
| Certifications | UL |
9. Warranty and Support
The product information indicates "Type of Guarantee: Na." For specific warranty details or customer support, please contact Z-Lite directly through their official website or customer service channels. Keep your purchase receipt as proof of purchase.