1. Introduction
Thank you for choosing the Catiga Cg-503 Digital Stopwatch. This manual provides detailed instructions for the proper use and maintenance of your device. Please read it thoroughly before operating the stopwatch to ensure optimal performance and longevity.
Key Features:
- 1/100 second accuracy
- Lap counter function
- Clock display with 12/24 hour format
- Calendar display (date and day of the week)
- Daily alarm function
- Countdown timer
- Neck strap for convenient carrying
2. Product Overview
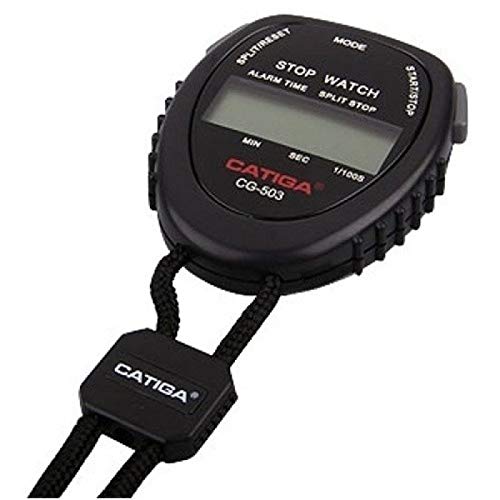
Image 1: Front view of the Catiga Cg-503 Digital Stopwatch, showing the display and control buttons, with the included neck strap.
The Catiga Cg-503 is a compact digital stopwatch designed for various timing needs. It features a clear digital display, multiple function buttons, and a durable casing. A neck strap is included for easy portability during sports or other activities.
Components:
- Display: Shows time, date, stopwatch readings, and countdown.
- Mode Button: Cycles through different modes (Stopwatch, Clock, Alarm, Countdown).
- Start/Stop Button: Initiates and pauses timing functions.
- Reset/Lap Button: Resets the stopwatch or records lap times.
- Set Button: Used for adjusting time, date, alarm, and countdown settings.
- Neck Strap Attachment: For securing the included neck strap.
3. Setup
3.1. Battery Installation
The stopwatch typically comes with a battery pre-installed. If the display is blank or dim, the battery may need replacement. This device uses a standard button cell battery (e.g., CR2032).
- Locate the battery compartment cover on the back of the stopwatch.
- Use a small screwdriver or coin to carefully open the cover.
- Remove the old battery, noting its polarity (+/-).
- Insert a new battery with the correct polarity.
- Securely close the battery compartment cover.
Note: Dispose of used batteries responsibly according to local regulations.
3.2. Initial Time and Date Setting
After battery installation or reset, you may need to set the current time and date.
- Press the Mode button repeatedly until the Clock display is shown.
- Press and hold the Set button until the time digits start flashing.
- Use the Start/Stop button to adjust the flashing digit (hours, minutes, seconds).
- Press the Reset/Lap button to move to the next digit or setting (e.g., 12/24 hour format, year, month, day).
- Repeat steps 3 and 4 until all settings are correct.
- Press the Set button again to exit the setting mode.
4. Operating Instructions
4.1. Stopwatch Mode
This mode is used for timing events with 1/100 second accuracy.
- Press the Mode button until the stopwatch display (00:00:00) appears.
- Press Start/Stop to begin timing.
- Press Start/Stop again to pause the timing.
- To resume, press Start/Stop.
- To record a lap or split time, press Reset/Lap while the stopwatch is running. The lap time will be displayed briefly, and the main timer will continue running.
- To reset the stopwatch to zero, press Start/Stop to pause it, then press Reset/Lap.
4.2. Clock and Calendar Mode
The stopwatch can display the current time and date.
- Press the Mode button until the current time is displayed.
- The display will show hours, minutes, and seconds, along with the day of the week and date.
- To switch between 12-hour and 24-hour format, enter the time setting mode as described in Section 3.2 and adjust the format.
4.3. Alarm Mode
Set a daily alarm to sound at a specific time.
- Press the Mode button until the Alarm display appears (usually indicated by 'AL' or a bell icon).
- Press and hold the Set button until the alarm time digits flash.
- Use the Start/Stop button to adjust the flashing hour digit.
- Press the Reset/Lap button to move to the minute digit, then adjust with Start/Stop.
- Press the Set button to confirm and exit.
- To turn the alarm ON/OFF, press the Start/Stop button while in Alarm mode (not in setting mode). An alarm icon will appear/disappear on the display.
4.4. Countdown Timer
Use the countdown timer for specific intervals.
- Press the Mode button until the Countdown Timer display appears (usually indicated by 'CD' or a down arrow icon).
- Press and hold the Set button until the countdown time digits flash.
- Use the Start/Stop button to adjust the flashing digit (hours, minutes, seconds).
- Press the Reset/Lap button to move to the next digit.
- Press the Set button to confirm and exit the setting mode.
- Press Start/Stop to begin the countdown.
- Press Start/Stop again to pause/resume the countdown.
- When the countdown reaches zero, an alarm will sound. Press any button to stop the alarm.
5. Maintenance
5.1. Cleaning
To clean your stopwatch, wipe it gently with a soft, dry cloth. For stubborn dirt, a slightly damp cloth can be used, followed by a dry cloth. Do not use abrasive cleaners, solvents, or harsh chemicals, as these can damage the casing or display.
5.2. Battery Replacement
When the display becomes dim or unresponsive, it's time to replace the battery. Refer to Section 3.1 for battery installation instructions. Always use the specified battery type.
5.3. Storage
Store the stopwatch in a cool, dry place away from direct sunlight, extreme temperatures, and high humidity. If storing for an extended period, consider removing the battery to prevent leakage.
6. Troubleshooting
| Problem | Possible Cause | Solution |
|---|---|---|
| Display is blank or dim. | Low or dead battery. | Replace the battery (refer to Section 3.1). |
| Buttons are unresponsive. | Battery issue or internal malfunction. | Replace battery. If problem persists, contact support. |
| Incorrect time/date displayed. | Time/date not set correctly. | Reset and set the time/date (refer to Section 3.2). |
| Stopwatch does not start/stop. | Incorrect mode selected. | Ensure the stopwatch is in Stopwatch Mode (refer to Section 4.1). |
7. Specifications
- Model: Cg-503
- Brand: TIGA
- Color: Black
- Size: Standard
- Accuracy: 1/100 second
- Time Format: 12/24 hour selectable
- Functions: Stopwatch, Lap Counter, Clock, Calendar, Daily Alarm, Countdown Timer
- First Available Date: September 14, 2018
- ASIN: B07HCKLG7H
8. Warranty and Support
This product is manufactured by TIGA. For any issues or support inquiries, please refer to the retailer where the product was purchased.
Return and Exchange Policy:
- Returns and exchanges must be made with the original box or packaging.
- The original invoice (all copies) and a completed return reason form (found on the back of the invoice) must accompany the returned product.
- Products with damaged original packaging, or those that have lost their resale value and cannot be sold to another customer, are not eligible for return.
For authenticity verification, you may check the product's barcode on gepir.org.tr.