Little Giant 9JF2V2DA1 (509674)
Little Giant 9JF2V2DA1 Pit Plus JR Sewage Basin System User Manual
Model: 9JF2V2DA1 (509674)
1. Introduction
This manual provides essential information for the safe and efficient installation, operation, and maintenance of your Little Giant 9JF2V2DA1 Pit Plus JR Sewage Basin System. Please read this manual thoroughly before installation and keep it for future reference.
The Pit Plus JR preassembled sewage pump system is an all-in-one solution designed for handling liquid and solid waste materials up to 2 inches. It includes a 4/10 HP submersible sewage/effluent pump, a durable basin, a float switch, and an indoor high water alarm. This system is particularly suited for areas with challenging soil conditions or rocky terrain, as its larger capacity helps extend pump life by reducing pumping cycles.
2. Safety Information
WARNING: Risk of Electric Shock. This pump is supplied with a grounding conductor and grounding-type attachment plug. To reduce the risk of electric shock, be certain that it is connected only to a properly grounded, grounding-type receptacle.
- Always disconnect power before servicing or performing any maintenance on the system.
- Ensure all electrical connections comply with local codes and regulations.
- Do not operate the pump with a damaged cord or plug.
- Do not use this pump for flammable or corrosive liquids.
- Wear appropriate personal protective equipment (PPE) during installation and maintenance.
- Keep children and unauthorized personnel away from the system.
- This system is designed for indoor use.
3. Components and Features
The Little Giant 9JF2V2DA1 Pit Plus JR Sewage Basin System comes pre-assembled and includes the following key components:
- 24"x24" Pit Plus JR Basin/Lid: Features a radial rib design for added strength, 360° molded handle, integrated anti-flotation collar, and recessed discharge and vent locations.
- 9SC-CIM Sewage Pump: A 4/10 HP cast iron submersible sewage/effluent pump with a 2-inch FNPT discharge and a 20-ft. cord.
- Float Switch and Float Tree: A piggy-back mechanical float switch for automatic operation and an alarm float for high water notification.
- Indoor High Water Alarm: Equipped with a red LED warning light, horn with silence switch, and test button. Includes a 9-volt DC battery backup (battery not included).
- Piping: One 13-inch x 2" MNPT discharge pipe with coupling and one 6-inch x 2.38-inch vent pipe.

This image displays the Little Giant Pit Plus JR Sewage Basin System with its lid removed, revealing the internal pump and float switch assembly within the green basin. The black lid is shown above the basin, indicating how the system is assembled.

This image provides a detailed internal view of the Pit Plus JR sewage basin system. Key features are labeled, including the molded inlet hub, 47-gallon capacity, float switch and alarm tree, radial rib design for strength, and anti-torque stops. The blue sewage pump is visible at the bottom of the basin.

This image focuses on the blue 9SC-CIM sewage pump, highlighting its key specifications: a 115-volt, 4/10 hp Permanent Split Capacitor (PSC) motor with thermal overload protection, a 2-inch FNPT discharge, and an epoxy-coated cast iron housing.
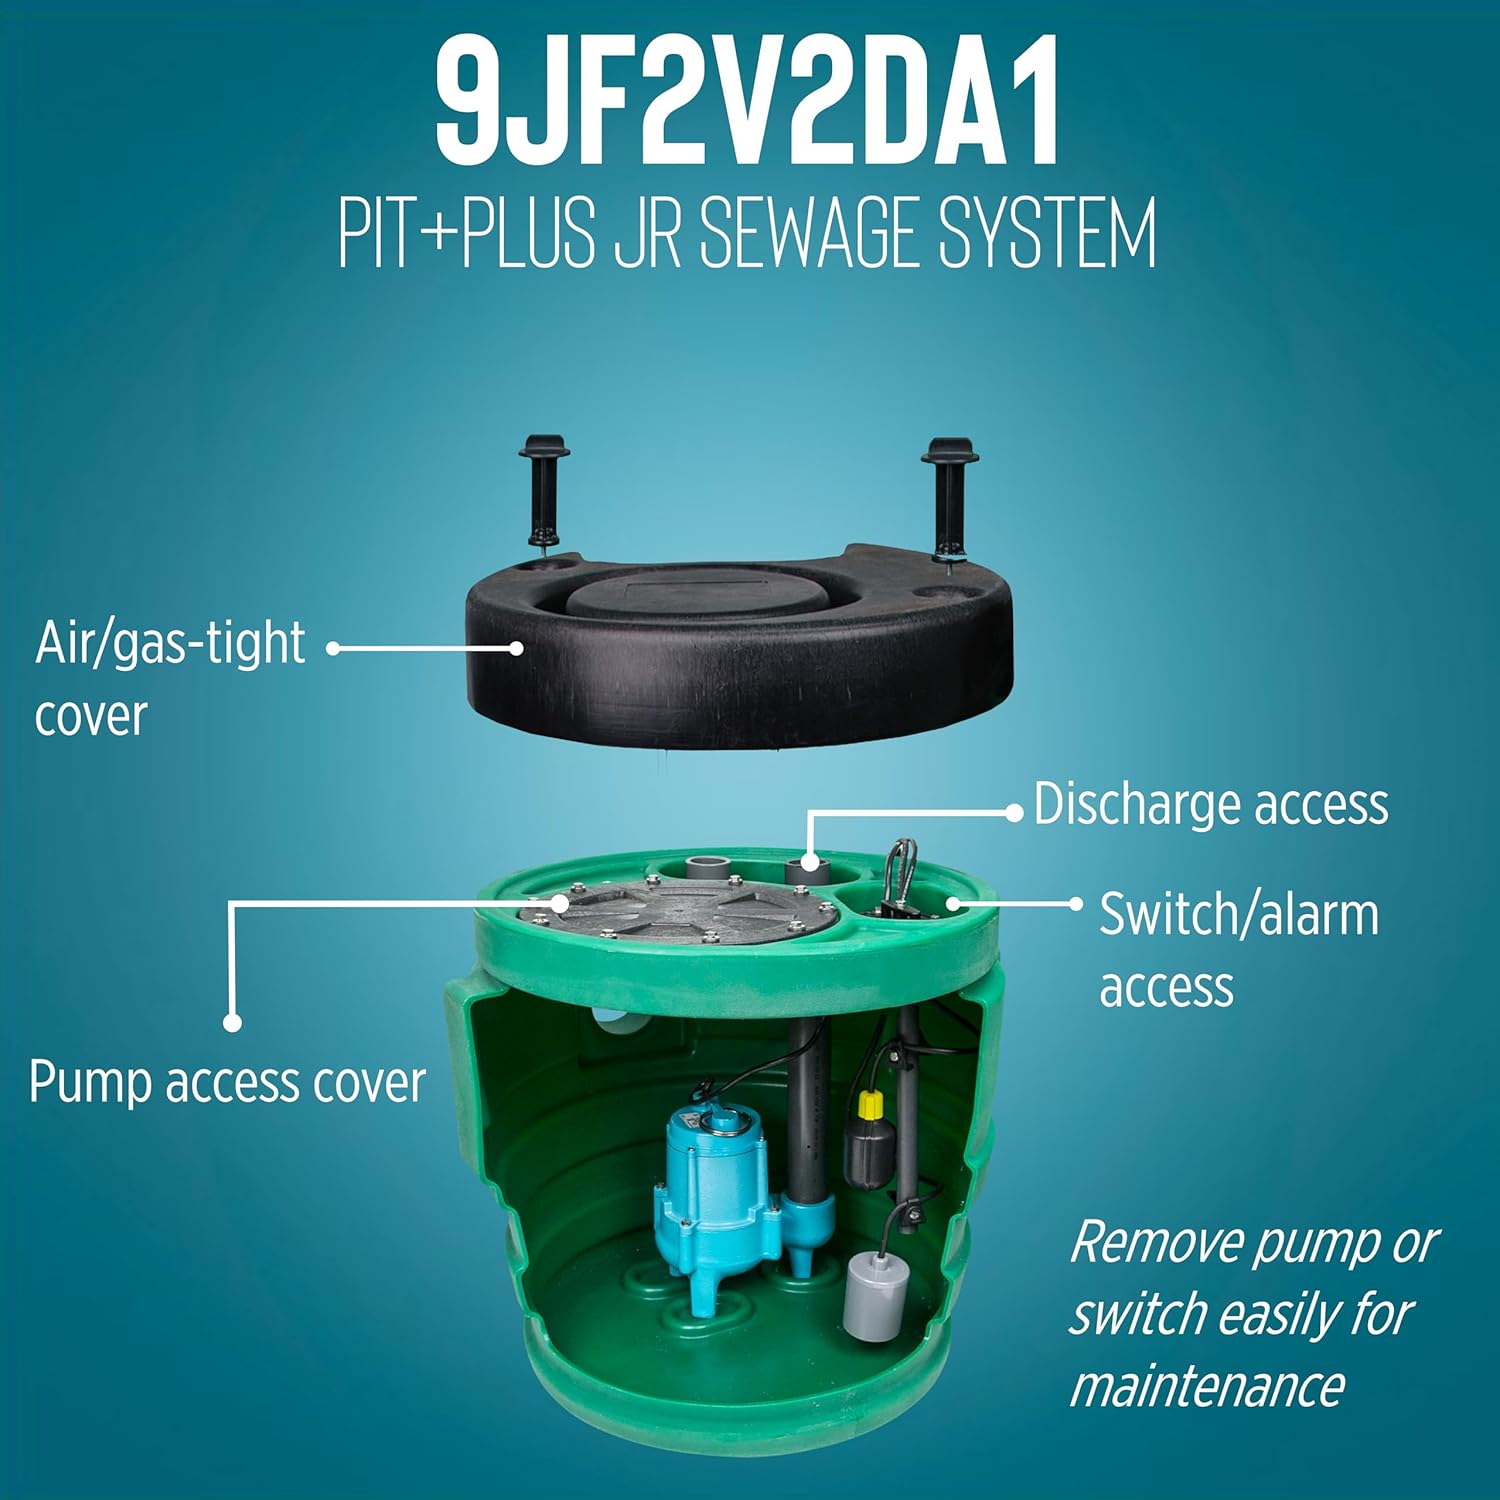
This image shows the Pit Plus JR system with the lid partially lifted, illustrating the air/gas-tight cover and various access points: discharge access, switch/alarm access, and a pump access cover. These features allow for easy removal of the pump or switch for maintenance.

This image details the float tree assembly, showing both the alarm float and the switch float. It specifies the switch float levels: "On" at 9"-14" and "Off" at 2"-6", which control the pump's operation.

This image displays the indoor alarm system unit. Labeled features include its design for indoor use, NEMA 1 thermoplastic enclosure, 115-Volt operation, 9V battery backup (battery not included), LED warning light, horn with silence button, and test button.
4. Specifications
| Attribute | Value |
|---|---|
| Model Number | 509674 (9JF2V2DA1) |
| Product Dimensions | 24"L x 24"W x 26.54"H |
| Item Weight | 69 Pounds |
| Power Source | Corded Electric |
| Voltage | 115 Volts |
| Horsepower (Pump) | 4/10 HP |
| Running Amps | 8 Amps |
| Watts | 870 Watts |
| Maximum Flow Rate | 6000 GPH (100 Gallons Per Minute) |
| Maximum Lifting Height (Shut-off) | 20 Feet |
| Maximum PSI | 8.7 PSI |
| Discharge Size | 2-inch FNPT |
| Cord Length | 20-ft. |
| Material | Cast Iron, Polyethylene |

This image provides a technical drawing with precise dimensions for the 9JF2V2DA1 Pit Plus JR Sewage System. It includes height (26.54" / 674 mm), bottom diameter (22.63" / 575 mm), cover diameter (24.00" / 610 mm), and weight (69 lbs / 31.3 kg), along with an indication of the 4" intake.

This image presents a table summarizing the pump's key specifications (HP, Volts, Amps, Watts, Discharge, Max. Head, Max. Flow, Cord) and a flow/capacity curve. The graph illustrates the pump's total dynamic head in feet and meters versus flow/capacity in US gallons per minute and liters per minute, demonstrating its performance characteristics.
5. Setup and Installation
The Pit Plus JR system is designed for straightforward installation. While it comes pre-assembled, proper site preparation and connection are crucial for optimal performance and safety. It is commonly used for residential basement bathroom installations.

This image shows the Pit Plus JR sewage system positioned in a bathroom setting, illustrating its common application for residential basement bathroom installations.
5.1 Site Preparation
- Ensure the installation area is level and provides adequate space for the basin and access for maintenance.
- Verify that the electrical supply meets the pump's requirements (115V, 60Hz).
- Plan for proper drainage and ventilation according to local plumbing codes.
- The system is designed for indoor use.
5.2 Plumbing Connections
- Connect the inlet pipe from the fixture(s) to the molded inlet hub on the basin.
- Connect the 2-inch discharge pipe to the pump's discharge port and route it to the main sewer line or septic system. A check valve is recommended but not included.
- Connect the 2.38-inch vent pipe to the basin's vent location and route it outdoors or to an approved vent stack.
- Ensure all connections are watertight and sealed properly to prevent leaks and odors.
5.3 Electrical Connections
- The pump comes with a 20-ft. cord and a grounding-type attachment plug.
- Plug the pump into a properly grounded 115V, 60Hz electrical outlet.
- Install the indoor high water alarm in a visible and audible location. Connect its float switch to the alarm unit and place the alarm float within the basin, ensuring it can move freely.
- Ensure the electrical circuit is protected by a Ground Fault Circuit Interrupter (GFCI) for added safety.
6. Operating Instructions
The Little Giant Pit Plus JR Sewage Basin System operates automatically via its float switch. When the liquid level in the basin rises to the "On" level (9"-14"), the pump will activate and begin discharging waste. When the liquid level drops to the "Off" level (2"-6"), the pump will shut off.
- Initial Start-up: After installation, ensure all connections are secure and power is supplied. Allow the basin to fill with water to observe the pump's automatic activation and deactivation cycles.
- High Water Alarm: If the liquid level continues to rise beyond the pump's "On" level, the high water alarm float will activate the indoor alarm. This indicates a potential issue with the pump or discharge line. Silence the alarm using the silence button and investigate the cause.
- Alarm Test: Periodically test the alarm by manually lifting the alarm float or by allowing the basin to fill until the alarm activates. Press the test button on the alarm unit to confirm its functionality.
7. Maintenance
Regular maintenance ensures the longevity and reliable operation of your sewage basin system.
- Monthly Inspection:
- Check the basin for excessive debris accumulation.
- Verify that the float switches move freely and are not obstructed.
- Test the high water alarm.
- Annual Cleaning:
- WARNING: Disconnect power before cleaning.
- Remove the pump access cover and carefully lift the pump out of the basin.
- Clean any accumulated sludge or debris from the pump intake and the bottom of the basin.
- Inspect the pump impeller for blockages.
- Reinstall the pump and ensure all covers are securely fastened.
- Alarm Battery Replacement: Replace the 9-volt battery in the indoor alarm system annually, or as indicated by the alarm unit.
8. Troubleshooting
This section provides solutions to common issues you might encounter with your sewage basin system.
| Problem | Possible Cause | Solution |
|---|---|---|
| Pump does not run | No power; tripped circuit breaker; float switch stuck; pump motor failure. | Check power supply and circuit breaker. Ensure float switch moves freely. Consult a qualified technician if motor failure is suspected. |
| Pump runs continuously | Float switch stuck in "On" position; check valve faulty; discharge line blockage. | Check float switch for obstructions. Inspect and clear discharge line. Check or replace check valve. |
| Pump runs but no water is discharged | Pump intake clogged; discharge line clogged; airlock in pump. | Disconnect power and clear pump intake. Clear discharge line. Remove pump and clear airlock. |
| High water alarm activates | Pump failure; discharge line blockage; float switch malfunction. | Investigate pump operation. Check for discharge line blockages. Verify float switch movement. |
| Alarm does not sound during test | Dead battery; faulty alarm unit. | Replace 9V battery. If still not working, the alarm unit may need replacement. |
9. Warranty and Support
Little Giant products are manufactured to high standards and are backed by a commitment to quality.
9.1 Warranty Information
For items purchased within 30 days, please refer to Amazon's 30-day return policy. For purchases beyond 30 days, if Amazon.com is the seller, your product is covered by the terms outlined in your owner's manual. Please consult your original purchase documentation for specific warranty details.
9.2 Customer Support
For troubleshooting assistance or installation support, please refer to this manual. If further assistance is required, contact Little Giant customer service or the seller directly as indicated on your invoice or order details.
You can also visit the official Little Giant store for more information: Little Giant Store on Amazon
Ask a question about this manual
Ask about setup, troubleshooting, compatibility, parts, safety, or missing instructions. Manuals+ will review the question and use this page’s manual context to help answer it.