1. Introduction
This manual provides detailed instructions for the DollaTek Multifunction Expansion Board, designed to enhance your Arduino UNO R3 projects. This board integrates nine different functions into a single shield, allowing for a wide variety of experiments and learning opportunities without the need for multiple individual modules.
The integrated functions include temperature and humidity sensing, passive buzzing, brightness detection, LM35D temperature sensing, multi-color LED control, infrared reception, and rotary potentiometer input. It is fully compatible with Arduino UNO R3.
2. Product Features
- Integrated Sensors: Includes temperature and humidity sensors, a brightness sensor, and an LM35D temperature sensor.
- Output Modules: Features a passive buzzer, a full-color RGB LED module, a red LED module, and a blue LED module.
- Input Modules: Incorporates an infrared receiver module and a rotary potentiometer module.
- Arduino UNO R3 Compatibility: Designed for seamless integration with Arduino UNO R3 boards.
- Expansion Ports: Reserves expansion ports for further experimentation.
- High-Pin Design: Customized high-pin configuration to prevent short circuits when connected to Arduino.
- Connectivity: Can connect to a computer via a data cable when attached to an Arduino board.

Figure 1: Top view of the DollaTek Multifunction Expansion Board.

Figure 2: Side view of the expansion board, showing the pins for Arduino connection.
3. Setup and Installation
- Compatibility Check: Ensure you are using an Arduino UNO R3 board for optimal compatibility.
- Board Alignment: Carefully align the pins on the underside of the DollaTek Multifunction Expansion Board with the corresponding headers on your Arduino UNO R3 board.
- Secure Connection: Gently but firmly press the expansion board onto the Arduino UNO R3 until all pins are fully seated. Ensure no pins are bent or misaligned during this process. The high-pin design helps prevent short circuits.
- Power and Data: Once connected, you can power your Arduino UNO R3 (with the expansion board attached) via its USB port or external power supply. The Arduino can then be connected to a computer using a data cable for programming and communication.

Figure 3: Illustration of connecting the expansion board to an Arduino UNO R3.
4. Operating the Multifunction Board
The DollaTek Multifunction Expansion Board integrates various components, each accessible through specific Arduino pins. Refer to the labeled diagram below for component identification and their corresponding pin assignments.
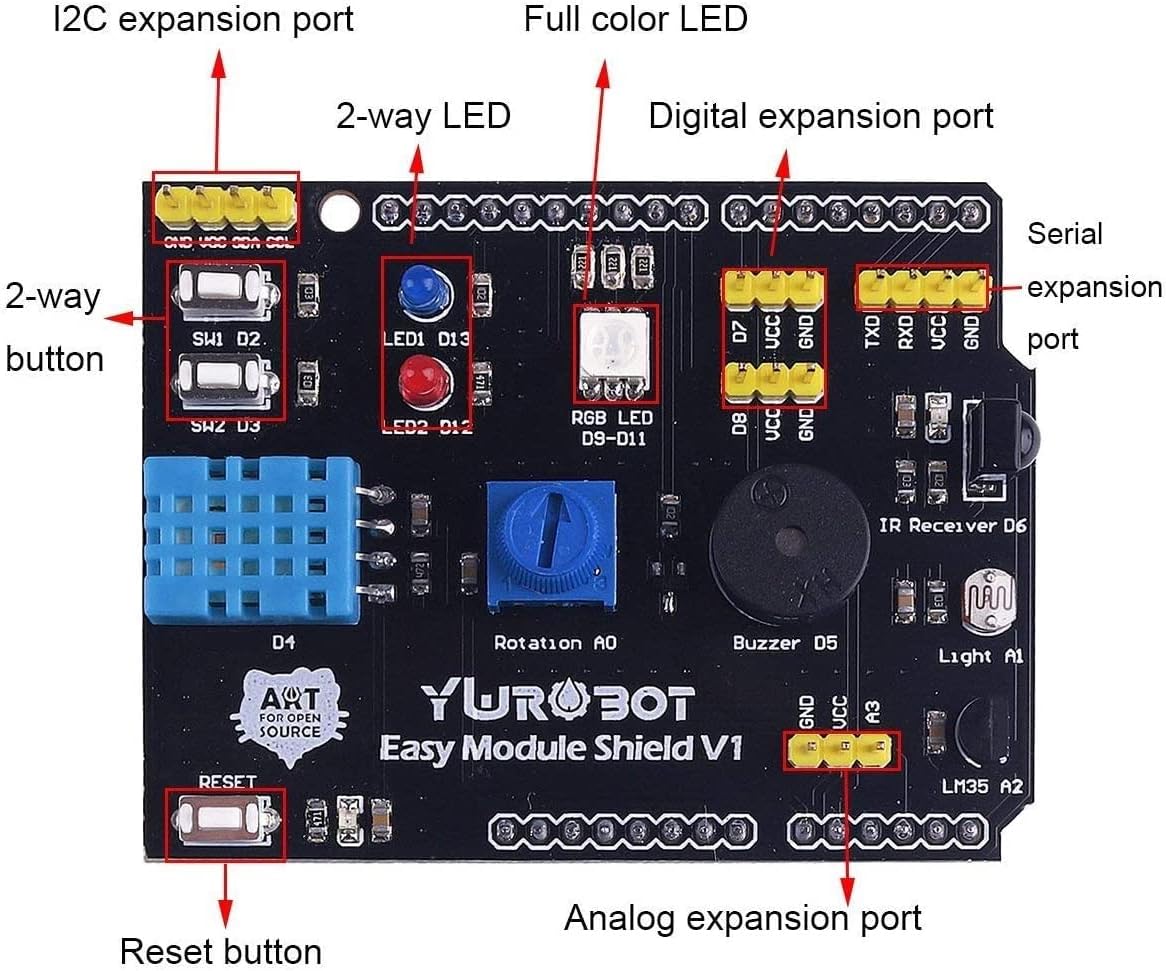
Figure 4: Detailed view of the expansion board with labels for components and expansion ports.
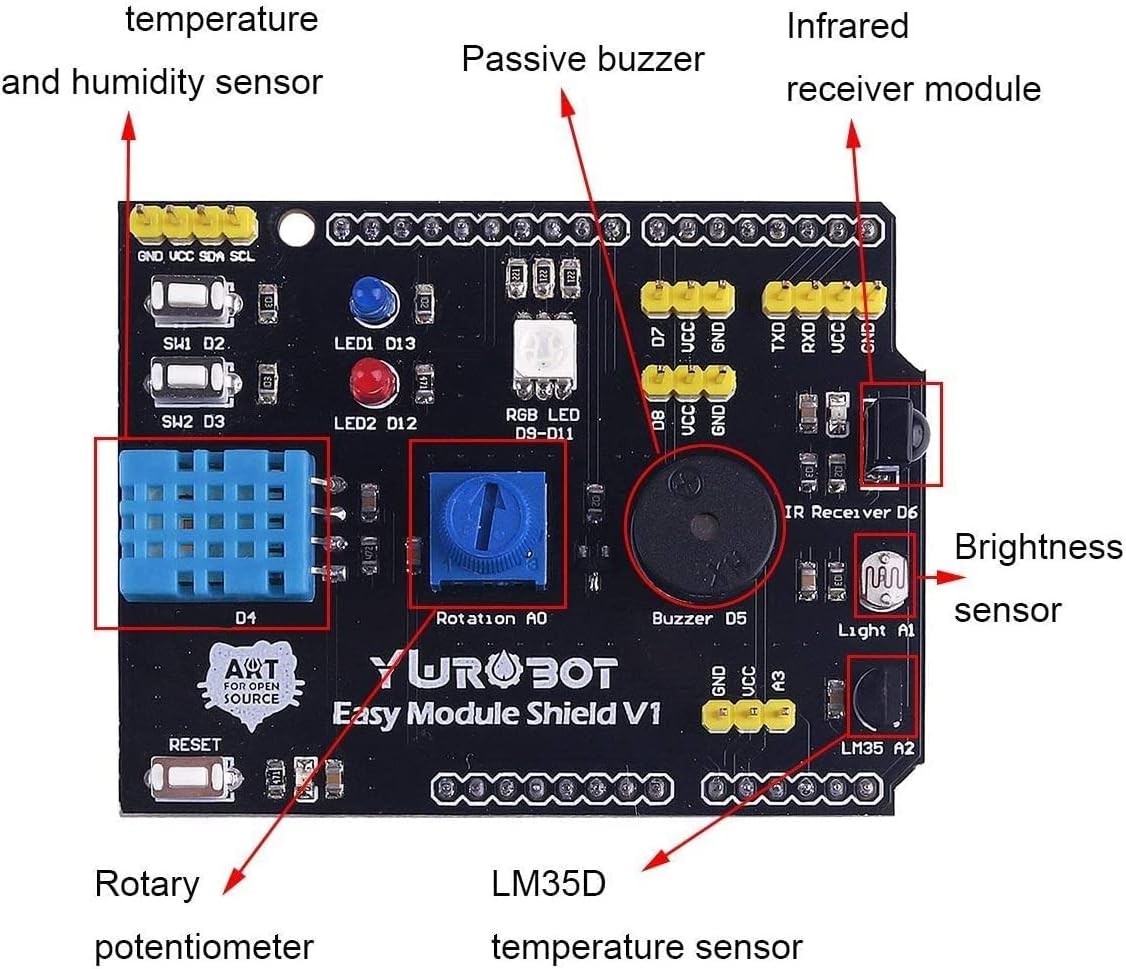
Figure 5: Another detailed view highlighting key sensors and modules on the board.
4.1 Component Overview and Usage
- Temperature and Humidity Sensor (DHT11/DHT22 compatible): Typically connected to a digital pin (e.g., D4). Use appropriate Arduino libraries (e.g., DHT sensor library) to read temperature and humidity values.
- Passive Buzzer: Connected to a digital pin (e.g., D5). Can be used to generate tones and melodies by sending PWM signals.
- Brightness Sensor (Photoresistor): Connected to an analog pin (e.g., A1). Reads ambient light levels by measuring resistance changes.
- LM35D Temperature Sensor: Connected to an analog pin (e.g., A2). Provides analog voltage output proportional to temperature.
- RGB LED Module: Connected to three digital pins (e.g., D9, D10, D11 for Red, Green, Blue). Control individual color intensity using PWM to create various colors.
- Red and Blue LED Modules: Connected to digital pins (e.g., D12, D13). Can be turned on/off or controlled with PWM for brightness.
- Infrared Receiver Module: Connected to a digital pin (e.g., D6). Receives infrared signals from remote controls. Requires an IR remote library.
- Rotary Potentiometer Module: Connected to an analog pin (e.g., A0). Provides variable resistance, useful for input control like volume or speed adjustment.
- 2-way Buttons (SW1, SW2): Connected to digital pins (e.g., D2, D3). Provide digital input for user interaction.
- Reset Button: Resets the Arduino board.
- I2C Expansion Port: For connecting I2C compatible devices.
- Digital Expansion Port: For connecting additional digital components.
- Serial Expansion Port: For serial communication.
- Analog Expansion Port: For connecting additional analog components.
For detailed programming examples and library usage, refer to online Arduino resources and specific component datasheets.
5. Maintenance
To ensure the longevity and proper functioning of your DollaTek Multifunction Expansion Board, follow these maintenance guidelines:
- Handle with Care: Avoid dropping the board or subjecting it to excessive force, which can damage components or bend pins.
- Keep Dry: Protect the board from moisture and liquids. Water can cause short circuits and corrosion.
- Cleanliness: Keep the board free from dust and debris. Use a soft, dry brush or compressed air for cleaning if necessary.
- Storage: Store the board in an anti-static bag when not in use to prevent electrostatic discharge damage.
- Power Off Before Connecting/Disconnecting: Always disconnect power from the Arduino before attaching or removing the expansion board or any other components.
6. Troubleshooting
- Board Not Powering On:
- Ensure the Arduino UNO R3 is properly powered.
- Verify that the expansion board is correctly seated on the Arduino, with all pins making proper contact.
- Check for any bent or broken pins on either the expansion board or the Arduino.
- Component Not Responding:
- Double-check your wiring and pin assignments in your Arduino code.
- Ensure you have included the correct libraries for the specific sensor or module you are trying to use.
- Verify that the component is not physically damaged.
- Intermittent Functionality:
- Loose connections can cause intermittent issues. Re-seat the expansion board and check any external wiring.
- Ensure your power supply is stable and sufficient for all connected components.
- Short Circuit Concerns:
- While the board has a high-pin design to mitigate this, always visually inspect for any accidental contact between pins or components.
- Avoid placing the board on conductive surfaces.
7. Specifications
| Feature | Detail |
|---|---|
| Brand | DollaTek |
| Model Name | Multifunction |
| Compatible Devices | Arduino UNO R3, Personal Computer |
| Operating System Compatibility | Windows, macOS, Linux |
| Connectivity Technology | Infrared, Rotary Potentiometer |
| Wireless Communication Standard | Infrared |
| Total USB Ports | 1 (via Arduino UNO R3) |
| UPC | 742548987404 |
8. Warranty Information
Warranty information for this product is not explicitly provided in the available documentation. Please refer to the retailer or manufacturer's official website for any applicable warranty terms and conditions.
9. Support
For further assistance, technical support, or additional resources, please consider the following:
- Manufacturer's Website: Check the DollaTek official website for product documentation, FAQs, and contact information.
- Online Forums: Arduino community forums and electronics hobbyist websites often provide valuable insights and troubleshooting tips for similar modules.
- Retailer Support: Contact the retailer from whom you purchased the product for return or exchange policies, if applicable.