1. Introduction
This manual provides comprehensive instructions for the safe and effective use of your Maxshine Pro DA Polisher M21 Pro. Please read this manual thoroughly before operating the device to ensure proper function, maximize performance, and prevent injury or damage. Keep this manual for future reference.
2. Safety Instructions
WARNING: Read all safety warnings, instructions, illustrations, and specifications provided with this power tool. Failure to follow all instructions listed below may result in electric shock, fire, and/or serious injury.
2.1 General Power Tool Safety
- Work Area Safety: Keep your work area clean and well-lit. Cluttered or dark areas invite accidents. Do not operate power tools in explosive atmospheres, such as in the presence of flammable liquids, gases, or dust.
- Electrical Safety: Power tool plugs must match the outlet. Never modify the plug in any way. Do not use any adapter plugs with earthed (grounded) power tools. Avoid body contact with earthed or grounded surfaces such as pipes, radiators, ranges, and refrigerators.
- Personal Safety: Always wear eye protection. Use appropriate personal protective equipment such as dust masks, non-skid safety shoes, hard hats, or hearing protection when necessary. Dress properly; do not wear loose clothing or jewelry. Keep hair and clothing away from moving parts.
- Tool Use and Care: Do not force the power tool. Use the correct power tool for your application. Disconnect the plug from the power source before making any adjustments, changing accessories, or storing power tools.
3. Package Contents
Verify that all items listed below are present and in good condition upon opening the package:
- 1x Maxshine Pro DA Polisher M21 Pro
- 1x Tool Bag
- 1x Side Handle
- 1x 6-inch Backing Plate
- 2x Additional Carbon Brushes
- Hardware (e.g., wrench for backing plate, washers)

Image: Maxshine Pro DA Polisher M21 Pro with its box, tool bag, handle, and other accessories.
4. Product Overview
The Maxshine Pro DA Polisher M21 Pro is a powerful dual-action polisher designed for efficient paint correction and detailing. It features a 21mm throw and a 6-inch backing plate for optimized performance on large surfaces.
4.1 Key Components
- Ergonomic Grip: Designed for comfortable handling and reduced fatigue.
- Variable Speed Dial: Allows adjustment of polishing speed (2200-5000 OPM).
- Trigger Lock: For continuous operation without holding the trigger.
- 6-inch Backing Plate: For attaching polishing pads.
- 13-foot Power Cable: Provides extended reach and flexibility.

Image: Close-up of the polisher showing the ergonomic front grip and main body.

Image: View of the backing plate with hook-and-loop surface for attaching pads.

Image: Detailed view of the speed control dial, indicating settings from 1 to 6.
5. Setup
5.1 Attaching the Backing Plate
- Ensure the polisher is unplugged from the power source.
- Align the backing plate with the spindle on the polisher.
- Thread the backing plate onto the spindle clockwise until it is hand-tight.
- Use the provided wrench to securely tighten the backing plate. Do not overtighten.
5.2 Attaching the Side Handle
- Locate the threaded holes on either side of the polisher head.
- Insert the handle's mounting screws into the desired holes.
- Tighten the screws firmly to secure the handle.
5.3 Attaching Polishing Pads
- Ensure the backing plate is clean and free of debris.
- Align the center of the polishing pad with the center of the backing plate.
- Press the pad firmly onto the hook-and-loop surface of the backing plate to ensure a secure attachment.
6. Operating Instructions
6.1 Powering On and Off
- Plug the polisher into a suitable 110V power outlet.
- To start, press the trigger switch.
- For continuous operation, press the trigger switch and then engage the trigger lock button.
- To stop, release the trigger (or disengage the trigger lock and then release the trigger).
6.2 Adjusting Speed
The variable speed dial allows you to select the appropriate OPM (Orbits Per Minute) for your task. Start with a lower speed for spreading product and increase as needed for cutting or polishing. The speed range is 2200-5000 OPM.
6.3 Polishing Techniques
- Apply a small amount of polishing compound or wax directly to the pad.
- Place the pad flat on the vehicle's surface before turning on the polisher.
- Start at a low speed to spread the product evenly over a small section (e.g., 2x2 feet).
- Increase the speed and move the polisher in a slow, overlapping cross-hatch pattern, maintaining even pressure.
- Do not apply excessive pressure; let the tool and product do the work.
- Periodically clean or change pads to maintain effectiveness.

Image: A user demonstrating the polisher in action on a vehicle's hood.
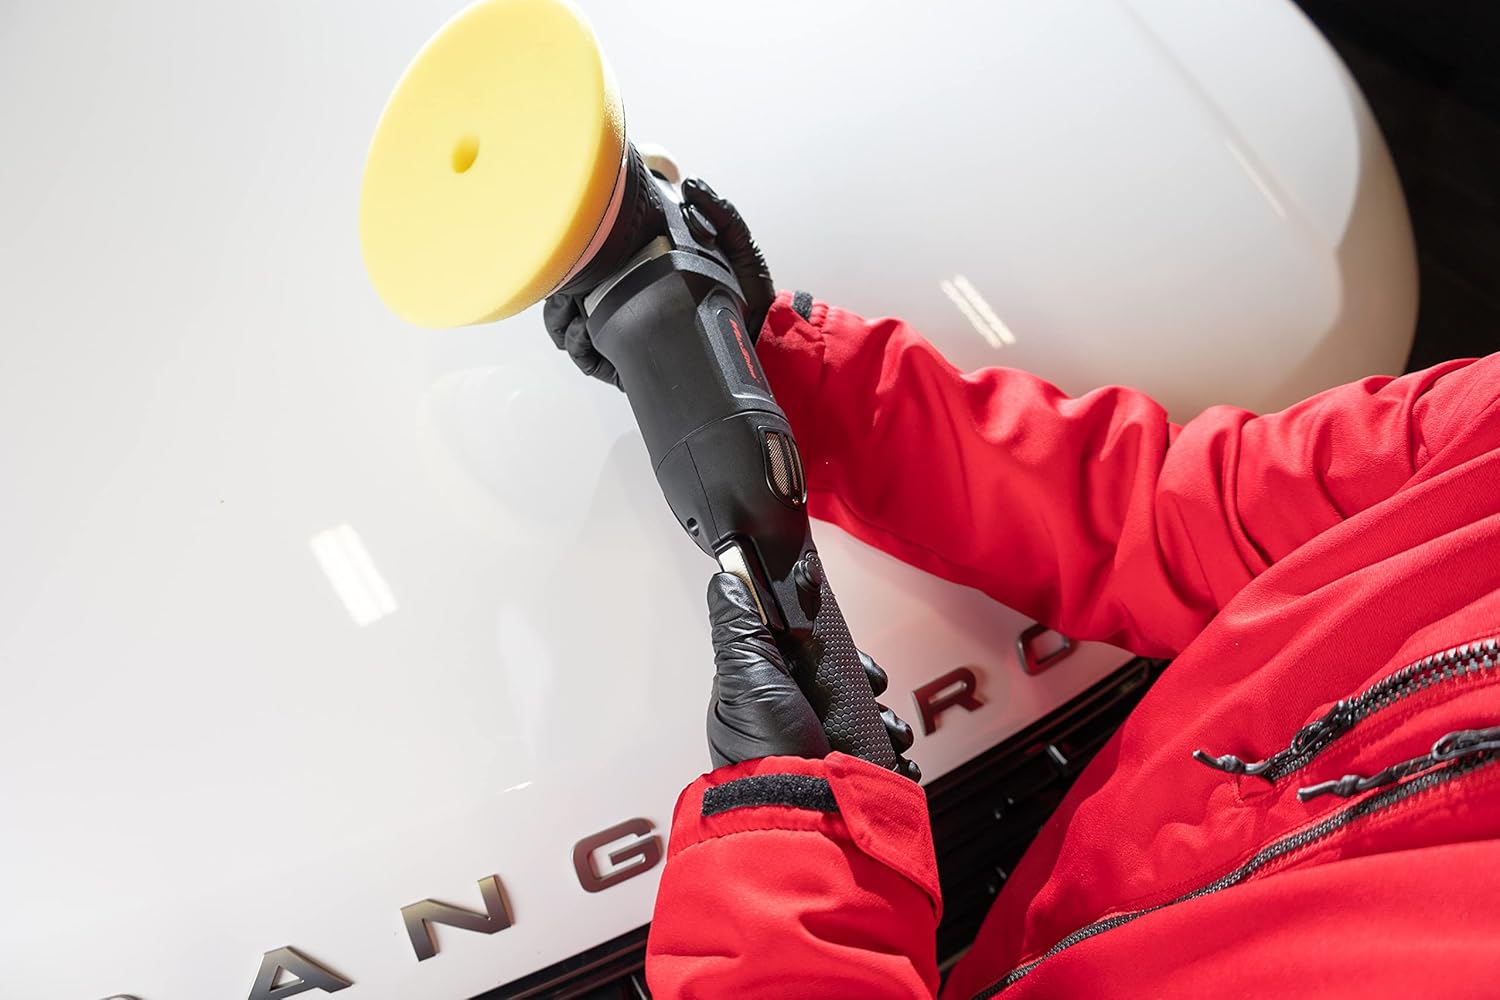
Image: Proper two-hand grip technique while operating the polisher.

Image: The polisher in use, showing the pad making contact with the car's surface.
7. Maintenance
Regular maintenance ensures the longevity and optimal performance of your polisher.
7.1 Cleaning
- Always unplug the polisher before cleaning.
- Wipe down the exterior of the polisher with a clean, damp cloth. Do not use harsh chemicals or solvents.
- Clean the backing plate and remove any residue from polishing pads.
- Ensure ventilation grilles are clear of dust and debris to prevent overheating.
7.2 Carbon Brush Replacement
The carbon brushes are wear items and will need replacement over time. The polisher includes two additional carbon brushes.
- Unplug the polisher.
- Locate the brush caps on the sides of the motor housing.
- Unscrew the brush caps using a flathead screwdriver or the provided tool.
- Remove the old carbon brushes.
- Insert the new carbon brushes, ensuring they are oriented correctly.
- Replace and tighten the brush caps.
7.3 Storage
Store the polisher in a clean, dry place, away from direct sunlight and extreme temperatures. Use the provided tool bag for protection during storage and transport.
8. Troubleshooting
| Problem | Possible Cause | Solution |
|---|---|---|
| Polisher does not start | No power supply; faulty power cord; worn carbon brushes. | Check power outlet and cord. Replace carbon brushes if worn. |
| Excessive vibration | Loose backing plate; unbalanced pad; internal lubrication issue. | Ensure backing plate is tight. Check pad for damage or unevenness. Consider professional service for internal issues. |
| Pad stops spinning (stalling) | Too much pressure applied; incorrect pad for task; backing plate contact with shroud. | Reduce pressure. Use appropriate pad. Check for backing plate clearance; a washer modification may be needed if contact occurs. |
| Overheating | Blocked ventilation; continuous heavy use; worn internal components. | Clean ventilation grilles. Allow tool to cool. Avoid prolonged heavy use. |
9. Specifications
| Feature | Detail |
|---|---|
| Model | M21 Pro |
| Power Source | Corded Electric |
| Voltage | 110 Volts |
| Maximum Power | 1000 Watts |
| Speed (OPM) | 2200-5000 OPM |
| Throw | 21mm |
| Backing Plate Size | 6 inches |
| Item Weight | 5.06 pounds (2.3 Kilograms) |
| Product Dimensions | 18.3 x 6.1 x 6.1 inches |
| Material | Rubber, Steel |
| UPC | 614070283555 |
10. Warranty & Support
10.1 Manufacturer Warranty
The Maxshine Pro DA Polisher M21 Pro is covered by a manufacturer's warranty. Please refer to the warranty card included in your product packaging for specific terms, conditions, and duration of coverage. Keep your proof of purchase for warranty claims.
10.2 Customer Support
For technical assistance, troubleshooting beyond this manual, or warranty inquiries, please contact Maxshine customer support. Contact information can typically be found on the official Maxshine website or on your product packaging.
Note: Do not attempt to repair the polisher yourself if it is under warranty, as this may void the warranty.