1. Introduction
This manual provides instructions for the setup, operation, and maintenance of your TechKen Wireless Controller. This controller is designed for use with all versions of the Nintendo Switch and Nintendo Switch Lite consoles, offering an enhanced gaming experience with features like Gyro axis and dual motor vibration. Please read this manual thoroughly before using the product.
2. Key Features
- Wide Compatibility: Fully compatible with Nintendo Switch and Switch Lite consoles.
- Advanced Motion Control: Equipped with Gyro axis function for precise motion sensing.
- Immersive Vibration: Features dual motors for enhanced vibration feedback.
- Ergonomic Design: Lightweight and comfortable for extended gaming sessions.
- Long Battery Life: Built-in rechargeable Lithium Metal battery provides extended playtime.
- LED Indicators: Integrated LEDs display pairing status, low power, sync status, and charging.
- Bluetooth 3.0 Connectivity: Ensures stable wireless connection to your console.

Image: The controller supports Gyro axis function and dual motor vibration, indicated by icons for Wi-Fi signal, vibration motor, and battery level.
3. Package Contents
- 1 x TechKen Wireless Controller
- 1 x USB-C Charging Cable
- 1 x User Manual (This document)

Image: The TechKen Wireless Controller shown with its retail box.
4. Setup and Connection
Follow these steps to connect your TechKen Wireless Controller to your Nintendo Switch or Switch Lite console:
- Turn on your console: Ensure your Nintendo Switch or Switch Lite console is powered on.
- Access Controller Settings: From the HOME Menu, select "Controllers" (the controller icon), then select "Change Grip/Order".
- Pair the Controller: On the TechKen Wireless Controller, press and hold the "Home" button (house icon) for 4 seconds. The LED indicators on the controller will begin to flash.
- Confirm Connection: Once the console detects the controller, press the L1 and R1 buttons simultaneously on the controller to finalize the connection. The player indicator LEDs on the controller will light up solid when successfully connected.
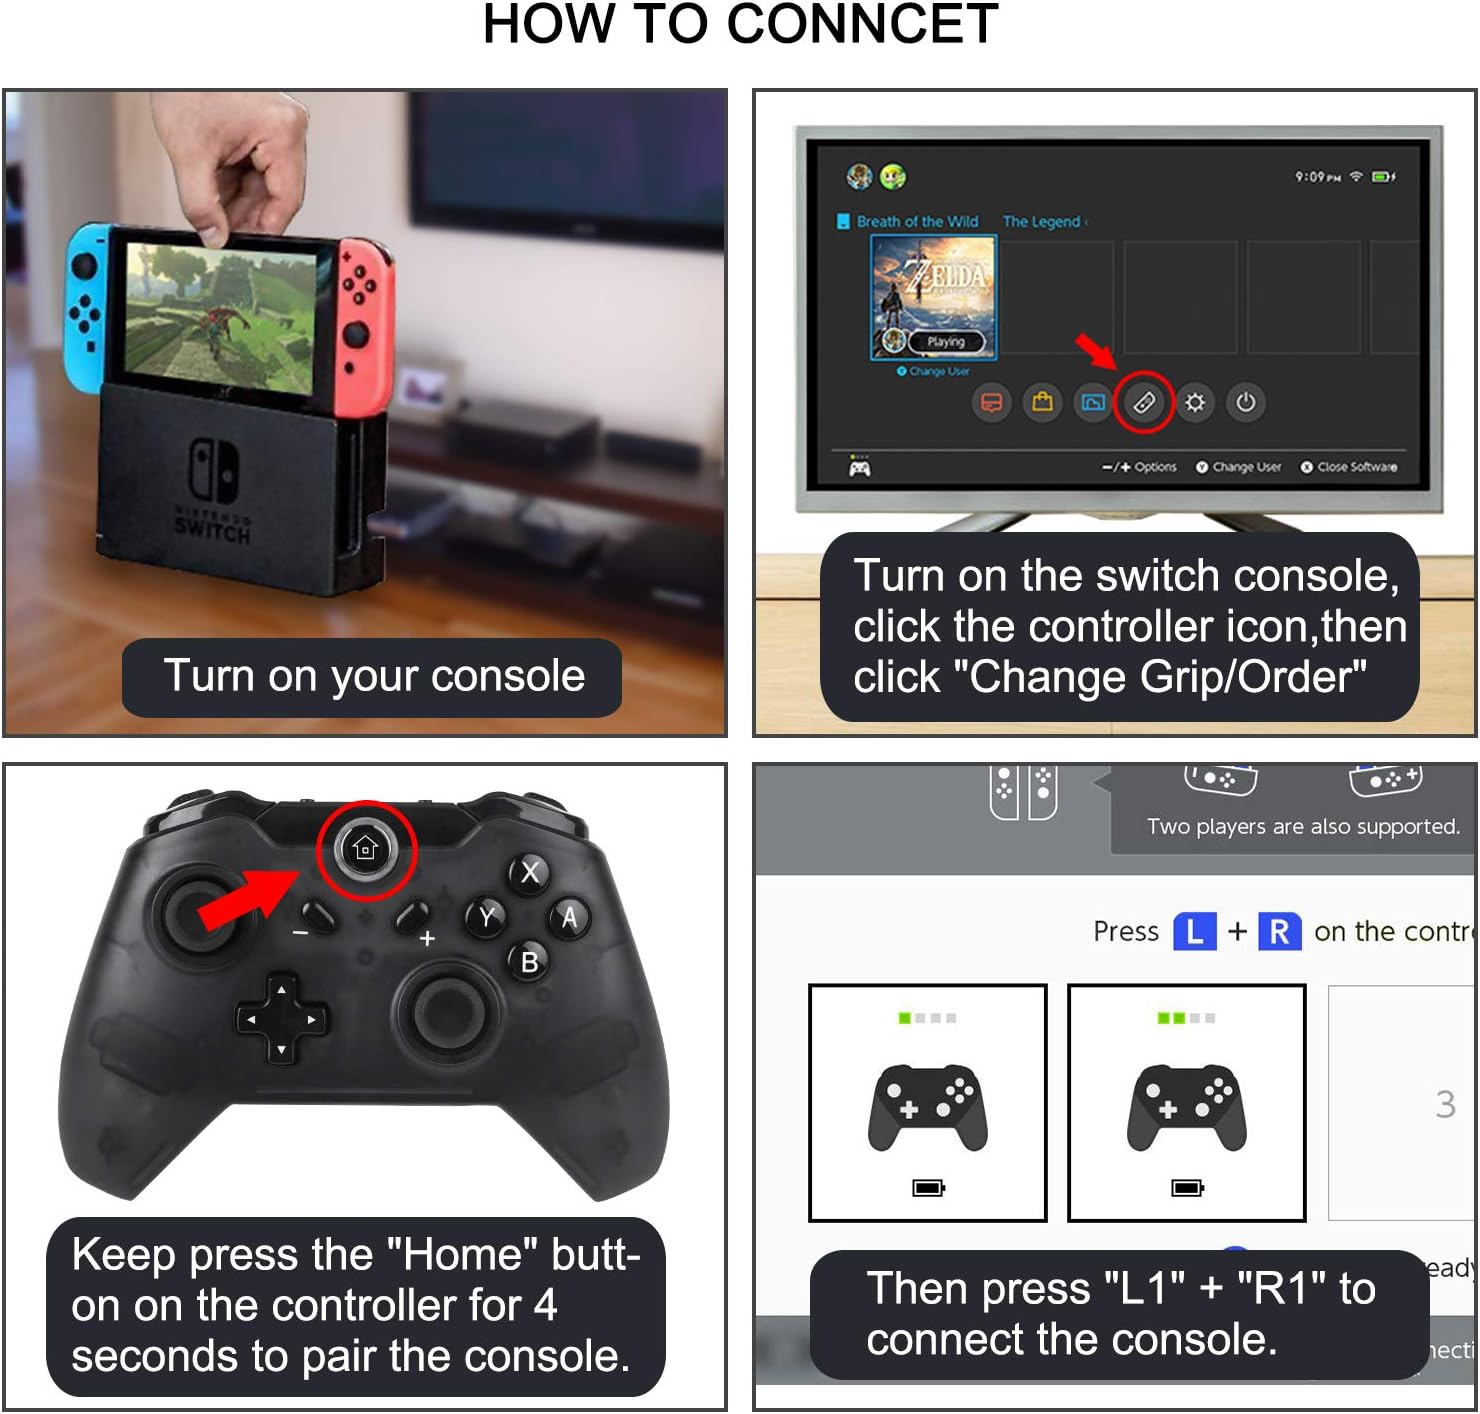
Image: Visual guide for connecting the TechKen Wireless Controller to a Nintendo Switch console.
The controller utilizes Bluetooth 3.0 for a stable wireless connection. Up to four wireless Pro controllers can be connected simultaneously to the console.

Image: A user playing a game with the TechKen Wireless Controller connected via Bluetooth 3.0 to a Nintendo Switch console displayed on a television.
5. Operating Instructions
5.1 Button Layout and Functions
The TechKen Wireless Controller features a standard button layout similar to the original Nintendo Switch Pro Controller, ensuring familiarity and ease of use.

Image: Detailed views of the controller's buttons, including the Home button, face buttons (A, B, X, Y), and analog stick texture.
5.2 Charging the Controller
Connect the supplied USB-C charging cable to the controller's USB-C port and the other end to a USB power source (e.g., Nintendo Switch dock, USB wall adapter, computer USB port). The LED indicators will show the charging status. A full charge provides extended gameplay.
5.3 LED Indicators
The built-in LEDs on the controller provide visual feedback for various states:
- Pairing: Flashing LEDs during the pairing process.
- Connected: Solid LEDs indicating player number.
- Low Power: Specific LED pattern to indicate low battery.
- Charging: LEDs indicating charging status.
6. Maintenance
To ensure the longevity and optimal performance of your TechKen Wireless Controller, follow these maintenance guidelines:
- Cleaning: Use a soft, dry cloth to clean the controller. Avoid using harsh chemicals or abrasive materials.
- Storage: Store the controller in a cool, dry place away from direct sunlight and extreme temperatures.
- Handling: Avoid dropping the controller or subjecting it to strong impacts.
- Liquid Exposure: Keep the controller away from liquids to prevent internal damage.
7. Troubleshooting
7.1 Connection Issues
If the controller fails to connect or maintain a stable connection:
- Ensure the console is updated to the latest system software.
- Ensure the controller is fully charged.
- Try re-pairing the controller by following the "Setup and Connection" steps.
- If connection issues persist, consider updating the controller's firmware if an update is available.
7.2 Analog Stick Calibration
If you experience issues with analog stick responsiveness or drift, you may need to calibrate them through the Nintendo Switch system settings. Navigate to System Settings > Controllers and Sensors > Calibrate Control Sticks. Follow the on-screen instructions.
7.3 Controller Reset
The controller features a small reset button, typically located on the back or bottom. Use a small, pointed object (like a paperclip) to press this button to perform a hard reset if the controller becomes unresponsive.
8. Specifications
| Brand | TechKen |
| Model | Wireless Controller |
| Compatibility | Nintendo Switch, Nintendo Switch Lite |
| Connectivity | Bluetooth 3.0 |
| Features | Gyro Axis, Dual Motor Vibration (No NFC) |
| Battery Type | 1 Lithium Metal battery (included) |
| Item Weight | 10.4 ounces |
| Package Dimensions | 6.2 x 4.8 x 2.6 inches |

Image: Dimensions of the TechKen Wireless Controller.
9. Warranty and Support
The TechKen Wireless Controller typically comes with a 1-year warranty. For warranty claims, technical support, or any product-related inquiries, please contact TechKen customer service. Refer to the product packaging or the official TechKen website for contact information.