PMC Supplies LLC FUR-0155
TableTop USA Hi-Temp 2200 Degree Electric Burnout Oven Kiln
Model: FUR-0155 | Brand: PMC Supplies LLC
1. Introduction and Product Overview
This manual provides essential information for the safe and effective operation, setup, and maintenance of your TableTop USA Hi-Temp 2200 Degree Electric Burnout Oven Kiln. Designed for precision and durability, this kiln is ideal for a wide variety of high-temperature applications, including jewelry making, dental casting, and burnout processes for wax, 3D resin, and PLA.
Your kiln features a maximum working temperature of 2200°F (1205°C) and is equipped with a programmable controller for precise temperature management. It includes a pre-drilled vent hole on the top and a high-temperature thermocouple for accurate readings. This product is proudly Made in the U.S.A.

Front view of the TableTop USA Hi-Temp Electric Burnout Oven Kiln with the door open, showcasing the insulated interior chamber and the digital control panel at the base.
2. Safety Information
WARNING: HIGH TEMPERATURES. SERIOUS INJURY OR PROPERTY DAMAGE MAY RESULT IF NOT HANDLED PROPERLY.
- Always operate the kiln in a well-ventilated area to dissipate fumes and gases produced during burnout.
- Do not touch the kiln surfaces during or immediately after operation. Surfaces will be extremely hot and can cause severe burns. Use appropriate heat-resistant gloves.
- Ensure the kiln is placed on a stable, non-combustible, heat-resistant surface. Maintain adequate clearance from walls and other objects.
- Never leave the kiln unattended during operation.
- Ensure the power supply matches the kiln's electrical requirements (120V, 1500 Watts). Do not overload electrical circuits.
- Keep children and pets away from the operating kiln.
- Do not place flammable materials near the kiln.
- Always unplug the kiln from the power outlet before cleaning or performing any maintenance.
3. Setup and Initial Preparation
3.1 Unpacking
Carefully remove the kiln from its packaging. Inspect for any signs of damage during transit. Retain packaging for future transport or storage.
3.2 Placement
Place the kiln on a sturdy, level, and heat-resistant surface. Ensure there is ample space around the kiln for air circulation and to prevent heat transfer to adjacent surfaces. The area must be well-ventilated.

Side profile of the TableTop USA Electric Burnout Oven Kiln, highlighting its compact stainless steel construction and the manufacturer's warning label.
3.3 Electrical Connection
Connect the kiln's power cord to a grounded electrical outlet. Verify that the outlet provides 120V and can support the kiln's 1500-watt power consumption.
3.4 Initial Burn-In (Conditioning)
Before first use with materials, it is recommended to perform an initial burn-in cycle to cure internal components and burn off any manufacturing residues. Consult the manufacturer's specific instructions for the recommended burn-in temperature and duration. Typically, this involves running the kiln empty at a moderate temperature for a few hours.
4. Operating Instructions
4.1 Powering On/Off
Locate the main power switch on the front panel of the kiln. Flip the switch to the 'ON' position to power on the unit. The digital controller display will illuminate. To power off, flip the switch to the 'OFF' position.
4.2 Understanding the Programmable Controller
The kiln is equipped with a programmable PID controller, allowing for precise control over temperature ramps, holds, and soak times. Detailed programming instructions are typically provided by the manufacturer in a separate controller-specific manual or online resources. Familiarize yourself with the controller's interface and programming logic before attempting complex cycles.

An illustrative diagram detailing key features of the TableTop Furnace Company kiln, including its compact design, spacious interior chamber, embedded heating element, safety door latch, on/off power switch, and programmable PID controller.
4.3 Loading the Kiln
The interior chamber of the kiln is designed to accommodate 3" x 5" flasks or smaller. Ensure the flask is properly positioned and stable within the chamber. Do not overfill the kiln or place objects directly against the heating elements.
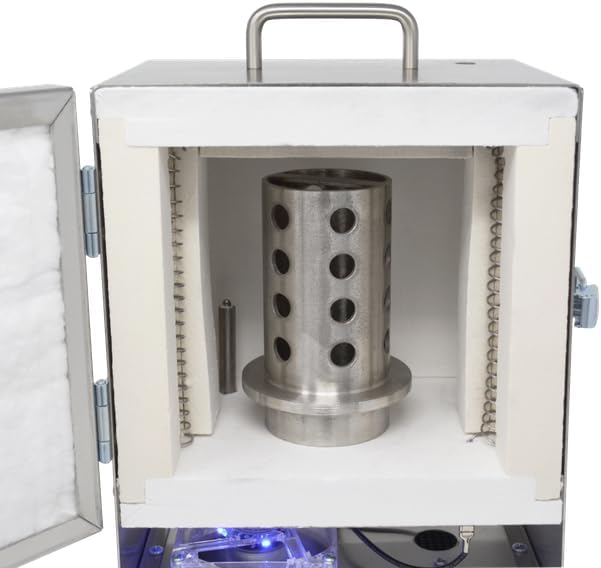
Close-up view of the kiln's interior, demonstrating how a perforated flask fits within the chamber for burnout processes.

Detailed view of the interior heating elements lining the walls of the kiln chamber, responsible for achieving high temperatures.
4.4 Burnout Process
- Program Cycle: Input your desired temperature program into the controller based on the material being burned out (e.g., wax, resin, PLA).
- Start Cycle: Initiate the program. The kiln will begin to heat up according to the programmed ramp rates.
- Monitor: Observe the temperature display. The high-temperature thermocouple ensures accurate readings.
- Ventilation: Ensure the pre-drilled vent hole on top is clear to allow for proper gas escape during the burnout process.
- Cool-Down: Once the cycle is complete, allow the kiln to cool down naturally. Do not open the door prematurely, as rapid temperature changes can damage the kiln or the contents.

Top-down view of the kiln, featuring the sturdy carrying handle and the pre-drilled vent hole for gas escape during operation.

A close-up image of the high-temperature thermocouple, an essential component for accurate temperature monitoring within the kiln chamber.
5. Maintenance
Regular maintenance ensures the longevity and optimal performance of your kiln.
- Cleaning: After the kiln has completely cooled, gently wipe down the exterior with a dry cloth. For the interior, use a soft brush or vacuum to remove any debris or ash. Do not use abrasive cleaners or liquids inside the chamber.
- Heating Elements: Periodically inspect the heating elements for any signs of damage, such as cracks or deformation. Damaged elements should be replaced by a qualified technician.
- Thermocouple: Check the thermocouple for physical damage or signs of wear. A faulty thermocouple can lead to inaccurate temperature readings.
- Door Seal: Ensure the door seal is intact and provides a tight closure to prevent heat loss.
- Storage: When not in use for extended periods, store the kiln in a dry, dust-free environment.
6. Troubleshooting
This section addresses common issues you might encounter with your kiln.
| Problem | Possible Cause | Solution |
|---|---|---|
| Kiln does not power on | No power to outlet; Power switch off; Blown fuse/tripped breaker | Check power outlet; Ensure power switch is ON; Reset breaker/check fuse |
| Kiln not heating or heating slowly | Incorrect program setting; Damaged heating element; Faulty thermocouple; Loose wiring | Verify program; Inspect elements (unplugged); Contact support for element/thermocouple replacement or wiring check |
| Error message on controller | Sensor error (thermocouple); Wiring issue; Controller malfunction | Check thermocouple connection; Refer to controller manual for specific error codes; Contact support |
| Excessive smoke/fumes | Improper ventilation; Material burning too quickly | Ensure adequate ventilation; Adjust program ramp rates if possible |
For issues not listed or if troubleshooting steps do not resolve the problem, please contact PMC Supplies LLC customer support.
7. Specifications
- Brand: PMC Supplies LLC
- Model Number: FUR-0155
- Maximum Working Temperature: 2200°F (1205°C)
- Power: 1500 Watts
- Voltage: 120V
- Fuel Type: Electric
- Material: Steel
- Product Dimensions: 8 x 8 x 13 inches (approximate exterior)
- Interior Chamber: Accommodates 3" x 5" flasks or smaller
- Item Weight: 15 pounds
- Special Features: Programmable Controller, High-Temperature Thermocouple, Pre-drilled Vent Hole
8. Warranty and Support
For information regarding product warranty, please refer to the documentation included with your purchase or contact PMC Supplies LLC directly. Warranty terms and conditions may vary.
For technical support, parts, or service inquiries, please contact PMC Supplies LLC customer service. Provide your model number (FUR-0155) and a detailed description of your issue for efficient assistance.
PMC Supplies LLC Contact Information: Please refer to the contact details provided on the official PMC Supplies LLC website or your purchase invoice.
Ask a question about this manual
Ask about setup, troubleshooting, compatibility, parts, safety, or missing instructions. Manuals+ will review the question and use this page’s manual context to help answer it.