ANJOSHI 2KCSK01S
ANJOSHI Quick Release Latch Lock Kit User Manual
Model: 2KCSK01S
Introduction
This manual provides comprehensive instructions for the installation, operation, and maintenance of your ANJOSHI Quick Release Latch Lock Kit. Designed for universal application, these push-button latches are ideal for securing various panels on automotive vehicles, custom furniture, and industrial applications. Please read this manual thoroughly before installation and use to ensure proper function and safety.
Safety Information
Important: The Mini Latches are designed to withstand pulling forces of up to 150 lbs. For extremely large panels or applications subject to significant force, consider increasing the number of latches or selecting a larger size latch to ensure adequate security and prevent premature wear. Uneven force distribution can affect the lifespan of the mini latch.
Drilling holes is required for proper installation. Ensure the installation location is suitable and that the product dimensions match your application requirements before proceeding.
Product Overview and Components
The ANJOSHI Quick Release Latch Lock Kit consists of durable aluminum alloy and stainless steel components, engineered for reliable performance.

Figure 1: Assembled Quick Release Latch Lock Kit (Pair)
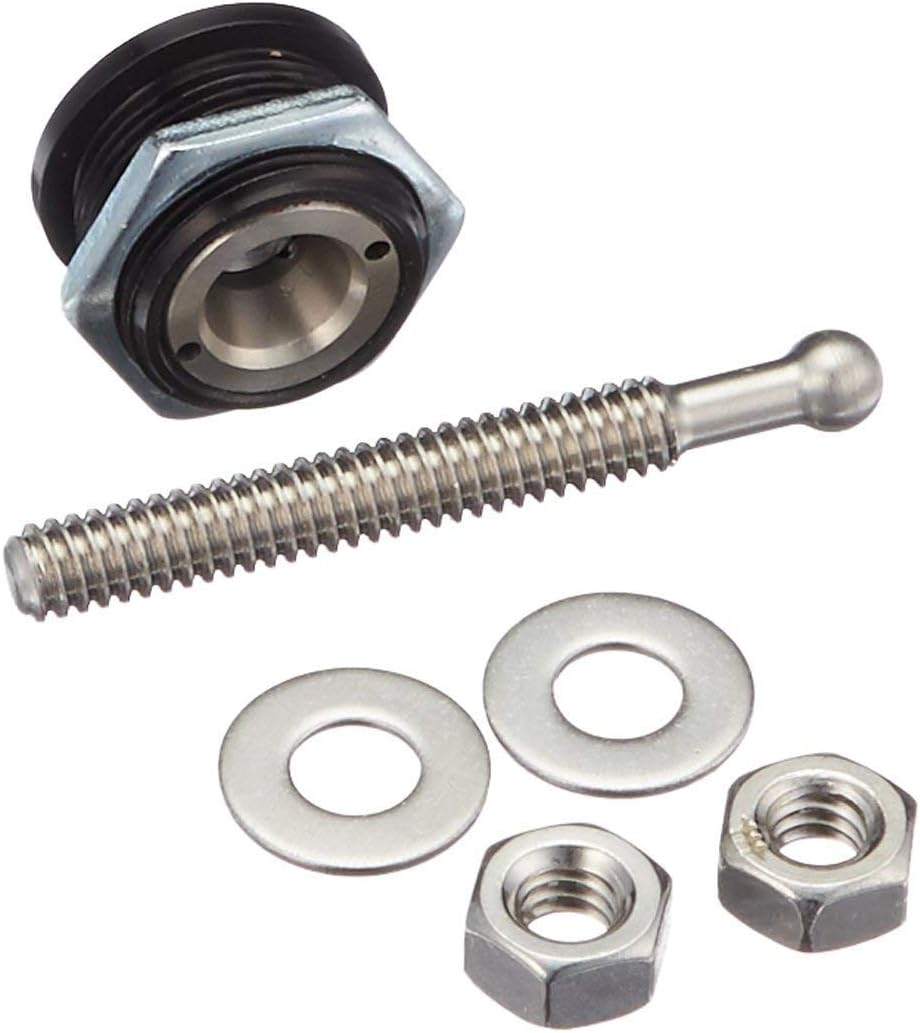
Figure 2: Individual Components of the Latch Kit
Package Contents:
- 2 x Push button quick release latch kit (each kit includes: latch body, threaded stud, washers, and nuts)
Specifications
| Material | Aluminum alloy and stainless steel |
| Color | Black |
| Outer Diameter | 1.25 inches (31.75 mm) |
| Mounting Stud Length | 2.17 inches (53 mm) |
| Pulling Force Withstand | Up to 150 lbs |
| Item Weight | 0.529 ounces (per latch) |
| Model Number | 2KCSK01S |
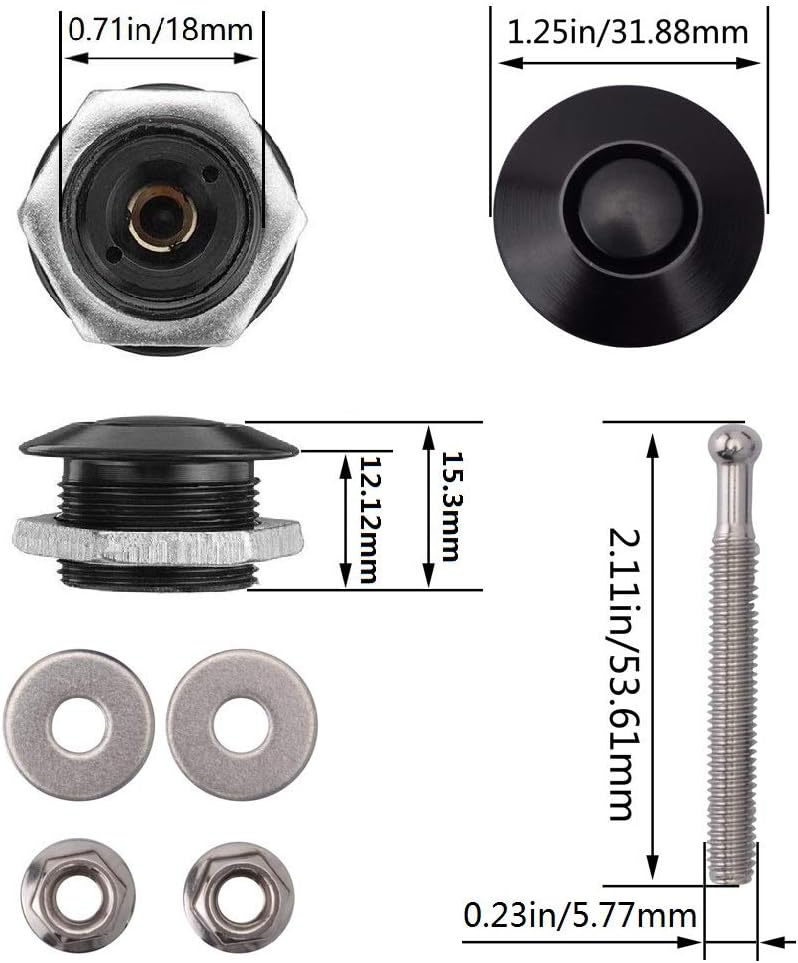
Figure 3: Product Dimensions
Installation
Note: Professional installation is highly recommended. This kit requires drilling holes to properly fit the pins to the structure. Ensure the installation location is clear of wires, hoses, or other critical components before drilling.
- Prepare the Installation Area: Identify the desired location for the latch. Ensure the surface is clean and free from obstructions. For automotive applications, this may involve removing bumper covers or accessing the hood support structure.
- Mark Drilling Points: Carefully mark the precise location where the threaded stud will pass through the panel. Use the latch components to verify alignment.
- Drill Holes: Using an appropriate drill bit size for the threaded stud, carefully drill the marked holes. Start with a smaller pilot hole and gradually increase the size if necessary to ensure a clean fit.
- Install the Latch Body: Insert the main latch body into the prepared hole. Secure it from the backside using the provided nut and washer. Ensure it is tightened securely but do not overtighten.
- Install the Threaded Stud: Thread the stud into its mounting location. This may involve securing it to a frame, bumper, or hood support. Adjust the length of the stud as needed to ensure proper engagement with the latch body when closed.
- Test Engagement: With both parts installed, test the latch mechanism. The push button should allow for smooth release, and the latch should hold securely when engaged. Adjust the stud length if the latch is too loose or too tight.

Figure 4: Installation Steps Overview

Figure 5: Examples of Latch Applications
Operating Instructions
The ANJOSHI Quick Release Latch operates with a simple push-button mechanism.
- To Lock: Align the threaded stud with the latch body and push the panel firmly until the latch clicks into place, securing the panel.
- To Unlock/Release: Press the center button on the latch body. This will release the threaded stud, allowing the panel to be opened.

Figure 6: Push Button Operation
Maintenance
To ensure the longevity and optimal performance of your quick release latches, follow these maintenance guidelines:
- Regular Cleaning: Periodically clean the latch bodies and studs with a soft cloth and mild cleaner to remove dirt, dust, and debris. Avoid abrasive cleaners.
- Lubrication: Apply a small amount of silicone-based lubricant to the moving parts of the latch mechanism and the threaded stud occasionally to ensure smooth operation and prevent corrosion, especially in harsh environments.
- Inspection: Regularly inspect the latches for any signs of wear, damage, or corrosion. Check that all nuts and washers are securely tightened. If any component appears damaged or excessively worn, consider replacement.
- Avoid Over-tightening: When installing or re-tightening, avoid overtightening nuts, as this can strip threads or damage components.
Troubleshooting
| Problem | Possible Cause | Solution |
|---|---|---|
| Latch does not engage securely. | Stud length is too short; misalignment; debris in mechanism. | Adjust stud length to be longer; realign components; clean the latch mechanism. |
| Latch is difficult to release. | Stud length is too long; lack of lubrication; internal corrosion. | Adjust stud length to be shorter; apply lubricant; clean internal mechanism. |
| Visible rust or corrosion. | Exposure to harsh elements; lack of maintenance. | Clean affected areas and apply rust inhibitor or protective coating. Consider replacement if severe. |
| Panel vibrates or rattles. | Insufficient number of latches; loose installation. | Consider adding more latches for larger panels; ensure all components are securely tightened. |
Warranty and Support
ANJOSHI products are manufactured to high standards. For any questions, concerns, or support regarding your Quick Release Latch Lock Kit, please contact the seller or refer to the ANJOSHI store on Amazon. While specific warranty details are not provided in this manual, customer satisfaction is a priority.
Contact Information:
- Visit the ANJOSHI Store on Amazon for further assistance.
Ask a question about this manual
Ask about setup, troubleshooting, compatibility, parts, safety, or missing instructions. Manuals+ will review the question and use this page’s manual context to help answer it.