1. Introduction
Thank you for choosing the eMylo 12V 1-Channel 433MHz RF Wireless Remote Control Switch. This device is designed to provide convenient wireless control for various electrical appliances, such as lights, motors, and security alarms. Please read this manual carefully before installation and operation to ensure proper use and safety.
2. Product Overview
Key Features
- Simple and Reliable Remote Control: Easy to set up and use, offering stable and reliable performance with high signal reception sensitivity.
- Strong and Penetrating Signal: Capable of passing through walls, floors, and doors, allowing control from a reliable operating distance.
- Anti-Interference Stability: Designed for high signal sensitivity and resistance to interference from other electronic devices.
- Flexible Configuration: Utilizes non-directional wireless encoding technology, enabling independent control without mutual interference. Can be flexibly configured for various quantities and operating modes.
- Wide Range of Applications: Suitable for industrial control, security systems, lights, motors, wireless security alarms, wireless door alarms, and other remote-controlled devices.
Package Contents
- 1 x eMylo 12V 1-Channel RF Wireless Receiver Module
- 2 x Remote Control Transmitters
- 1 x User Manual (This Document)

Figure 1: eMylo 12V 1-Channel RF Wireless Remote Control Switch with two remote controls.

Figure 2: Dimensions of the eMylo RF Wireless Remote Control Switch receiver (50x36x23mm) and remote control (60x35mm).

Figure 3: Internal view of the eMylo RF Wireless Remote Control Switch receiver, showing the relay and circuit board.
3. Specifications
| Feature | Specification |
|---|---|
| Model | YSL116D4N |
| Input Voltage | DC 12V |
| Operating Frequency | 433MHz |
| Rated Contact Current | 10 Amperes |
| Contact Material | Silver |
| Contact Type | Normally Open (NO), Normally Closed (NC), Common (COM) |
| Mounting Type | General Assembly |
| Connector Type | Screw Terminal |
| Number of Terminals | 3 (NO, NC, COM) + 2 (Input Power) |
| Manufacturer | eMylo |
4. Safety Information
- Ensure the power supply is disconnected before any wiring or installation to prevent electric shock.
- This device operates on 12V DC input. Do not connect it directly to AC mains power without a suitable power adapter.
- The relay contacts can switch higher voltages (e.g., 110V/240V AC) but ensure proper insulation and wiring practices are followed. If you are unsure, consult a qualified electrician.
- Do not exceed the maximum rated current of 10 Amperes for the relay contacts.
- Keep the device away from water, moisture, and extreme temperatures.
- Do not attempt to disassemble or modify the device, as this will void the warranty and may cause damage or injury.
5. Setup and Pairing
5.1 Wiring the Receiver Module
The receiver module requires a 12V DC power supply for its operation. The relay contacts can be used to switch a separate load, which can be either DC or AC, within the specified current limits.

Figure 4: Wiring Diagram for the eMylo RF Wireless Remote Control Switch. Diagram I shows wiring for a low-voltage DC light. Diagram II shows wiring for a high-voltage AC light.
- Connect Power to the Module: Connect your 12V DC power supply to the input terminals of the receiver module. Ensure correct polarity: positive (+) to the positive terminal and negative (-) to the negative terminal. The green power indicator will turn on.
- Connect the Load: Connect your device (e.g., light, motor) to the relay's output terminals (NO, NC, COM) according to your application needs.
- For a normally open (NO) circuit: Connect one side of your load to the COM terminal and the other side to the NO terminal. The circuit will be open (OFF) when the relay is de-energized and closed (ON) when energized.
- For a normally closed (NC) circuit: Connect one side of your load to the COM terminal and the other side to the NC terminal. The circuit will be closed (ON) when the relay is de-energized and open (OFF) when energized.
5.2 Clearing Existing Codes
To clear any previously paired remote controls from the receiver module:
- Press and hold the Programming Button on the receiver for approximately 5 seconds.
- The red signal indicator will turn ON and then OFF.
- Release the button. The code clearance is complete, and all paired transmitters are removed.
5.3 Choosing Operating Mode and Pairing Transmitters
The receiver module supports three operating modes: Momentary, Latched, and Toggle. The transmitters are typically pre-paired in the factory, but you can re-pair them or pair new ones as follows:
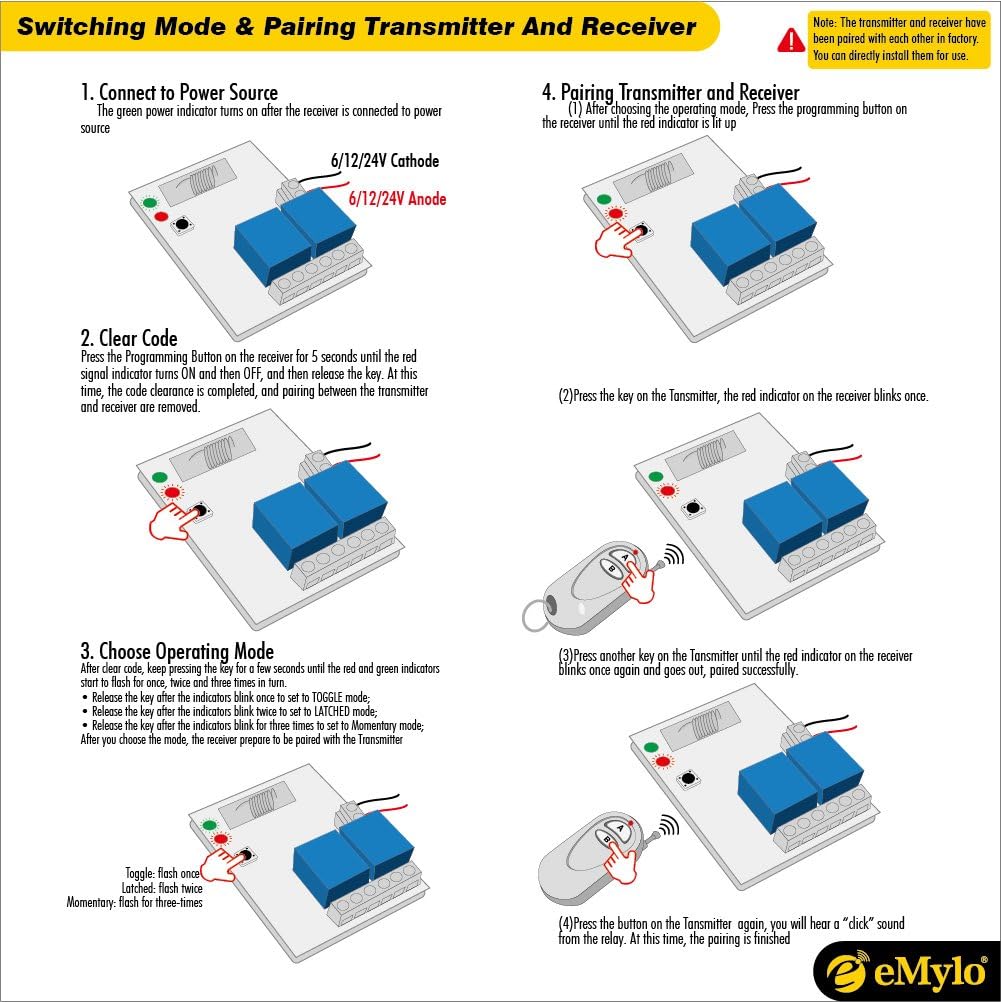
Figure 5: Step-by-step guide for switching operating modes and pairing the transmitter with the receiver.
- Enter Learning Mode: After clearing any existing codes (or if pairing for the first time), press and hold the Programming Button on the receiver for approximately 3 seconds until the red and green indicators start to flash. Release the button.
- Select Operating Mode: While the indicators are flashing, press the Programming Button again to cycle through the modes:
- Toggle Mode: Indicators blink once.
- Latched Mode: Indicators blink twice.
- Momentary Mode: Indicators blink three times.
- Confirm Mode and Pair: Once you have selected the desired mode (by observing the blink pattern), press the Programming Button one more time. The red indicator will light up.
- Pair Transmitter: Press any key on the transmitter. The red indicator on the receiver will blink once.
- Complete Pairing: Press another key on the same transmitter. The red indicator will blink once again and then go out.
- Test Pairing: Press a button on the transmitter again. You should hear a "click" sound from the relay, indicating successful pairing.
6. Operating Modes
The eMylo RF Wireless Remote Control Switch supports three distinct operating modes:

Figure 6: Visual representation of the Momentary, Latched, and Toggle operating modes.
- Momentary Mode: The relay remains activated only while the transmitter button is pressed and held. Releasing the button deactivates the relay. This is suitable for applications like electric door locks or garage door openers where temporary activation is needed.
- Latched Mode: Pressing the transmitter button (e.g., 'A') activates the relay, and it remains activated even after the button is released. Pressing the same button ('A') again deactivates the relay. This mode acts like a toggle switch for a single button.
- Toggle Mode: Pressing one transmitter button (e.g., 'A') activates the relay. Pressing another transmitter button (e.g., 'B') deactivates the relay. This mode is useful when you want separate ON and OFF buttons.
7. Maintenance
- Keep the device clean and dry. Wipe with a soft, dry cloth if necessary.
- Avoid exposing the device to direct sunlight, high humidity, or extreme temperatures.
- Replace the battery in the remote control transmitter when its range decreases or it stops responding. Refer to the transmitter's specific instructions for battery replacement.
- Regularly check wiring connections for tightness and signs of wear.
8. Troubleshooting
| Problem | Possible Cause | Solution |
|---|---|---|
| Receiver does not power on. | No power supply or incorrect wiring. | Check 12V DC power connection and polarity. Ensure power source is active. |
| Remote control does not activate the relay. | Transmitter not paired, battery low, or out of range. | Re-pair the transmitter following Section 5.3. Replace transmitter battery. Move closer to the receiver. |
| Relay activates unexpectedly or inconsistently. | Interference or multiple transmitters paired. | Clear all codes (Section 5.2) and re-pair only the desired transmitters. Ensure no other RF devices are causing interference. |
| Load does not turn ON/OFF when relay clicks. | Incorrect load wiring or faulty load. | Check wiring between the load and relay contacts (NO, NC, COM). Test the load independently. |
9. Warranty and Support
eMylo products are manufactured to high-quality standards. For warranty information, technical support, or service inquiries, please refer to the documentation provided at the point of purchase or contact your retailer. Keep your purchase receipt as proof of purchase.