1. Product Overview
The MIFXIN Mini Airbrush Compressor Set is designed for a variety of applications including commercial arts, beauty makeup, illustration, photo retouching, temporary tattoos, cake decorating, crafts, and hobbies. This kit features a compact air compressor and a dual-action spray gun for precise control.
Intended Use
This airbrush system is suitable for detailed painting and spraying tasks requiring fine control and adjustable air pressure. It is ideal for both beginners and experienced users in various artistic and cosmetic fields.
Package Contents
Before beginning, please verify that all components listed below are present in your package:
- 1 x Airbrush
- 1 x Airbrush Holder
- 1 x Air Compressor
- 1 x Air Hose
- 1 x AC Transformer (Power Adapter)
- 1 x Instruction Manual (this document)
- 1 x Storage Case for Air Compressor

Figure 1: Components of the MIFXIN Mini Airbrush Compressor Set.
2. Safety Information
Please read and understand all safety instructions before operating the airbrush compressor set. Failure to follow these instructions may result in injury or damage to the product.
- Always operate the airbrush in a well-ventilated area to avoid inhaling paint fumes.
- Wear appropriate personal protective equipment (PPE), such as a respirator mask, safety glasses, and gloves.
- Keep the equipment away from children and pets.
- Do not use the airbrush near flammable liquids or gases.
- Ensure the power adapter is connected to a grounded electrical outlet.
- Never immerse the compressor or power adapter in water or other liquids.
- Disconnect the power supply before cleaning or performing maintenance.
- Use only paints and thinners recommended for airbrush use.
- Avoid pointing the airbrush at yourself or others.
- Do not modify the equipment in any way.
3. Setup Instructions
Follow these steps to set up your MIFXIN Mini Airbrush Compressor Set:
- Connect the Airbrush: Attach the airbrush to the air hose. Ensure a secure connection to prevent air leaks.
- Connect the Air Hose to Compressor: Connect the other end of the air hose to the air outlet port on the compressor.
- Connect Power: Plug the AC adapter into the compressor's power input. Then, plug the AC adapter into a standard electrical outlet (100V-240V).
- Place Airbrush in Holder: If not in use, place the airbrush securely in the provided airbrush holder on the side of the compressor.

Figure 2: Compressor details including power port and pressure adjustment button.
4. Operating Instructions
Once the airbrush set is properly assembled and connected, you can begin operation.
Power On and Pressure Adjustment
- Turn On: Press the "ON/OFF" button on the compressor to power it on. The compressor will start running.
- Adjust Air Pressure: The compressor features 3 adjustable air pressure stages (Low, Medium, High). Press the "SHIFT" button to cycle through the pressure settings. Observe the indicator lights to confirm the selected pressure level.
Loading Paint and Spraying
- Prepare Paint: Ensure your paint is properly thinned for airbrush use. Refer to the paint manufacturer's instructions for thinning ratios.
- Load Paint: Pour the prepared paint into the gravity feed cup of the airbrush. Do not overfill.
- Test Spray: Before applying to your project, perform a test spray on a scrap piece of material to check paint consistency and air pressure.
- Spray Operation:
- To start airflow, press down on the airbrush trigger.
- To release paint, pull the trigger back while maintaining downward pressure. The further back you pull, the more paint will be released.
- Practice controlling both air and paint flow simultaneously for desired results.
- To stop paint flow, release the trigger forward. To stop airflow, release the trigger completely.
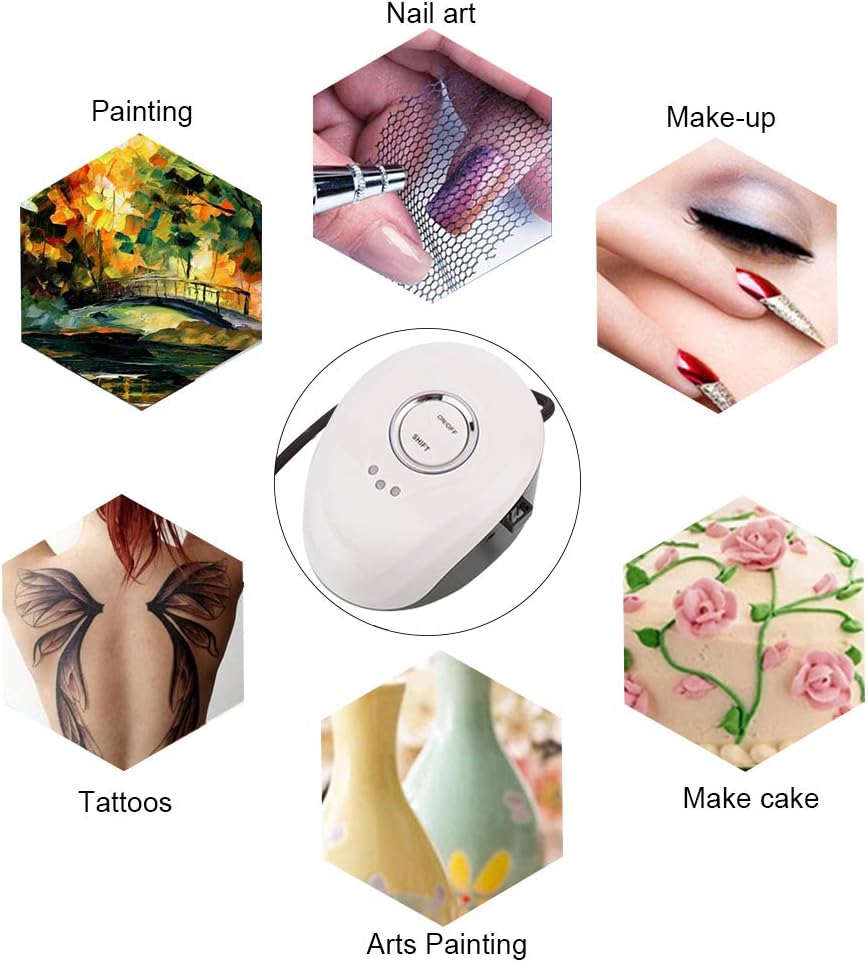
Figure 3: Various applications for the airbrush set.
5. Maintenance and Cleaning
Regular cleaning and maintenance are crucial for the longevity and optimal performance of your airbrush set.
Airbrush Cleaning (After Each Use)
- Empty Paint Cup: Pour any remaining paint from the gravity feed cup back into its container.
- Rinse Cup: Add a small amount of appropriate cleaning solution (water for water-based paints, thinner for solvent-based paints) to the paint cup.
- Back-Flush: Cover the airbrush nozzle with your finger or a cap and pull the trigger back. This will force air back into the paint cup, bubbling and cleaning the inside. Release the trigger and spray the cleaning solution into a waste container. Repeat until the solution sprays clear.
- Wipe Down: Use a soft cloth or cotton swab dampened with cleaner to wipe the inside of the paint cup and the exterior of the airbrush.
- Needle Cleaning: Carefully remove the needle from the back of the airbrush and wipe it clean. Be gentle to avoid bending the needle.
- Reassemble: Reinsert the needle and reassemble the airbrush components.
Compressor Maintenance
- Keep the compressor clean and free of dust. Wipe the exterior with a dry or slightly damp cloth.
- Ensure the air intake and exhaust vents are not obstructed to prevent overheating.
- Store the compressor in a dry, cool place when not in use.
6. Troubleshooting
If you encounter issues with your airbrush set, refer to the common problems and solutions below:
| Problem | Possible Cause | Solution |
|---|---|---|
| No air from airbrush |
|
|
| Paint not spraying or sputtering |
|
|
| Airbrush leaks paint |
|
|
7. Specifications
Technical specifications for the MIFXIN Mini Airbrush Compressor Set:
| Feature | Detail |
|---|---|
| Compressor Dimensions | 130mm (L) x 100mm (W) x 80mm (H) |
| Weight | 0.85 kg (Compressor), 2.09 pounds (Item Weight) |
| Material | Copper (Airbrush) |
| Voltage | 12V DC |
| Adapter | International convertor, 100V-240V |
| Sound Level | Light, vibration-free operation |
| Air Hose Length | 1.5 meters |
| Air Flow | 11, 12, 13 L/min (3 stage adjustable) |
| Max Pressure | 25 PSI |
| Working Style | 3 adjustable pressure modes |

Figure 4: Air Compressor dimensions.
8. Warranty and Support
Specific warranty details for the MIFXIN Mini Airbrush Compressor Set are not provided in this manual. For warranty information, technical support, or to inquire about replacement parts, please contact the manufacturer or the seller directly through your purchase platform.
You may also visit the official MIFXIN store for additional resources: MIFXIN Store on Amazon