
1. Important Safety Instructions
Please read and understand all safety instructions before operating this appliance. Failure to follow these instructions may result in product damage, injury, or death.
- Ensure the heater is fully submerged in water at all times during operation. Never operate the heater out of water.
- Always unplug the heater from the power outlet before performing any maintenance, cleaning, or handling the heater.
- Inspect the heater for any damage (cracks, frayed cord) before each use. Do not use if damaged.
- This heater is designed for indoor use in aquariums only. Do not use for other purposes.
- Keep the power cord away from sharp objects and hot surfaces.
- Ensure the voltage of your power supply matches the voltage specified on the heater (110-120V).
- This appliance is not intended for use by persons (including children) with reduced physical, sensory or mental capabilities, or lack of experience and knowledge, unless they have been given supervision or instruction concerning use of the appliance by a person responsible for their safety.
- Do not allow children to play with the appliance.
2. Product Features
The Orlushy 200W Submersible Aquarium Heater is designed to provide stable and reliable heating for your aquatic environment.
- Optimal Wattage: 200W suitable for 40 to 60-gallon aquariums.
- Durable Construction: Features 2mm thickened quartz glass, providing explosion-proof and anti-cracking properties.
- Versatile Use: Safe for both freshwater and saltwater aquariums.
- Adjustable Thermostat: Precise temperature dial allows setting from 68°F to 89°F (20°C to 32°C) with a 1-degree difference.
- Automatic Temperature Control: Sensitive and reliable thermostat maintains uniform temperature and automatically shuts off when the set temperature is reached.
- Compact Design: Length of 11 inches, easy to hide within the tank.
- Secure Installation: Equipped with 2 suction cups for stable placement.
- Power Cord: 6ft long power cord for convenient placement.

Figure 1: Key components of the Orlushy Submersible Aquarium Heater.

Figure 2: Illustration of the 2mm thickened quartz glass for enhanced durability.
3. Specifications
| Feature | Detail |
|---|---|
| Model Number | 200W |
| Wattage | 200W |
| Recommended Tank Size | 40 to 60 Gallons |
| Heater Length | 11 inches |
| Voltage | 110-120V |
| Power Cord Length | 6 feet |
| Temperature Range | 68-89°F (20-32°C) |
| Material | 2mm Thickened Quartz Glass |
| Application | Freshwater and Saltwater Aquariums |
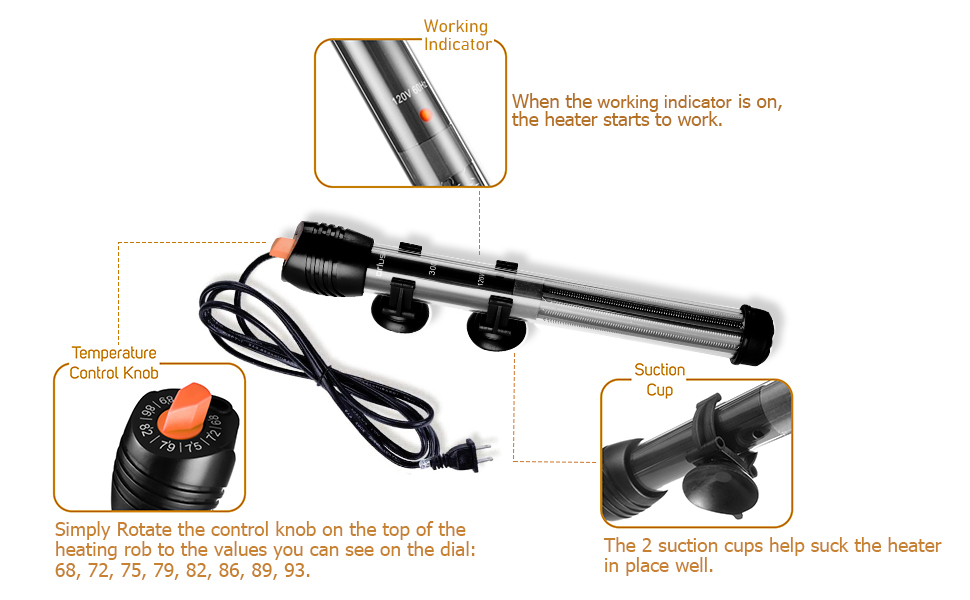
Figure 3: Guide for choosing the correct heater wattage based on tank volume.
4. Setup and Installation
- Attach Suction Cups: Securely attach the two provided suction cups to the heater body.
- Heater Placement: Position the heater fully submerged inside your aquarium. It can be installed vertically on the inner side or horizontally on the bottom of the fish tank. Ensure it is placed in an area with good water circulation to distribute heat evenly.
- Avoid Heating Area Obstruction: Do not fix the suction cups directly in the heating area of the heater, as this can impede heat dissipation and potentially deform the suction cups.
- Maintain Water Level: Ensure the water level in the fish tank is not too low, as exposing the main body of the heater to air can cause damage. The heater must always be completely submerged.
- Connect to Power: Once the heater is correctly positioned and fully submerged, plug the power cord into a suitable 110-120V power outlet. The working indicator light will illuminate when the heater begins to operate.

Figure 4: Correct and incorrect heater placement and water level guidelines.

Figure 5: Visual guide for fully immersing the heater and avoiding suction cup placement on the heating element.
5. Operating Instructions
- Set Temperature: Rotate the temperature control knob on the top of the heater to your desired temperature setting. The available settings range from 68°F to 89°F (20°C to 32°C).
- Monitor Heating: The working indicator light will turn on when the heater is actively heating the water. It will turn off once the set temperature is reached.
- External Thermometer: It is highly recommended to use an external aquarium thermometer to accurately monitor the water temperature and verify the heater's performance.
- Automatic Operation: The heater's sensitive thermostat will automatically turn the heating element on and off to maintain the set temperature within a 1-degree difference.

Figure 6: Adjusting the temperature using the control knob.
6. Maintenance
- Regular Cleaning: Periodically clean the heater to prevent algae and mineral buildup, which can affect efficiency. Always unplug the heater and allow it to cool completely before removing it from the water for cleaning. Use a soft cloth or sponge to gently wipe the surface. Do not use harsh chemicals or abrasive materials.
- Inspect for Damage: Regularly check the heater for any signs of wear, cracks, or damage to the glass tube or power cord. Replace the heater immediately if any damage is observed.
- Water Changes: During water changes, ensure the heater remains fully submerged. If the water level drops below the minimum immersion line, unplug the heater immediately and allow it to cool before refilling the tank.
7. Troubleshooting
If you encounter issues with your Orlushy aquarium heater, refer to the following common problems and solutions:
- Heater Not Heating / Water Temperature Too Low:
- Check if the heater is plugged in and the power outlet is functional.
- Verify that the set temperature on the dial is higher than the current water temperature.
- Ensure the heater is fully submerged.
- If the measured temperature is lower than the set temperature, you may need to adjust the dial slightly higher to compensate for minor variations. For example, if set to 79°F and measured is 76°F (3°F difference), reset the dial to 82°F (79+3).
- Water Temperature Too High / Overheating:
- Check the set temperature on the dial. It might be set too high.
- Ensure the heater is not exposed to air, as this can cause it to overheat rapidly.
- If the measured temperature is higher than the set temperature, you may need to adjust the dial slightly lower. For example, if set to 79°F and measured is 83°F (4°F difference), reset the dial to 75°F (79-4).
- Unplug the heater and allow the water to cool naturally before readjusting the temperature.
- Heater Indicator Light Not On:
- The light only illuminates when the heater is actively heating. If the water is already at or above the set temperature, the light will be off.
- Check power connection and outlet.
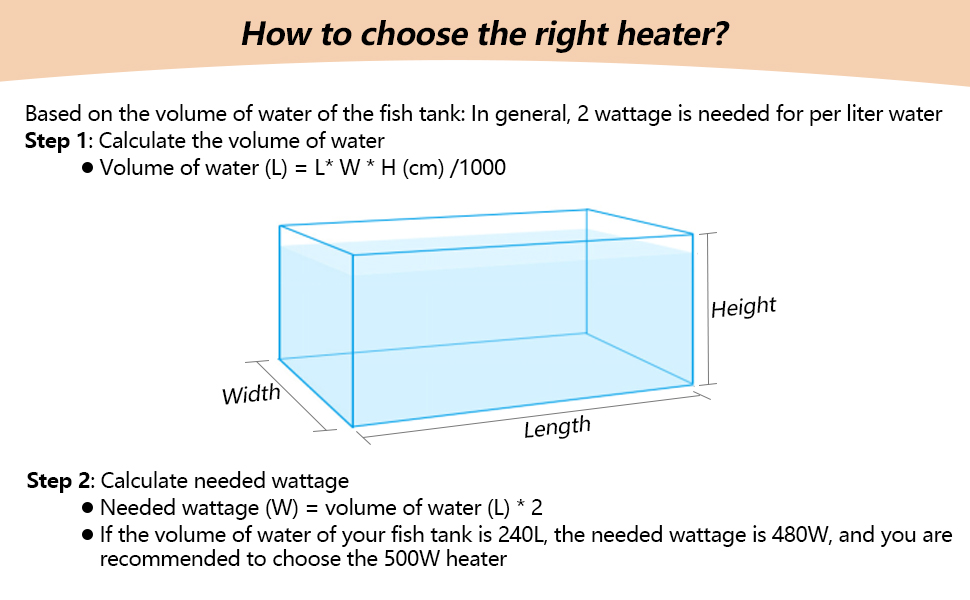
Figure 7: Temperature calibration guide for accurate heating.
8. Warranty and Support
Orlushy stands behind the quality of its products. For warranty information, technical support, or any questions regarding your aquarium heater, please contact our customer service team. Details can typically be found on our official website or through your purchase platform.
Please retain your proof of purchase for warranty claims.