Introduction
This manual provides detailed instructions for the installation, operation, and maintenance of your Hibbent Universal Toilet Fill Valve Kit. Please read these instructions carefully before beginning installation to ensure proper function and longevity of the product. This fill valve is designed to replace cracked, noisy, or slow-filling valves in most standard toilets, including brands like Kohler, Toto, and American Standard.
Product Features
- Universal Design: Fits most toilet brands.
- Adjustable Height: Easily adjusts between 7.8 inches and 13 inches to fit various tank sizes.
- Quiet Operation: Designed for quiet refilling.
- Easy Installation: Features a twist-lock adjustment for simplified setup.
- Water Saving: Helps maximize toilet performance and conserve water.
- Internal Filter: Keeps impurities out of the valve and is easy to clean.

Image: Detailed diagram illustrating the key features of the fill valve, including water supplement adjustment, height adjustment rotation, inlet delay design, and internal filter.

Image: The fill valve shown at its minimum (7.8 inches) and maximum (13 inches) adjustable heights.
Safety Information
- Always turn off the water supply to the toilet before beginning any repair or installation.
- Flush the toilet to empty the tank before working on the internal components.
- Wear appropriate personal protective equipment, such as gloves and eye protection, if necessary.
- Do not overtighten nuts, as this can damage plastic components. Hand-tightening is often sufficient.
- If you are unsure about any step, consult a qualified plumber.
Setup and Installation
Follow these steps to install your new Hibbent Universal Toilet Fill Valve Kit:
- Turn Off Water Supply: Locate the water supply valve behind or near the toilet and turn it clockwise until the water flow stops.
- Flush Toilet: Flush the toilet to drain the water from the tank. Use a sponge or towel to remove any remaining water.
- Remove Old Fill Valve: Disconnect the water supply line from the bottom of the old fill valve. Unscrew the mounting nut from underneath the tank and remove the old fill valve from the tank.
- Adjust Fill Valve Height: Before installing, adjust the height of the new fill valve. Push the lock ring up to unlock the shaft, then extend or retract the valve body to the desired height (between 7.8 and 13 inches). Ensure the top of the fill valve is at least 1 inch below the tank lever hole. Push the lock ring down to secure the height.
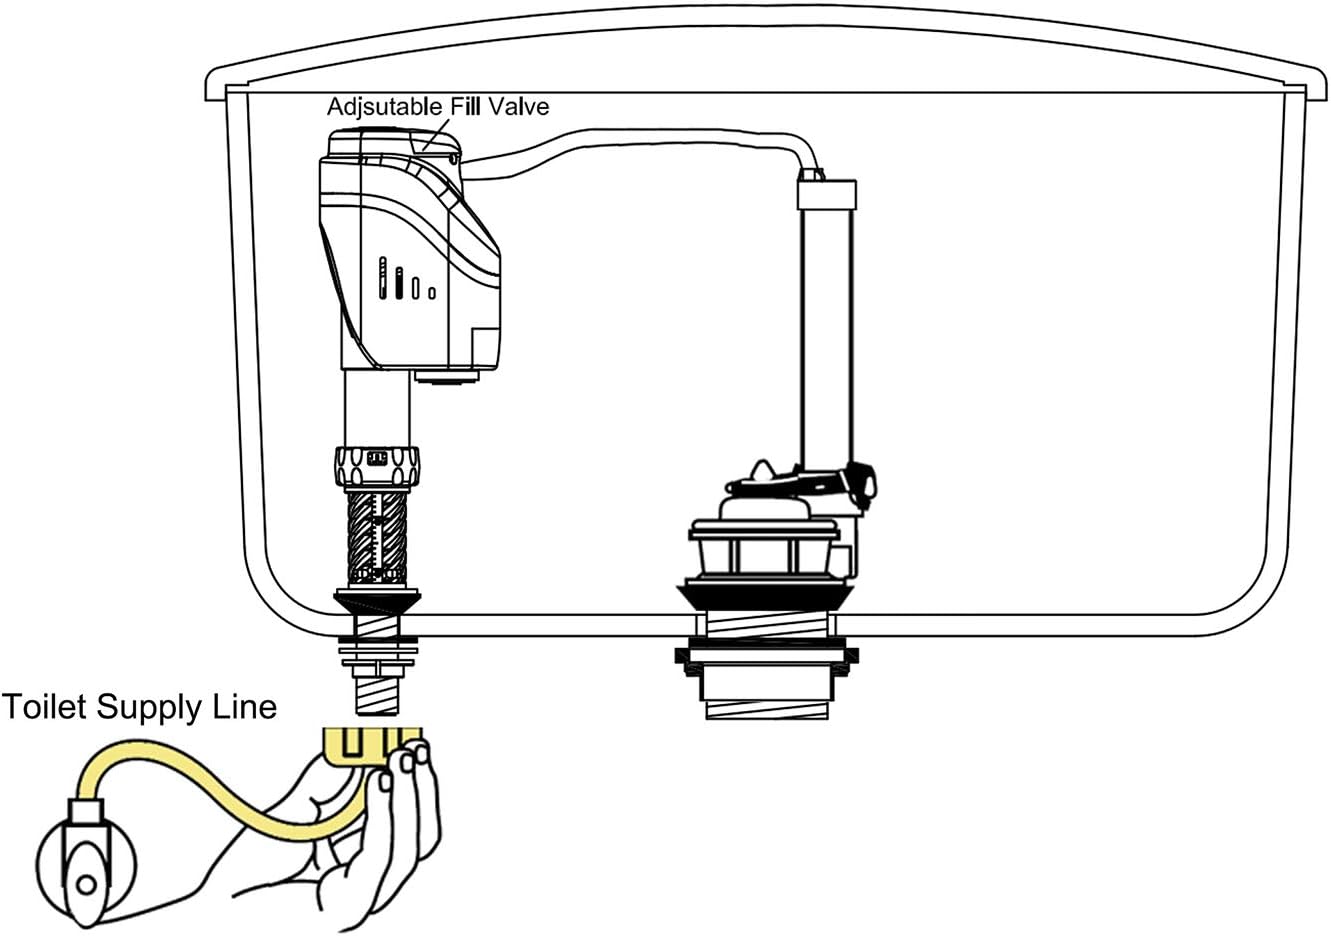
Image: Instructions for adjusting the fill valve height by pushing the lock ring up to unlock and down to lock.
- Install New Fill Valve: Insert the new fill valve into the hole at the bottom of the toilet tank. Ensure the rubber washer is properly seated on the threaded shank inside the tank. From underneath the tank, thread the plastic mounting nut onto the shank and hand-tighten it securely. Do not overtighten.
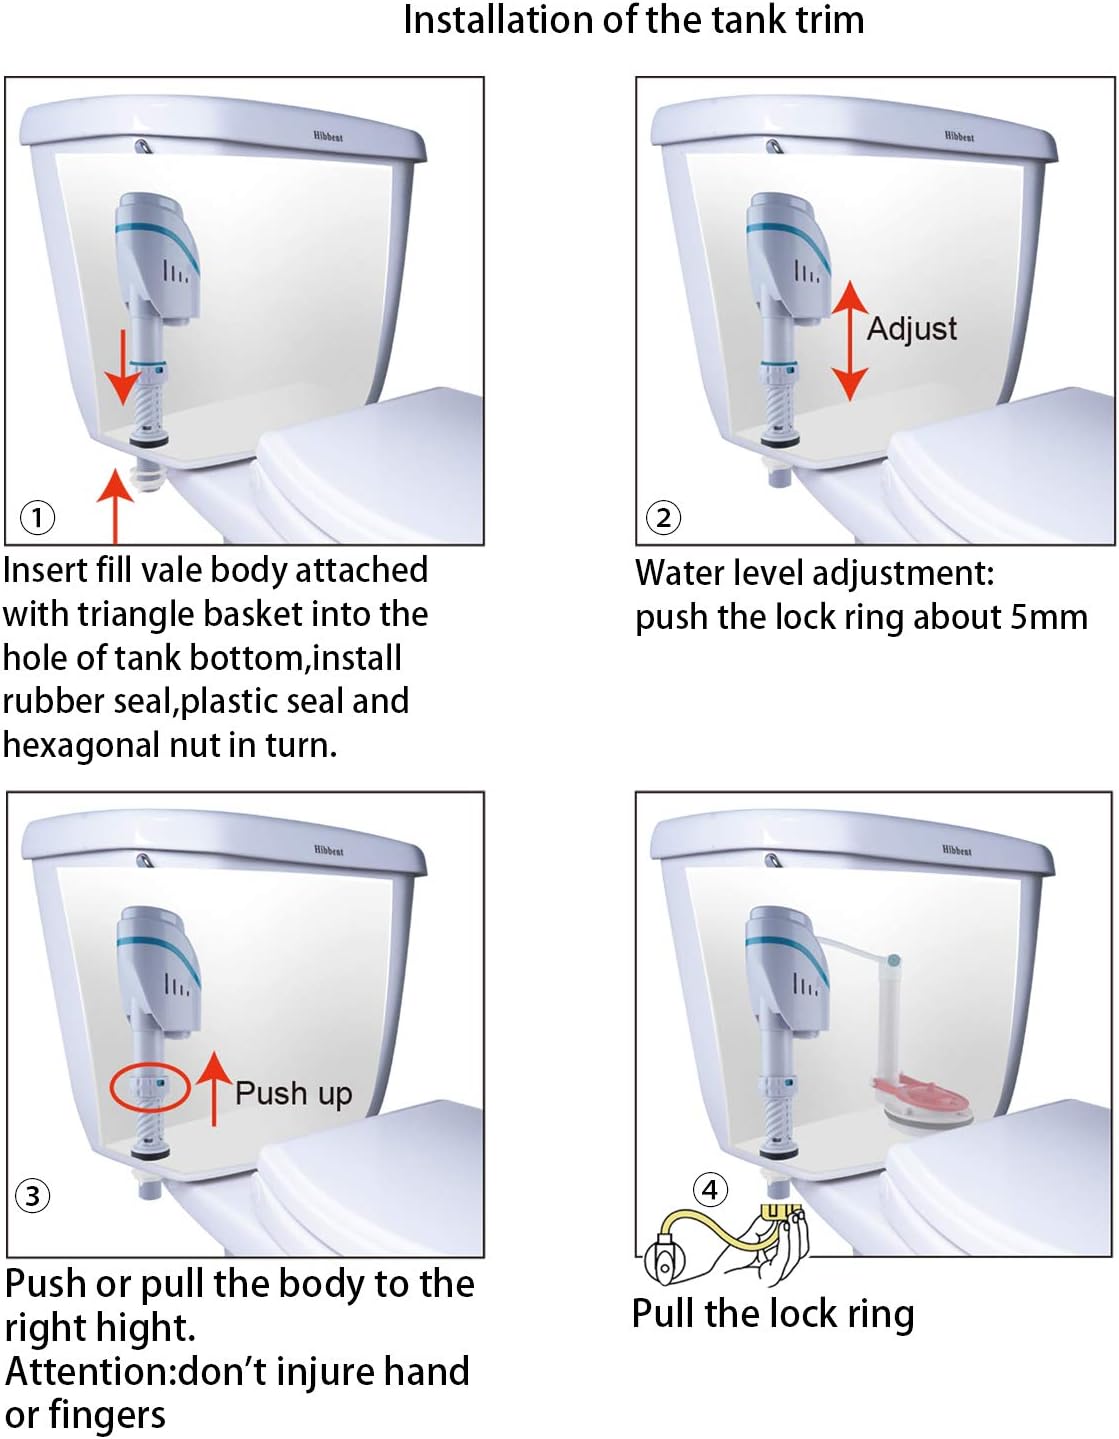
Image: Step-by-step diagram illustrating the installation of the fill valve into the toilet tank, including securing with the nut and connecting the refill tube.
- Connect Refill Tube: Attach the small refill tube from the fill valve to the overflow pipe of the flush valve. Ensure the tube is securely placed and directs water into the overflow pipe.
- Connect Water Supply Line: Reconnect the water supply line to the bottom of the new fill valve. Hand-tighten the connection.
- Turn On Water Supply: Slowly turn the water supply valve counter-clockwise to restore water flow to the toilet tank. Check for any leaks at the connections.
- Adjust Water Level: Allow the tank to fill. The water level should stop approximately 1 inch below the top of the overflow pipe. If adjustment is needed, unlock the fill valve height adjustment as described in step 4 and fine-tune the height. You can also adjust the water level by rotating the top part of the fill valve. Lock the adjustment once the desired water level is achieved.
Video: This video demonstrates the easy installation and adjustable height feature of the toilet fill valve, showing how to set the desired water level in the tank.
Operating Instructions
Once installed, the Hibbent Universal Toilet Fill Valve operates automatically. After each flush, the valve will open to refill the toilet tank to the preset water level and then close. The adjustable water line feature allows you to optimize water usage for your toilet.
To adjust the water level in the tank:
- Remove the toilet tank lid.
- Locate the height adjustment lock ring on the fill valve shaft.
- Push the lock ring upwards to unlock the shaft.
- Gently twist the upper part of the fill valve or slide the shaft up or down to achieve the desired water level. The water level should be approximately 1 inch below the top of the overflow pipe.
- Push the lock ring downwards to lock the shaft in place.
- Flush the toilet to verify the new water level. Adjust further if necessary.
Maintenance
Regular maintenance ensures optimal performance and extends the life of your fill valve. The internal filter helps prevent debris from entering the valve mechanism.
- Filter Cleaning: Periodically, or if you notice slow filling, the internal filter may need cleaning.
- Turn off the water supply to the toilet.
- Flush the toilet to drain the tank.
- Carefully remove the fill valve from the tank (refer to installation steps).
- Locate the internal filter at the bottom of the fill valve.
- Gently pull out or unscrew the filter.
- Rinse the filter under running water to remove any accumulated debris or sediment.
- Reinsert the clean filter and reinstall the fill valve.
- Turn on the water supply and check for proper operation.

Image: Close-up of the lock ring mechanism on the fill valve, which is used for height adjustment.
Troubleshooting
| Problem | Possible Cause | Solution |
|---|---|---|
| Toilet runs continuously or cycles on and off. | Water level is too high, causing water to flow into the overflow pipe. Fill valve is not sealing properly. Flapper is not sealing. | Adjust the fill valve height to lower the water level (1 inch below overflow pipe). Check for debris in the fill valve. Clean the filter. Inspect the flapper for wear or damage; replace if necessary. |
| Toilet fills slowly or not at all. | Water supply valve is partially closed. Internal filter is clogged. Fill valve is faulty. | Ensure the water supply valve is fully open. Clean the internal filter (see Maintenance section). If other solutions fail, the fill valve may need replacement. |
| Noisy filling. | High water pressure. Loose connections. | Consider installing a water hammer arrestor or pressure reducing valve if noise persists. Ensure all connections are hand-tightened. |
| Water leaks from connections. | Loose connections. Damaged washers. | Tighten connections by hand. Do not overtighten. Inspect rubber washers for damage and replace if necessary. |
Specifications
- Model Number: TFV1820PUS
- Adjustable Height Range: 7.8 inches - 13 inches
- Material: Plastic
- Item Weight: 12.3 ounces
- Package Dimensions: 9.88 x 3.82 x 2.72 inches
- Manufacturer: HANASCAR (Brand: Hibbent)
Warranty Information
Hibbent products are manufactured to high-quality standards. For specific warranty details, please refer to the product packaging or contact Hibbent customer support. Keep your purchase receipt as proof of purchase for any warranty claims.
Support
If you encounter any issues or have questions regarding your Hibbent Universal Toilet Fill Valve Kit, please contact our customer support team. For the most up-to-date contact information, visit the official Hibbent website or refer to the contact details provided on your product packaging.
Online Resources:
- Hibbent Store on Amazon: Visit the Hibbent Store