1. Introduction
Thank you for choosing the Netvision Vehicle Blackbox DVR. This device is a full HD front and rear view camera system designed to enhance your driving safety and provide reliable recording capabilities. It features a 4.3-inch dual-lens rear view mirror with an Ultra HD display, integrating a 2-in-1 TFT Full HD 1080P wide-angle lens car DVR and a high-definition rear view camera with parking sensor and night vision.
This manual provides detailed instructions for the installation, operation, and maintenance of your new DVR system. Please read it thoroughly before using the product to ensure proper functionality and to avoid any damage.
2. Safety Information
Please observe the following safety precautions to prevent damage to the device or injury to yourself:
- Do not attempt to disassemble, repair, or modify the device. This may cause damage, electric shock, or fire, and will void the warranty.
- Keep the device away from water, moisture, and extreme temperatures.
- Ensure all cables are securely connected and do not obstruct the driver's view or interfere with vehicle controls.
- Use only the accessories provided or recommended by Netvision.
- Do not operate the device while driving if it distracts you from the road. Always prioritize safe driving.
- Clean the device with a soft, dry cloth. Do not use harsh chemicals or abrasive cleaners.
3. Package Contents
Verify that all items are present in the package:
- 1 x Car DVR (Main Unit)
- 1 x Cigarette Lighter Power Wire
- 1 x Back Camera Wire
- 2 x Screws (for rear camera mounting)
- 2 x Front DVR Fix Brackets
- 1 x Rear Back Camera 3M Sticker
- 1 x User Manual (this document)
- 1 x Packing Box
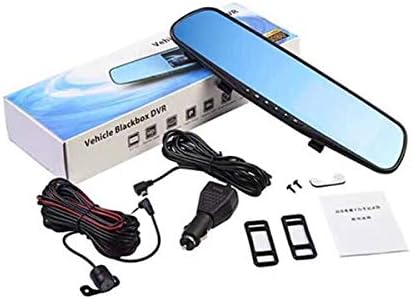
Figure 3.1: Contents of the Netvision Vehicle Blackbox DVR package, including the main DVR unit, rear camera, power cables, mounting accessories, and user manual.
4. Product Overview
The Netvision Vehicle Blackbox DVR combines a front-facing camera with a rear-view mirror display and a separate rear camera for comprehensive vehicle monitoring.

Figure 4.1: The Netvision Vehicle Blackbox DVR main unit (mirror-style) and the included rear camera. The main unit features a 4.3-inch display and an integrated front camera.
4.1 Main Unit (Mirror DVR)
- Display: 4.3-inch TFT Ultra HD display integrated into the rear view mirror.
- Front Camera: 800W Pixels, Fisheye lens, 170-degree wide angle, 1080P Full HD recording.
- Controls: Buttons located on the bottom edge for menu navigation, recording, and mode selection.
- Ports: USB2.0, AV-IN (for rear camera), TF card slot (supports max 32GB Class 10).
- Features: G-sensor, Cyclic recording, Parking monitoring, Audio recording.
4.2 Rear Camera
- Pixels: 500W.
- Angle: 120-degree wide angle, 720P HD recording.
- Functionality: Automatically displays rear view when reversing, includes parking sensor with 0-2M detect distance.
- Night Vision: Equipped for low-light conditions.
5. Setup and Installation
The installation process is designed to be straightforward. Follow these steps carefully:
5.1 Preparing for Installation
- Ensure the vehicle's engine is off and the ignition key is removed.
- Insert a Class 10 TF (microSD) card (max 32GB) into the DVR's TF card slot.
5.2 Installing the Main DVR Unit
- Attach the two front DVR fix brackets to the back of the main DVR unit.
- Carefully clip the main DVR unit over your existing vehicle's rear view mirror using the attached brackets. Ensure it is securely fastened and does not obstruct your view.
- Connect the cigarette lighter power wire to the DVR's power input port.
- Route the power wire neatly along the windshield trim and down to the vehicle's cigarette lighter socket.
5.3 Installing the Rear Camera
- Determine the optimal mounting location for the rear camera. Common locations include above the license plate or inside the rear window.
- Clean the mounting surface thoroughly.
- Attach the rear camera using the provided 3M sticker or screws, depending on your chosen location and preference.
- Connect the back camera wire to the rear camera.
- Route the back camera wire from the rear of the vehicle to the main DVR unit, connecting it to the AV-IN port. Ensure the cable is hidden and secured to avoid interference.
- If the rear camera has a reverse trigger wire (usually red), connect it to your vehicle's reverse light power wire. This enables automatic display switching when reversing.
5.4 Initial Power On and Settings
- Plug the cigarette lighter power wire into the vehicle's cigarette lighter socket.
- Start the vehicle's engine. The DVR should power on automatically.
- Adjust the front camera lens angle to ensure it captures the desired view of the road ahead.
- Navigate through the DVR's menu using the buttons to set the date, time, language, and other preferences.
- Format the TF card through the DVR's menu before first use to ensure proper recording.
6. Operating Instructions
This section details the basic operation of your Netvision DVR system.
6.1 Power On/Off
- The DVR will automatically power on and begin recording when the vehicle's ignition is turned on.
- It will automatically power off and save the current recording when the ignition is turned off.
- To manually power on/off, press and hold the power button (refer to device layout for exact location).
6.2 Recording Modes
- Loop Recording: The DVR continuously records video in segments (e.g., 1, 3, or 5 minutes). When the memory card is full, it automatically overwrites the oldest unlocked files.
- G-Sensor (Emergency Recording): In the event of a sudden impact or collision, the built-in G-sensor will automatically lock the current video file, preventing it from being overwritten by loop recording.
- Parking Monitoring: When enabled, the DVR will automatically start recording if it detects a vibration or impact while the vehicle is parked. This feature requires a continuous power supply (e.g., hardwire kit, not included).
6.3 Display Modes
- The display can show the front camera view, rear camera view, or both simultaneously (picture-in-picture). Use the mode button to switch between views.
- When the vehicle is put into reverse, the display will automatically switch to the full-screen rear camera view (if the reverse trigger wire is connected).
6.4 Playback
- Stop recording (if active).
- Enter playback mode via the menu.
- Browse through recorded video files (front camera and rear camera recordings are typically stored in separate folders).
- Select a file to play.
6.5 Menu Settings
Access the menu to configure various settings, including:
- Video Resolution (Front/Rear)
- Loop Recording Duration
- G-Sensor Sensitivity
- Parking Monitor On/Off
- Date/Time Stamp
- Audio Recording On/Off
- Language
- Format TF Card
- Factory Reset
7. Maintenance
Proper maintenance ensures the longevity and optimal performance of your DVR system.
- Cleaning: Use a soft, lint-free cloth to clean the lenses and the display screen. Do not use chemical cleaners or abrasive materials.
- TF Card Maintenance: It is recommended to format the TF card every 2-4 weeks to prevent data corruption and ensure smooth recording, especially if you frequently use the G-sensor or parking monitor features. Back up any important files before formatting.
- Firmware Updates: Check the Netvision official website periodically for any available firmware updates. Follow the instructions provided with the update carefully.
- Temperature: Avoid exposing the device to extreme temperatures for prolonged periods, as this can affect battery life and component integrity.
8. Troubleshooting
If you encounter issues with your DVR, refer to the following common problems and solutions:
| Problem | Possible Cause / Solution |
|---|---|
| DVR does not power on. |
|
| Recording stops or files are corrupted. |
|
| Rear camera not displaying. |
|
| Buttons are unresponsive. |
|
9. Specifications
| Feature | Detail |
|---|---|
| Model Number | F4-04-04 |
| Brand | Netvision |
| Display Screen Size | 4.3 Inches |
| Front Camera Resolution | 1080P Full HD |
| Front Camera Angle | 170 Degrees (Fisheye Lens) |
| Rear Camera Resolution | 720P HD |
| Rear Camera Angle | 120 Degrees |
| Storage | Supports up to 32GB Class 10 TF Card (not included) |
| Interface | USB2.0, AV-IN, TF Card Slot |
| Special Features | G-Sensor, Cyclic Recording, Parking Monitoring, Night Vision (rear camera), Parking Sensor (0-2M detect distance) |
| Power Source | Vehicle Cigarette Lighter (DC 12V) |
| Battery | 1 Nonstandard Battery (included) |
| Item Weight | 1.45 pounds |
| Package Dimensions | 13 x 5 x 2.5 inches |
| Compatible Devices | Car, Truck |
| Installation Type | Rear View Mirror Clip-on |
| UPC | 616929578010 |
10. Warranty and Support
Specific warranty information for the Netvision Vehicle Blackbox DVR is not provided in this manual. Please refer to the product packaging or the retailer's website for details regarding warranty coverage and terms.
For technical support, troubleshooting assistance beyond this manual, or inquiries about replacement parts, please contact Netvision customer service through their official website or the contact information provided at the point of purchase. When contacting support, please have your model number (F4-04-04) and purchase details ready.


