1. Introduction
The Renogy Rover 40A MPPT Solar Charge Controller is designed to optimize the power output from your solar panels to efficiently charge your battery bank. Utilizing Maximum Power Point Tracking (MPPT) technology, it ensures maximum energy harvest from your solar array. This controller is compatible with 12V/24V DC systems and supports various battery types including AGM, Gel, and Lithium. It features an LCD screen for system information display and offers remote monitoring capabilities via an optional Bluetooth module.
2. Key Features
- Maximum Power Point Tracking (MPPT): Ensures optimal power extraction from solar modules, achieving up to 99% tracking efficiency and 98% conversion efficiency.
- Automatic System Voltage Detection: Automatically detects 12V/24V DC system voltages (Lithium batteries require manual setting).
- Informative LCD Display: Provides real-time solar charging and battery operation information, customizable parameters, and error codes.
- Advanced 4-Stage Charging: Offers Bulk, Boost, Float, and Equalization charging for lead-acid batteries, and 2-stage charging (Bulk and Boost) with lithium reactivation for lithium batteries.
- Comprehensive System Protection: Features self-diagnosis functions to protect against reverse polarity, overcharging, over-discharging, short circuits, and reverse current.
- Remote Monitoring: Equipped with an RS232 communication port for connection to the Renogy BT-1 Bluetooth module, enabling monitoring via the Renogy DC Home app.
3. Product Overview

Front view of the Renogy Rover 40A MPPT Solar Charge Controller.

The LCD screen and multiple LEDs display system operating information, including battery voltage, charging status, and error codes.

Rear view showing the product label with model and version number (e.g., V010408).

The RS232 port allows communication with an optional Renogy BT-1 Bluetooth Module for remote monitoring.
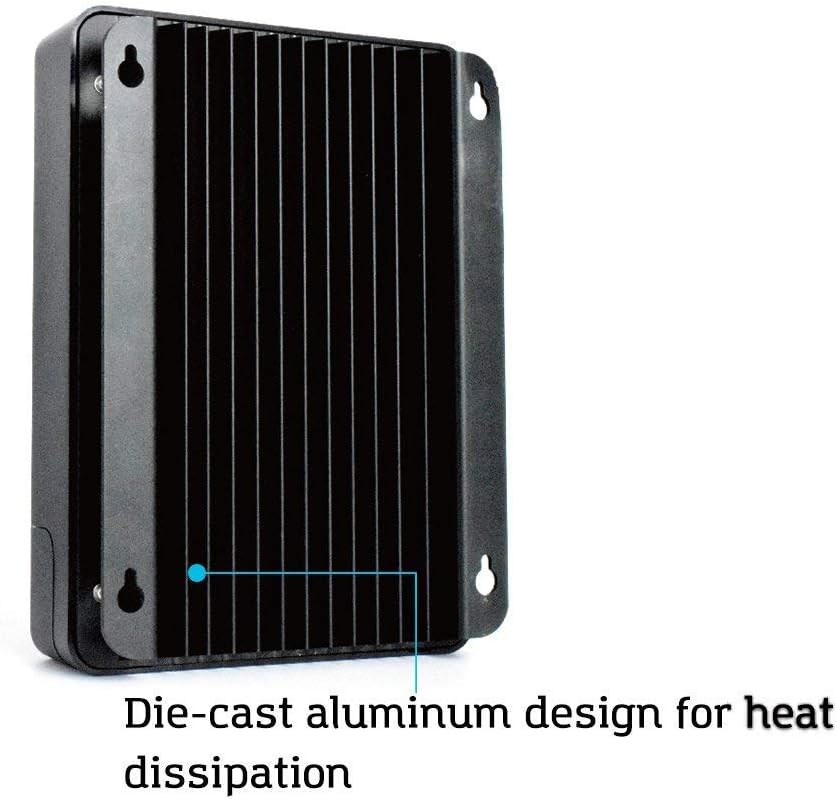
Die-cast aluminum design with fins for efficient heat dissipation, ensuring optimal performance and longevity.

The Renogy BT-1 Bluetooth Module, used for wireless monitoring of the charge controller via a mobile app.
4. Setup and Installation
4.1 Safety Precautions
- Ensure all connections are tight to avoid loose connections which can cause excessive heat.
- Install the controller indoors in a well-ventilated area, away from direct sunlight, high temperatures, and water.
- Connect the battery first, then the load, and finally the solar panel. Disconnect in the reverse order.
- Use appropriate circuit breakers or fuses for the battery, solar panel, and load circuits.
4.2 Mounting the Controller
Mount the controller vertically on a solid surface, ensuring adequate airflow around the unit for heat dissipation. Maintain a minimum clearance of 6 inches (15 cm) above and below the controller.
4.3 Wiring Sequence
- Connect the battery to the controller's BAT+ and BAT- terminals. Observe correct polarity.
- Connect the DC load to the controller's LOAD+ and LOAD- terminals (if applicable). Observe correct polarity.
- Connect the solar panel to the controller's PV+ and PV- terminals. Observe correct polarity.
- If using the BT-1 Bluetooth module, connect it to the RS232 port.
5. Operating Instructions
5.1 LCD Display and Button Functions
The integrated LCD screen displays various system parameters such as battery voltage, charging current, solar panel voltage, and load status. Use the buttons below the screen to navigate through the display menus and adjust settings.
- UP/DOWN Buttons: Navigate through display screens and adjust parameter values.
- ENTER Button: Confirm selections or enter setting modes.
- ESC Button: Exit setting modes or return to the previous screen.
5.2 Battery Type Selection
The controller automatically detects 12V/24V systems. For lithium batteries, the battery type must be manually selected through the LCD menu to ensure proper charging algorithms. Refer to the detailed manual for specific steps on setting battery parameters.
5.3 Remote Monitoring (with BT-1 Module)
Once the BT-1 Bluetooth module is connected, download the Renogy DC Home app on your smartphone. Pair your device with the controller to monitor real-time system data, view historical performance, and adjust certain parameters remotely.
6. Maintenance
Regular maintenance ensures the longevity and optimal performance of your solar charge controller.
- Check Connections: Periodically inspect all wiring connections to ensure they are secure and free from corrosion.
- Cleanliness: Keep the controller clean and free from dust and debris. Use a dry cloth for cleaning.
- Ventilation: Ensure that the area around the controller remains unobstructed to allow for proper heat dissipation.
- Firmware Updates: Check the Renogy website for any available firmware updates for your controller.
7. Troubleshooting
If you encounter issues with your Renogy Rover 40A MPPT Solar Charge Controller, refer to the following common troubleshooting steps:
- No Display/Power: Check battery connections and ensure the battery voltage is within the operating range.
- No Charging: Verify solar panel connections, ensure panels are receiving adequate sunlight, and check for any shading. Confirm solar panel voltage is above battery voltage.
- Load Not Working: Check load connections, ensure the load is not exceeding the controller's rated current, and verify load settings on the LCD.
- Error Codes: Consult the detailed manual for a list of specific error codes displayed on the LCD and their corresponding solutions.
- Bluetooth Connectivity Issues: Ensure the BT-1 module is properly connected, Bluetooth is enabled on your device, and you are within range.
8. Specifications
| Attribute | Value |
|---|---|
| Model | MPPT 40A+BT |
| Brand | Renogy |
| Color | Nero |
| Voltage | 12 Volt (CC) |
| Product Dimensions (LxWxH) | 23.8L x 17.3l x 72.5H cm |
| Material | Plastica |
| UPC | 816360029649 |
| Part Number | RNG-CTRL-RVR40-BT-DE |
| Components Included | Regolatore di carica con modulo Bluetooth |
| Country of Origin | Cina |
| Display Type | LCD |
| Item Weight | 2.45 Kilograms |
9. Warranty and Support
Renogy products are backed by a limited warranty. For detailed warranty information, product registration, and technical support, please visit the official Renogy website or contact their customer service. Keep your purchase receipt for warranty claims.
For further assistance, please refer to the contact information provided on the Renogy official website: www.renogy.com


