1. Introduction
This manual provides detailed instructions for the proper installation, operation, and maintenance of your Roadstar RD8410N and RD8200N TV Tuner and TV Antenna. Please read this manual thoroughly before using the product to ensure safe and efficient operation. Keep this manual for future reference.
2. Safety Information
- Ensure the power supply voltage matches the requirements specified on the device.
- Do not expose the device to rain, moisture, or extreme temperatures.
- Avoid placing the device near heat sources or in direct sunlight.
- Do not open the casing of the TV tuner; refer all servicing to qualified personnel.
- Keep the antenna away from high-voltage power lines and other electrical hazards.
- Disconnect the power adapter during lightning storms or when unused for long periods.
3. Package Contents
Please check the package contents upon opening. If any items are missing or damaged, contact your retailer.
- Roadstar TV Tuner (RD8410N or RD8200N)
- TV Antenna
- Power Adapter
- Remote Control (if included with your model)
- User Manual (this document)
4. Product Overview
Familiarize yourself with the components of your Roadstar TV Tuner and Antenna.
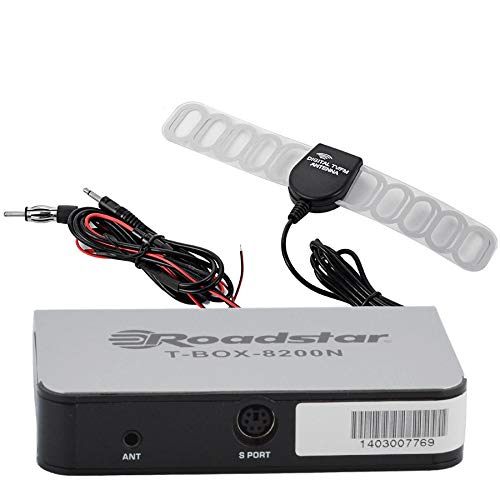
Figure 1: Roadstar T-BOX-8200N TV Tuner
This image displays the Roadstar T-BOX-8200N TV Tuner. It is a compact, silver-grey rectangular device with black side panels. The front face prominently features the "Roadstar" logo and the model name "T-BOX-8200N". On the right side, two ports are visible: one labeled "12V" for power input and another labeled "ANT" for antenna connection. This device is designed to receive and process television signals.
4.1. TV Tuner Ports and Indicators
- ANT Input: Connects to the TV antenna for receiving broadcast signals.
- 12V DC Input: Connects to the provided power adapter.
- (Other ports like HDMI Out, USB, AV Out may be present depending on specific model variant. Refer to your device for exact port configuration.)
4.2. TV Antenna
The included TV antenna is designed to capture terrestrial broadcast signals. Its performance may vary based on location, signal strength, and obstacles.
5. Setup
5.1. Connecting the TV Tuner
- Connect the Antenna: Plug the antenna cable into the "ANT" input port on the Roadstar TV Tuner.
- Connect to TV: Use an appropriate cable (e.g., HDMI, AV) to connect the TV tuner's output port to an available input port on your television. Note the input port you use (e.g., HDMI 1, AV 2).
- Connect Power: Insert the small end of the power adapter into the "12V DC" input port on the TV tuner. Plug the other end of the power adapter into a standard electrical outlet.
5.2. Positioning the TV Antenna
- Place the antenna in a location with minimal obstructions, ideally near a window or high up.
- Experiment with different antenna positions to find the best signal reception.
- Avoid placing the antenna near large metal objects or other electronic devices that may cause interference.
6. Operating Instructions
6.1. Initial Power On and Channel Scan
- Turn on your television and select the correct input source (e.g., HDMI 1, AV 2) that the TV tuner is connected to.
- The TV tuner should power on automatically or can be turned on using its power button or remote control.
- Follow the on-screen prompts for initial setup. This typically includes selecting your language and country.
- Initiate an "Auto Scan" or "Channel Search" from the TV tuner's menu. This process will scan for available digital television channels. This may take several minutes.
- Once the scan is complete, the tuner will save the found channels, and you should be able to view them.
6.2. Basic TV Viewing
- Use the remote control's channel up/down buttons to navigate through channels.
- Use the volume buttons on your TV's remote control to adjust audio levels.
- Access the menu to adjust settings, view program guides (EPG), or manage channels.
7. Maintenance
7.1. Cleaning
- Ensure the device is unplugged before cleaning.
- Wipe the exterior of the TV tuner and antenna with a soft, dry cloth.
- Do not use liquid cleaners, aerosols, or abrasive chemicals.
7.2. Storage
- If storing the device for an extended period, disconnect it from power and store it in a cool, dry place.
- Keep it away from direct sunlight and extreme temperatures.
8. Troubleshooting
| Problem | Possible Cause | Solution |
|---|---|---|
| No power | Power adapter not connected or faulty outlet. | Ensure power adapter is securely connected to the tuner and a working electrical outlet. |
| No signal / "No Channel" message | Antenna not connected, poor antenna position, or no channels scanned. |
|
| Poor picture quality / pixelation | Weak signal, interference, or antenna position. |
|
| No sound | TV volume muted or too low, incorrect audio settings. |
|
9. Specifications
Note: Specifications are subject to change without notice.
- Model: Roadstar RD8410N, Roadstar RD8200N
- Product Type: TV Tuner and Antenna Package
- Tuner Type: Digital Terrestrial Television (DTT)
- Input Voltage: 12V DC (via included power adapter)
- Antenna Type: Passive or Active (depending on specific antenna model)
- Connectivity: ANT In, 12V DC In, (e.g., HDMI Out, USB, AV Out - specific to model)
- ASIN: B07GXJPR3R
- Brand: Roadstar
10. Warranty and Support
For warranty information and technical support, please refer to the documentation provided with your purchase or contact your retailer. Keep your proof of purchase for warranty claims.