Garosa 798382303696
Garosa Electronic Cam Lock User Manual
Model: 798382303696
1. Introduction
This user manual provides detailed instructions for the installation, operation, and maintenance of your Garosa Electronic Cam Lock. This keyless cabinet lock offers secure access control using a touch keypad, ideal for various applications including cabinets, lockers, and drawers in homes, offices, schools, and public facilities.
Please read this manual thoroughly before installation and use to ensure proper functionality and longevity of the product.
2. Package Contents and Product Overview
Verify that all components are present before beginning installation.
- Electronic Cam Lock Unit
- Mounting Screws
- User Manual (this document)

Figure 2.1: Included components of the Garosa Electronic Cam Lock.
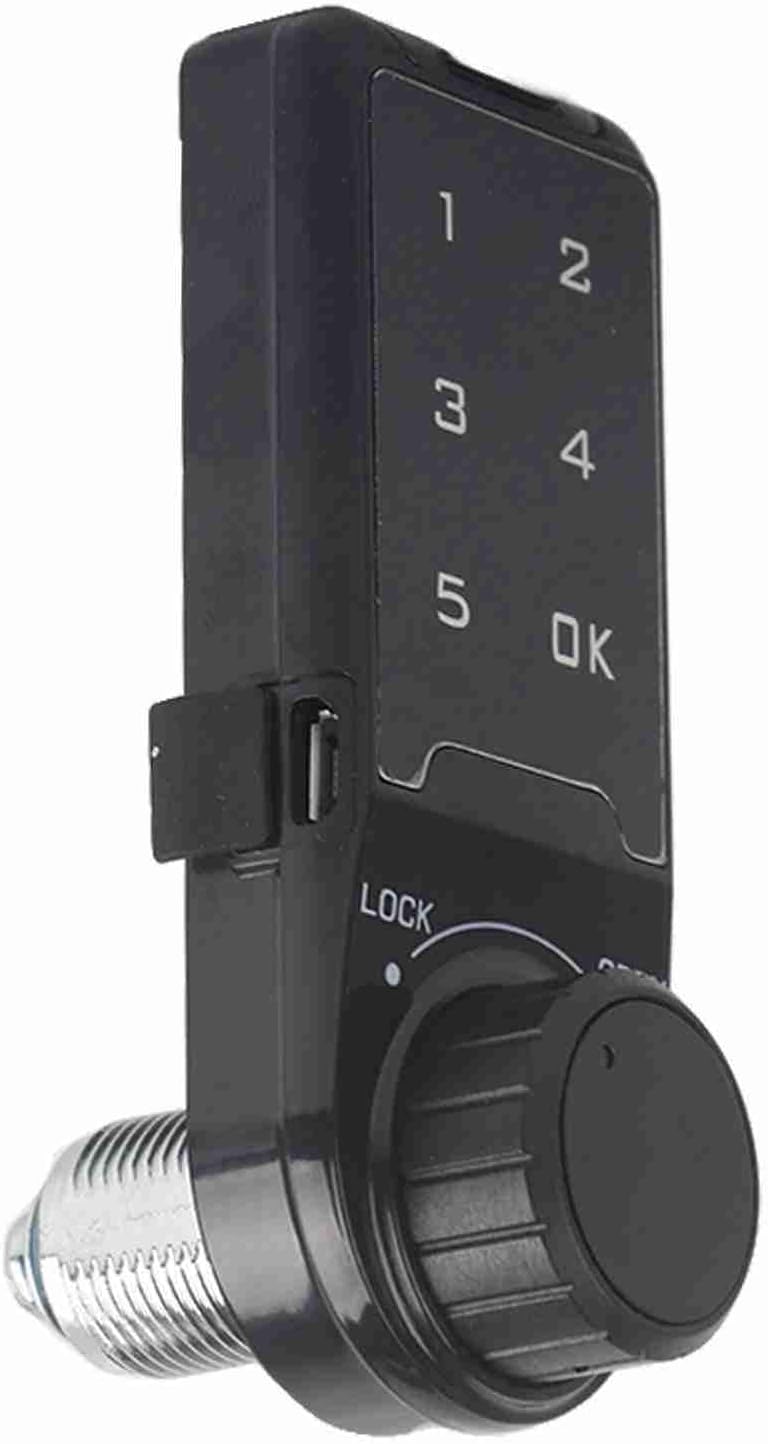
Figure 2.2: Front view of the Garosa Electronic Cam Lock, showing the keypad and knob.
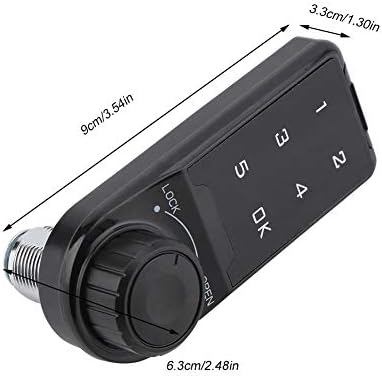
Figure 2.3: Product dimensions of the Garosa Electronic Cam Lock (9.5 cm length, 3.5 cm width, 1.5 cm depth).

Figure 2.4: Labeled diagram of the lock, indicating the touch keyboard, battery compartment, knob, low battery indicator, unlock indicator, and body code.
3. Setup and Installation
The Garosa Electronic Cam Lock is designed for easy installation on various cabinet and locker types. Ensure the mounting surface is flat and stable.
3.1 Installation Steps
- Prepare the cabinet door or drawer for installation. Refer to the installation hole size diagram for precise drilling.
- Mount the wooden mounting plate (if required for your cabinet type) to the inside of the cabinet door using appropriate screws.
- Insert the electronic lock unit through the prepared hole from the outside of the cabinet door.
- Secure the lock unit from the inside using the provided mounting screws, ensuring it is flush and stable.
- Attach the cam arm to the back of the lock mechanism and secure it.
- Install the battery (CR2032, not included) into the battery compartment.
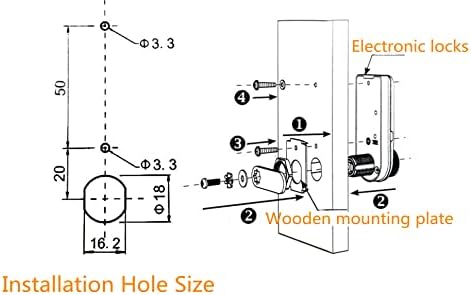
Figure 3.1: Detailed installation diagram showing hole sizes (diameter 18mm, 3.3mm) and mounting steps for the electronic lock and wooden mounting plate.
4. Operation
4.1 Factory Default Settings
Upon first use, the lock is in default home mode. The management password is set to 1234.

Figure 4.1: The lock displaying its factory state with the default management password of 1234.
4.2 Unlocking the Lock
To unlock the cabinet:
- Enter the correct password on the touch keypad.
- Press the "OK" button.
- When the green indicator light is on, turn the knob to the "OPEN" position to unlock.
If an incorrect password is entered, the lock will sound "Di Di Di" three times.
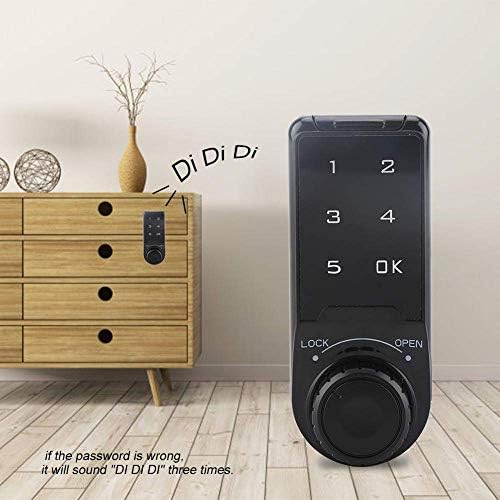
Figure 4.2: The lock indicating an incorrect password entry with a "Di Di Di" sound.
Video 4.1: Demonstration of unlocking the Garosa Electronic Cam Lock using the touch keypad and knob.
4.3 Changing the Management Password
To change the management password:
- With the lock unlocked, press and hold the "OK" button until the indicator light flashes.
- Enter the current management password (default is 1234) and press "OK".
- Enter your new 4-digit management password and press "OK".
- Re-enter the new password to confirm and press "OK". A successful change will be indicated by a confirmation sound.
4.4 Anti-Peeping Virtual Password
The lock supports an anti-peeping function, allowing you to enter a 16-digit virtual password. As long as the correct password sequence is embedded within the continuous string of numbers, the lock will verify and unlock. This feature helps prevent others from guessing your password by observing your input.

Figure 4.3: Diagram illustrating the anti-peeping virtual password feature, where the correct password (e.g., 1234) can be part of a longer sequence of numbers.
4.5 Application Scenarios
The Garosa Electronic Cam Lock is versatile and suitable for a wide range of applications, including:
- Home cabinets and drawers
- Office filing cabinets
- School lockers
- Spa/sauna bath centers
- Swimming pool and gymnasium lockers
- Supermarket and hotel storage

Figure 4.4: Examples of where the Garosa Electronic Cam Lock can be used, including home cabinets, office desks, and public lockers.
5. Maintenance
5.1 Battery Replacement
The lock is powered by a CR2032 battery. When the battery is low, the low battery indicator will activate. Replace the battery promptly to ensure continuous operation.
- Locate the battery compartment on the lock unit (refer to Figure 2.4).
- Open the battery compartment cover.
- Remove the old CR2032 battery.
- Insert a new CR2032 battery, ensuring correct polarity.
- Close the battery compartment cover securely.
5.2 Low Battery Indicator
The low battery indicator light will blink when the battery voltage is low, signaling that the battery needs to be replaced soon. The lock will still function for a short period after the indicator appears, but performance may degrade.
5.3 Cleaning
To clean the lock, use a soft, dry cloth. Avoid using abrasive cleaners, solvents, or excessive moisture, as these can damage the electronic components or the finish.
6. Troubleshooting
Refer to the table below for common issues and their solutions.
| Problem | Possible Cause | Solution |
|---|---|---|
| Lock does not respond to keypad input. | Dead or low battery. | Replace the CR2032 battery. |
| Lock beeps "Di Di Di" when entering password. | Incorrect password entered. | Ensure the correct password is entered. Try again. |
| Cannot change management password. | Incorrect current password entered during change process. | Ensure the lock is unlocked. Re-enter the correct current management password (default is 1234 if not changed). |
| Knob does not turn after correct password entry. | Mechanism obstruction or internal issue. | Check for any physical obstructions. If the issue persists, contact customer support. |
7. Specifications
| Feature | Detail |
|---|---|
| Model Number | 798382303696 |
| Dimensions (L x W x H) | 9.5 x 3.5 x 1.5 cm |
| Weight | 100 g |
| Material | Acrylonitrile Butadiene Styrene (ABS) |
| Color | Black |
| Lock Type | Keypad Cam Lock |
| Power Source | CR2032 Battery (not included) |
| Default Management Password | 1234 |
8. Warranty Information
Garosa products are manufactured to high-quality standards. This product comes with a standard manufacturer's warranty against defects in materials and workmanship. Please refer to the product packaging or contact Garosa customer support for specific warranty terms and conditions.
9. Customer Support
If you have any questions, require technical assistance, or encounter issues not covered in this manual, please contact Garosa customer support through the retailer's platform or the official Garosa website.
For more information, visit the Garosa Store on Amazon.
Ask a question about this manual
Ask about setup, troubleshooting, compatibility, parts, safety, or missing instructions. Manuals+ will review the question and use this page’s manual context to help answer it.