1. Important Safety Instructions
To reduce the risk of fire, electric shock, or injury when using your appliance, follow these basic precautions:
- Read all instructions before using the appliance.
- DANGER: Risk of child entrapment. Before you throw away your old refrigerator or freezer, take off the doors. Leave the shelves in place so that children may not easily climb inside.
- Never allow children to operate, play with, or crawl inside the appliance.
- Never clean appliance parts with flammable fluids. The fumes can create a fire hazard or explosion.
- Do not store or use gasoline or other flammable vapors and liquids in the vicinity of this or any other appliance. The fumes can create a fire hazard or explosion.
- Unplug the appliance before cleaning or making any repairs.
- Ensure the appliance is properly grounded.
- Do not damage the refrigerant circuit.
- Do not use electrical appliances inside the food storage compartments of the appliance, unless they are of the type recommended by the manufacturer.
2. Product Overview
The Galanz 1.7 Cu.Ft. Mini Fridge (Model GL17BK) is a compact refrigeration unit designed for small spaces. It features a single reversible door and a small freezer compartment.
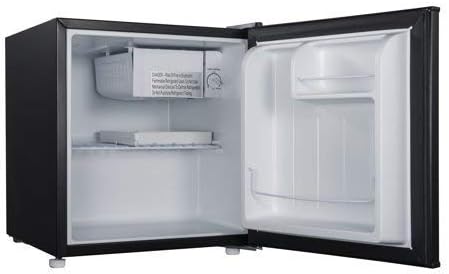
Figure 2.1: Interior view of the Galanz 1.7 Cu.Ft. Mini Fridge, showing the freezer compartment, wire shelf, and door storage.
Key Features:
- Compact Design: Ideal for bedrooms, offices, or dormitories.
- Reversible Door: Allows for flexible placement by changing the door swing direction.
- Small Freezer Compartment: Suitable for ice cubes or small frozen items.
- Adjustable Temperature Control: Easily manage cooling settings.
- Quiet Operation: Designed to operate with minimal noise.

Figure 2.2: The Galanz 1.7 Cu.Ft. Mini Fridge positioned in a modern living room setting, demonstrating its compact size and suitability for various environments.

Figure 2.3: An image highlighting the quiet operation feature of the Galanz Mini Fridge, with a sleeping child in the background.
3. Setup and Installation
3.1 Unpacking
- Remove all packaging materials, including the foam base and adhesive tape holding accessories.
- Inspect the appliance for any damage during transit. Report any damage to the retailer immediately.
- Keep packaging materials out of reach of children.
3.2 Placement
- Place the refrigerator on a flat, solid surface strong enough to support it when fully loaded.
- Allow at least 5 inches (12.7 cm) of space between the back and sides of the refrigerator and any adjacent walls to ensure proper air circulation.
- Avoid placing the appliance in direct sunlight or near heat sources (e.g., stove, heater).
- Do not install in areas where the temperature will fall below 50°F (10°C) or rise above 90°F (32°C).
3.3 Leveling
It is important for the refrigerator to be level to function properly. To level your appliance, adjust the leveling legs located at the bottom front of the unit by turning them clockwise to raise or counter-clockwise to lower.
3.4 Reversible Door Installation
The door swing direction can be reversed from right to left, or left to right, to suit your installation needs. This process requires tools and careful handling. Refer to the detailed diagrams and instructions provided in the full manual for reversing the door. Ensure the appliance is unplugged before attempting this procedure.

Figure 3.1: Illustration demonstrating the reversible door feature, allowing the door to open from either the left or right side.
3.5 Power Connection
- Plug the refrigerator into a dedicated, grounded 115V, 60Hz AC outlet.
- Do not use an extension cord or adapter plug.
- Allow the refrigerator to stand upright for at least 2-4 hours before plugging it in to allow the refrigerant to settle.
4. Operating Instructions
4.1 Temperature Control
The temperature in the refrigerator is controlled by a thermostat dial located inside the unit, typically near the freezer compartment. The dial settings range from "1" (warmest) to "7" (coldest), with "4" often being the recommended setting for normal use.
- Turn the thermostat dial to the desired setting.
- Allow several hours for the temperature to stabilize after adjusting the control.
- Factors such as ambient room temperature, frequency of door opening, and amount of food stored can affect the internal temperature.
4.2 Initial Cooling
After plugging in the appliance, allow it to cool for 2-3 hours before placing food inside. This ensures the refrigerator reaches its optimal operating temperature.
4.3 Manual Defrosting
This refrigerator features a manual defrost system for the freezer compartment. Frost will gradually accumulate on the freezer walls. When the frost layer becomes about 1/4 inch (6 mm) thick, defrost the unit.
- Turn the thermostat dial to "OFF" and unplug the refrigerator.
- Remove all food from the freezer and refrigerator compartments.
- Place towels on the floor to catch melting ice.
- Leave the door open to allow frost to melt naturally. Do not use sharp objects or heating devices to remove frost, as this can damage the cooling system.
- Once defrosted, clean and dry the interior thoroughly.
- Plug the refrigerator back in and reset the temperature control.
5. Maintenance and Cleaning
5.1 Cleaning the Interior
- Always unplug the refrigerator before cleaning.
- Wash the interior with a mild detergent and warm water solution.
- Use a soft cloth or sponge. Do not use abrasive cleaners or harsh chemicals.
- Rinse thoroughly and wipe dry with a clean, soft cloth.
- Remove shelves and drawers for easier cleaning.
5.2 Cleaning the Exterior
- Clean the exterior surface with a soft cloth dampened with a mild detergent solution.
- Wipe dry with a clean, soft cloth.
- Keep the door gasket clean to ensure a proper seal.
5.3 Power Interruptions
Most power failures are corrected within a few hours and should not affect the temperature of your appliance if you minimize the number of times the door is opened. For longer power failures, take steps to protect your food, such as placing dry ice in the unit.
5.4 Vacation Time
- Short vacations: Leave the refrigerator operating.
- Long vacations: Remove all food, unplug the power cord, clean the interior, and leave the door slightly ajar to prevent odor and mold formation.
6. Troubleshooting Guide
Before calling for service, review the following table for common issues and their solutions.
| Problem | Possible Cause | Solution |
|---|---|---|
| Refrigerator does not operate. | Not plugged in; circuit breaker tripped; temperature control set to "OFF". | Ensure plug is secure; reset circuit breaker; turn temperature control to a higher setting. |
| Temperature inside is too warm. | Door opened too frequently; large amount of warm food added; poor air circulation; temperature control set too low. | Minimize door openings; allow food to cool before placing in fridge; ensure adequate space around unit; adjust temperature control to a colder setting. |
| Excessive frost buildup. | Door not sealed properly; high humidity; frequent door openings. | Check door gasket for proper seal; avoid opening door unnecessarily; defrost the unit as per instructions. |
| Vibrations or rattling noises. | Refrigerator not level; loose parts. | Adjust leveling legs; check for and tighten any loose components. |
| Door does not close properly. | Refrigerator not level; door gasket dirty or damaged; items obstructing door. | Level the unit; clean or replace door gasket; rearrange items inside. |
7. Product Specifications
| Feature | Detail |
|---|---|
| Model Number | GL17BK |
| Capacity | 1.7 Cubic Feet |
| Configuration | Compact Freezer-on-Top |
| Color | Black |
| Special Feature | Reversible door |
| Installation Type | Freestanding |
| Number of Doors | 1 |
| Defrost System | Manual |
| Finish Type | Black |
| Shelf Type | Wire Slide-Out Shelf |
| Item Weight | 6.8 kg |
8. Warranty and Customer Support
For detailed warranty information, please refer to the warranty card included with your product or visit the official Galanz website. If you require technical assistance or have questions not covered in this manual, please contact Galanz customer support.
Please retain your proof of purchase for warranty claims.