YAMAHA TT-S303BL
YAMAHA TT-S303 Hi-Fi Vinyl Belt Drive Turntable
Instruction Manual
1. Introduction
Thank you for purchasing the YAMAHA TT-S303 Hi-Fi Vinyl Belt Drive Turntable. This manual provides essential information for the proper setup, operation, and maintenance of your new turntable. Please read this manual thoroughly before using the product to ensure safe and optimal performance. The TT-S303 is designed to deliver exceptional sound quality from your vinyl collection, featuring a static balanced straight tone arm, a rigid cabinet to suppress vibration, and a belt-driven high inertia platter for stable rotation.
For additional support and product information, please visit the official YAMAHA Store on Amazon.
2. Safety Information
Always observe the following basic precautions when using this product to reduce the risk of fire, electric shock, and injury.
- Power Source: Use only the specified power supply voltage. Ensure the power plug is fully inserted into the outlet.
- Water and Moisture: Do not expose the unit to rain or moisture. Do not place objects filled with liquids, such as vases, on the unit.
- Ventilation: Ensure proper ventilation. Do not block ventilation openings.
- Heat: Do not place the unit near heat sources such as radiators, heat registers, stoves, or other apparatus that produce heat.
- Handling: Handle the tonearm and stylus with care. Avoid touching the stylus directly.
- Cleaning: Disconnect the power cord before cleaning. Use a soft, dry cloth. Do not use liquid cleaners or aerosol cleaners.
3. Package Contents
Verify that all items listed below are included in the package:
- YAMAHA TT-S303 Turntable Unit
- Platter
- Drive Belt
- Dust Cover
- Stylus (pre-installed on cartridge)
- Counterweight
- 45 RPM Adapter
- RCA Audio Cable
- AC Adapter
- Instruction Manual (this document)
4. Product Overview
Familiarize yourself with the main components of your TT-S303 turntable.
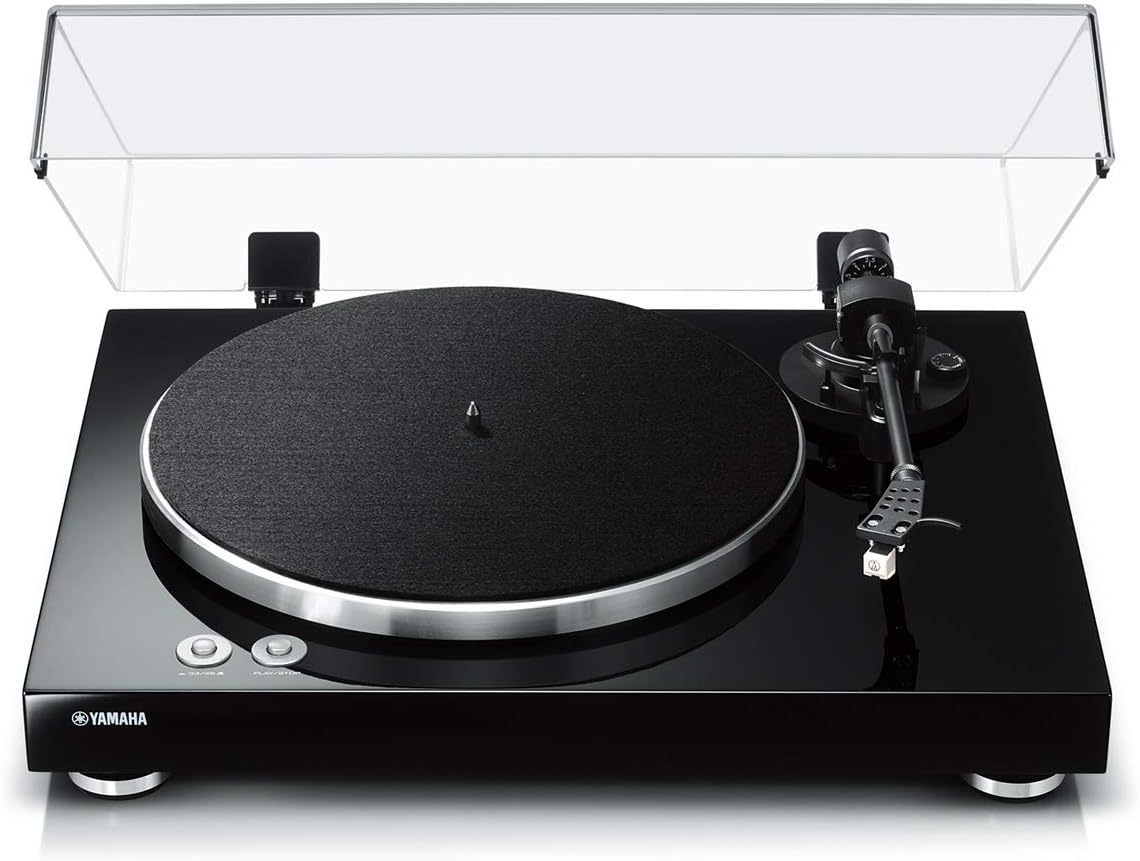
Figure 4.1: Front view of the YAMAHA TT-S303 Turntable with dust cover installed. Shows the main unit, platter, tonearm, and control buttons.

Figure 4.2: Top-down view highlighting the platter, tonearm assembly, and speed/play/stop buttons.
- Platter: The circular platform on which records are placed.
- Tonearm: Holds the cartridge and stylus, tracking the record's grooves.
- Stylus (Needle): The tip that reads the grooves of the record.
- Counterweight: Balances the tonearm and sets tracking force.
- Anti-skate Dial: Prevents the tonearm from being pulled inward.
- Speed Selector Buttons: For 33 1/3 RPM and 45 RPM records.
- Play/Stop Button: Initiates or halts platter rotation.
- Dust Cover: Protects the turntable from dust when not in use.
- Phono EQ Switch: Selects between PHONO output (for amplifiers with a phono input) and LINE output (for amplifiers without a phono input, using the turntable's built-in pre-amp).
5. Setup
Follow these steps for initial setup of your turntable.
- Placement: Place the turntable on a stable, level surface away from direct sunlight, heat sources, and excessive vibration. Ensure adequate space for the dust cover to open fully.
- Platter Installation: Carefully place the platter onto the center spindle.
- Belt Installation: Locate the drive belt. Gently stretch the belt around the inner rim of the platter and hook it onto the motor pulley (a small brass or plastic cylinder) located beneath the platter. Ensure the belt is not twisted.
- Dust Cover Attachment: Insert the hinges of the dust cover into the hinge receptacles on the rear of the turntable unit.
- Counterweight Installation: Slide the counterweight onto the rear of the tonearm. Rotate it until it is approximately balanced.
- Tonearm Balance and Tracking Force Adjustment:
- Remove the stylus protector.
- Lower the tonearm lift lever.
- Adjust the counterweight by rotating it until the tonearm is horizontally balanced and floats freely.
- Once balanced, hold the counterweight steady and rotate only the tracking force ring (the numbered ring on the front of the counterweight) to '0'.
- Rotate the entire counterweight (including the ring) counter-clockwise to the recommended tracking force for your stylus (refer to stylus specifications, typically 1.8g - 2.2g for the included stylus).
- Anti-skate Adjustment: Set the anti-skate dial to the same value as your tracking force. This compensates for the inward force on the stylus as the record spins.
- Connecting to an Amplifier/Receiver:

Figure 5.1: Rear panel showing PHONO EQ switch, PHONO OUT RCA jacks, and DC IN 12V power input.
- Connect the supplied RCA audio cable from the PHONO OUT jacks on the turntable to the corresponding input jacks on your amplifier/receiver.
- If your amplifier has a dedicated PHONO input, set the turntable's PHONO EQ switch to 'THRU'.
- If your amplifier does NOT have a PHONO input (e.g., only AUX, CD, LINE inputs), set the turntable's PHONO EQ switch to 'ON'. This activates the built-in phono pre-amplifier.
- Connect the AC adapter to the DC IN 12V port on the turntable and then to a wall outlet.
6. Operating Instructions
How to play your vinyl records.
- Power On: Press the power button (if available, or ensure AC adapter is connected).
- Select Speed: Press the '33/45' button to select the appropriate speed for your record (33 1/3 RPM for LPs, 45 RPM for singles). The indicator light will illuminate.
- Place Record: Carefully place your vinyl record onto the platter. If playing a 45 RPM single with a large center hole, use the supplied 45 RPM adapter.
- Start Platter Rotation: Press the 'PLAY/STOP' button. The platter will begin to rotate.
- Position Tonearm: Gently lift the tonearm using the tonearm lift lever. Carefully move the tonearm over the desired starting groove of the record.
- Lower Tonearm: Slowly lower the tonearm using the tonearm lift lever. The stylus will descend onto the record and playback will begin.
- Stopping Playback: To stop playback, gently lift the tonearm using the tonearm lift lever, return it to the tonearm rest, and then press the 'PLAY/STOP' button to stop the platter rotation.
7. Maintenance
Regular maintenance helps preserve the performance and appearance of your turntable.
- Cleaning the Cabinet and Dust Cover: Wipe surfaces with a soft, dry cloth. For stubborn dirt, use a slightly damp cloth and then wipe dry. Avoid abrasive cleaners or solvents.
- Stylus Cleaning: Use a soft brush designed for stylus cleaning, brushing gently from back to front. Clean regularly to remove dust and debris that can affect sound quality and record wear.
- Record Cleaning: Keep your records clean. Use a carbon fiber brush before each play to remove surface dust. For deeper cleaning, use a dedicated record cleaning solution and cloth.
- Belt Inspection: Periodically check the drive belt for signs of wear, stretching, or cracking. Replace if necessary to maintain stable platter speed.
8. Troubleshooting
If you experience issues with your turntable, refer to the following common problems and solutions.
| Problem | Possible Cause | Solution |
|---|---|---|
| No sound or very low sound | Incorrect PHONO EQ switch setting; cables not connected properly; amplifier input not selected. | Ensure PHONO EQ switch is set correctly (ON for LINE input, THRU for PHONO input). Check all cable connections. Select the correct input on your amplifier. |
| Distorted or muffled sound | Stylus dirty or worn; incorrect tracking force; damaged record. | Clean the stylus. Re-adjust tracking force. Inspect record for damage. |
| Record speed is incorrect (too fast/slow) | Incorrect speed selected; worn or stretched drive belt. | Verify the 33/45 RPM button is set correctly. Inspect and replace the drive belt if necessary. |
| Skipping or jumping | Dust/debris on record/stylus; incorrect tracking force or anti-skate; turntable not level; damaged record. | Clean record and stylus. Re-adjust tracking force and anti-skate. Ensure turntable is on a level surface. |
| Humming noise | Grounding issue; interference from other electronics. | Ensure proper grounding if your amplifier requires it. Move turntable away from other electronic devices. |
9. Specifications
Technical specifications for the YAMAHA TT-S303 Turntable.
- Model Name: TT-S303
- Color: Piano Black
- Style: Turntable
- Item Weight: 10.6 Pounds (4.8 kg)
- Product Dimensions: 14.5 x 17.75 x 5.38 inches (36.83 x 45.09 x 13.67 cm)
- Material: Plastic (Cabinet)
- Connectivity Technology: Wired (RCA)
- Drive System: Belt Drive
- Motor: DC Motor
- Speeds: 33 1/3 RPM, 45 RPM
- Tonearm Type: Static Balanced Straight Tonearm
- Signal To Noise Ratio: 67 dB or higher (A-weighted, 20 kHz, LPF)
- Built-in Phono Preamp: Yes (switchable PHONO/LINE output)
- Manufacturer: Yamaha Electronics
- Country of Origin: China
10. Warranty and Support
For warranty information and customer support, please refer to the warranty card included with your product or visit the official Yamaha website. Keep your purchase receipt as proof of purchase for warranty claims.
For technical assistance or service inquiries, please contact Yamaha customer support through their official channels.
Ask a question about this manual
Ask about setup, troubleshooting, compatibility, parts, safety, or missing instructions. Manuals+ will review the question and use this page’s manual context to help answer it.