1. Introduction
Thank you for choosing the Thermex HIT 10-U Pro Under-Sink Water Heater. This compact and efficient 10-liter, 1500W electric water heater is designed for reliable hot water supply in your kitchen or similar applications. It features a pressure-resistant boiler and an integrated inlet combination valve for safety and ease of installation. Please read this manual carefully before installation and operation to ensure proper use and longevity of your appliance.

Figure 1: Front view of the Thermex HIT 10-U Pro water heater, showing the control dial and indicator lights.
2. Safety Instructions
Always observe the following safety precautions to reduce the risk of fire, electric shock, injury, or damage to the appliance.
- Read all instructions before using the appliance.
- This appliance must be installed by a qualified professional in accordance with local regulations.
- Ensure the power supply voltage matches the rating label on the appliance (230V).
- Do not operate the water heater if the power cord or plug is damaged.
- Do not block the pressure relief valve.
- Ensure the appliance is properly grounded.
- Do not immerse the appliance in water or other liquids.
- Keep children and unauthorized persons away from the appliance during operation.
- Disconnect the power supply before performing any maintenance or cleaning.
- The water heater is designed for indoor use only.
3. Package Contents
Verify that all components are present and undamaged upon unpacking.
- Thermex HIT 10-U Pro Water Heater unit
- Inlet combination valve (pressure limiting valve and non-return valve)
- Mounting bracket
- Screws and wall plugs
- User Manual (this document)
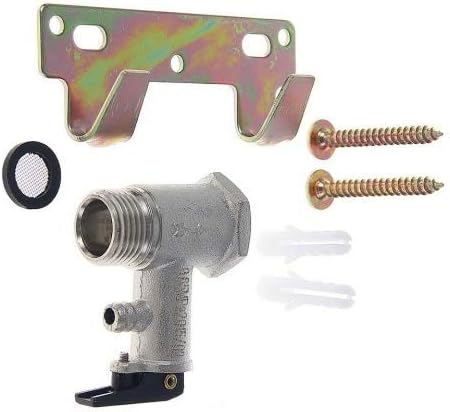
Figure 2: Included installation components: mounting bracket, screws, and the inlet combination valve.
4. Installation
The Thermex HIT 10-U Pro is designed for under-sink installation with connections facing upwards. Installation should be performed by a qualified professional.
4.1 Mounting the Unit
- Choose a suitable location under the sink, ensuring sufficient space for maintenance and connections.
- Mark the drilling points for the mounting bracket on the wall.
- Drill holes and insert wall plugs.
- Securely fasten the mounting bracket to the wall using the provided screws.
- Carefully hang the water heater unit onto the mounting bracket.
4.2 Water Connections
- Connect the cold water inlet (blue marking) to the domestic cold water supply using 1/2" fittings.
- Install the provided inlet combination valve on the cold water inlet. This valve acts as both a pressure limiting valve and a non-return valve, essential for safe operation.
- Connect the hot water outlet (red marking) to the hot water tap using 1/2" fittings.
- Ensure all connections are tight and leak-free.
- Fill the water heater with water by opening the hot water tap until water flows freely, indicating the tank is full.
4.3 Electrical Connection
- The appliance comes with a 1.5m power cable.
- Connect the power plug to a grounded 230V electrical outlet.
- Ensure the electrical circuit is protected by a residual current device (RCD).

Figure 3: Side view of the water heater, illustrating the compact design and connection points.
5. Operation
5.1 Initial Start-up
- After installation and filling the tank with water, plug the appliance into the power outlet.
- The "Heating" indicator light on the front panel will illuminate, indicating that the water heater is active and heating the water.
5.2 Temperature Control
- The water heater features a control dial on the front panel.
- Rotate the dial to adjust the desired water temperature. The "ECO" setting provides an energy-efficient temperature.
- The "Heating" indicator light will turn off once the set temperature is reached and will cycle on and off to maintain the temperature.
5.3 Heating Time
The approximate preheating time for the 10-liter tank is 25 minutes to reach the set temperature from cold.
6. Maintenance
Regular maintenance ensures optimal performance and extends the lifespan of your water heater. Always disconnect the power supply before any maintenance.
- Descaling: Depending on water hardness, periodic descaling of the heating element may be necessary. This should be performed by a qualified technician.
- Inlet Valve Check: Periodically check the inlet combination valve for any blockages or leaks. Ensure the pressure relief function is not obstructed.
- Cleaning: Clean the exterior of the unit with a soft, damp cloth. Do not use abrasive cleaners or solvents.
- Leak Inspection: Regularly inspect all water connections for any signs of leaks.
7. Troubleshooting
Before contacting customer support, refer to the following common issues and solutions.
| Problem | Possible Cause | Solution |
|---|---|---|
| No hot water | No power supply; Thermostat set too low; Heating element failure. | Check power connection and circuit breaker; Adjust thermostat setting; Contact a qualified technician. |
| Water not hot enough | Thermostat set too low; High hot water demand; Sediment buildup. | Increase thermostat setting; Allow more time for reheating; Consider descaling (professional service). |
| Water leakage | Loose connections; Faulty inlet valve; Tank damage. | Tighten connections; Inspect and replace inlet valve if necessary; Contact a qualified technician for tank inspection. |
| Loud noises from unit | Sediment buildup in tank. | Professional descaling recommended. |
8. Technical Specifications
| Feature | Detail |
|---|---|
| Model | HIT 10-U Pro |
| Capacity | 10 Liters |
| Power | 1500 Watts |
| Voltage | 230 Volts |
| Dimensions (L x W x H) | 40 x 36.6 x 30.4 cm |
| Weight (empty) | 7 Kilograms |
| Preheating Time (approx.) | 25 minutes |
| Electrical Protection | IPX4 |
| Max Pressure | 6 Kilopascal |
| Connection Type | 1/2" fittings |
| Energy Efficiency Class | B |
| Annual Electricity Consumption | 559 kWh/annum |
| Sound Power Level (indoors) | 15 dB |

Figure 4: Energy label for the Thermex HIT 10-U Pro, showing efficiency class B and annual consumption.

Figure 5: Product Fiche providing detailed technical information and compliance data. For more details, refer to the EPREL database (ID 1023329).
9. Warranty and Support
Thermex provides a warranty for this product:
- Appliance: 2 years warranty
- Boiler: 5 years warranty
For technical support, service, or warranty claims, please contact Thermex customer service:
- Website: thermex.lv
- Email: ankir@thermex.com
- Phone: +371 29165629
- Address: Krustpils str. 31, 1073 Riga, Lettland
Please have your model number (HIT 10-U Pro) and purchase date available when contacting support.