1. Introduction
This manual provides essential information for the safe installation, operation, and maintenance of your hntoolight LED Floodlight. Please read this manual thoroughly before installation and retain it for future reference.
2. Safety Information
- Ensure the power supply is disconnected before installation, maintenance, or cleaning.
- Installation should be performed by a qualified electrician or competent person.
- Verify that the supply voltage matches the voltage specified on the product label (AC100-240V).
- Do not look directly into the LED light source when it is operating, as it may cause eye damage.
- Keep the product away from flammable materials.
- Ensure proper grounding to prevent electrical shock.
- Do not modify the product in any way. Unauthorized modifications may void the warranty and pose safety risks.
3. Package Contents
Please check the package to ensure all components are present and undamaged:
- 1 x hntoolight LED Floodlight (30W, AC100-240V)
- 1 x Mounting Bracket (pre-attached or separate)
- Instruction Manual (this document)
4. Setup and Installation
The hntoolight LED Floodlight is designed for outdoor use with an IP65 waterproof rating, suitable for wall mount or flush mount installations.
4.1 Mounting the Floodlight
- Choose a Location: Select a suitable outdoor location for installation, ensuring it can support the weight of the floodlight and provides the desired illumination area.
- Mark Drilling Points: Use the mounting bracket as a template to mark the drilling points on the wall or mounting surface.
- Drill Holes: Drill appropriate holes for the mounting screws (not included).
- Secure Bracket: Attach the mounting bracket securely to the surface using suitable screws and anchors.
- Adjust Angle: The bracket allows for angle adjustment. Loosen the screws on the side of the bracket, adjust the light to the desired angle, and then tighten the screws firmly.
4.2 Electrical Connection
WARNING: Ensure power is OFF at the circuit breaker before making any electrical connections.
- The floodlight comes with a short power cord. Connect the wires to your main power supply according to local electrical codes.
- Typically, the wiring color codes are:
- Brown/Black: Live (L)
- Blue/White: Neutral (N)
- Green/Yellow: Ground (GND)
- Use appropriate waterproof connectors and junction boxes for outdoor wiring to maintain the IP65 rating.
- After connections are made and secured, restore power to the circuit.
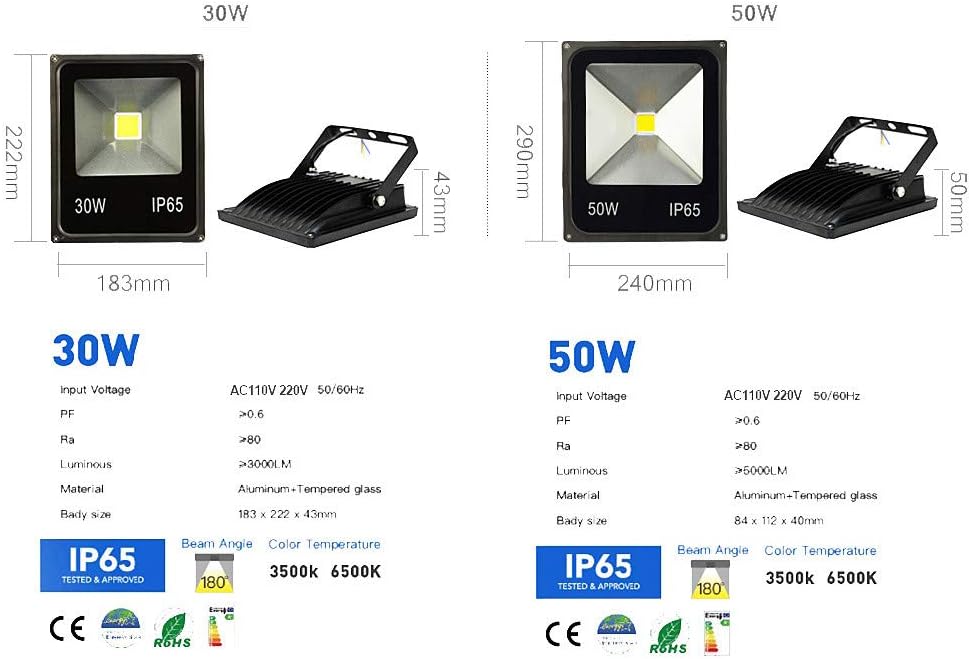
Image: Dimensions and specifications for 30W and 50W LED floodlights. The 30W model measures approximately 183mm wide, 222mm high, and 43mm deep, with an IP65 rating and 180-degree beam angle.

Image: Close-up of the LED chip and the floodlight's heat dissipation design. The image highlights the robust construction designed for efficient heat management, crucial for LED longevity.
5. Operating Instructions
Once properly installed and connected to a power source, the hntoolight LED Floodlight operates simply:
- Power On/Off: The floodlight will turn on when power is supplied to its circuit and turn off when power is disconnected. It is typically controlled by an external wall switch, timer, or motion sensor (not included).
- Beam Angle: The floodlight provides a wide beam angle, suitable for general area illumination.
- Color Temperature: This model emits a white light with a color temperature of 6000-6500K, providing bright, clear illumination.

Image: Illustration of various lighting effects corresponding to different color temperatures. This floodlight provides a white light in the 6000-6500K range, which is a cool white light.

Image: Examples of the floodlight's application in outdoor environments, including illuminating trees, building facades, and pathways. This demonstrates the versatility of the floodlight for various outdoor lighting needs.
6. Maintenance
Regular maintenance ensures optimal performance and longevity of your floodlight.
- Cleaning: Periodically clean the surface of the floodlight and the glass cover with a soft, damp cloth. Do not use abrasive cleaners or solvents, as they may damage the finish or lens. Ensure the power is off before cleaning.
- Inspection: Regularly inspect the power cord and connections for any signs of wear, damage, or corrosion. Ensure all mounting screws remain tight.
- No User-Serviceable Parts: The LED light source is integrated and not user-replaceable. Do not attempt to open the housing.
7. Troubleshooting
If you encounter issues with your floodlight, refer to the following common problems and solutions:
| Problem | Possible Cause | Solution |
|---|---|---|
| Light does not turn on. | No power supply. Loose wiring connection. Faulty switch/sensor. | Check circuit breaker and power source. Verify all wiring connections are secure (ensure power is off). Test the switch or sensor with another device. |
| Light flickers or is dim. | Unstable power supply. Loose connection. Incorrect voltage. | Ensure stable power supply. Check wiring connections. Verify input voltage is within AC100-240V range. |
| Water inside the housing. | Improper installation. Damage to housing/seal. | Ensure all seals and connections are properly tightened during installation. If damaged, discontinue use and contact support. |
If the problem persists after attempting these solutions, please contact hntoolight customer support for assistance.
8. Specifications
| Feature | Detail |
|---|---|
| Model | 30W LED Floodlight |
| Power | 30 Watts |
| Input Voltage | AC100-240V |
| Light Source | COB LED |
| Color Temperature | 6000-6500K (White Light) |
| Waterproof Rating | IP65 |
| Material | Aluminum, Tempered Glass |
| Indoor/Outdoor Usage | Outdoor |
| Installation Type | Flush Mount, Wall Mount |
| Dimensions (approx.) | 183mm (W) x 222mm (H) x 43mm (D) |
9. Warranty and Support
hntoolight products are manufactured to high-quality standards. For warranty information or technical support, please refer to the purchase documentation or contact the seller directly. Keep your proof of purchase for any warranty claims.