
Introduction
This manual provides instructions for the safe and efficient use of your LP LP-E8 Battery Charger. This charger is designed to provide reliable power for your compatible camera batteries.
Compatibility
The LP LP-E8 Battery Charger is compatible with Canon EOS Rebel cameras that use LP-E8 batteries. This includes models such as:
- Canon EOS Rebel T2i
- Canon EOS Rebel T3i
- Canon EOS Rebel T4i
- Canon EOS Rebel T5i
- Canon EOS 550D
- Canon EOS 600D
- Canon EOS 650D
- Canon EOS 700D
- Canon EOS Kiss X4
- Canon EOS Kiss X5
- Canon EOS Kiss X6i
- Canon EOS Kiss X7i
Note: This charger is not compatible with Canon EOS Rebel T2, T3, T4, or T5 models.

Image: LP LP-E8 Battery Charger showing compatibility with various Canon EOS Rebel camera models.
Safety Information
To ensure safe operation and prevent damage, please observe the following safety precautions:
- Overcharge Protection: The charger is equipped with circuitry to prevent overcharging of batteries.
- Short Circuit Protection: Built-in protection against short circuits ensures safe operation.
- High Temperature Protection: The charger includes features to prevent overheating during the charging process.
- Surge Protection: Designed to protect against power surges.
- Do not disassemble the charger. Refer to qualified service personnel for repairs.
- Use in dry locations only. Avoid exposure to moisture or water.
- Keep out of reach of children.
Product Features
- Standard Compatibility: Meets or exceeds OEM Canon LP-E8 Battery Charger specifications.
- Worldwide Use: Supports AC100-240V input, allowing use in various countries.
- Portable Design: Constructed from durable ABS material, lightweight and compact for easy transport.
- LED Indicator: Provides clear charging status (Red for charging, Green for fully charged).
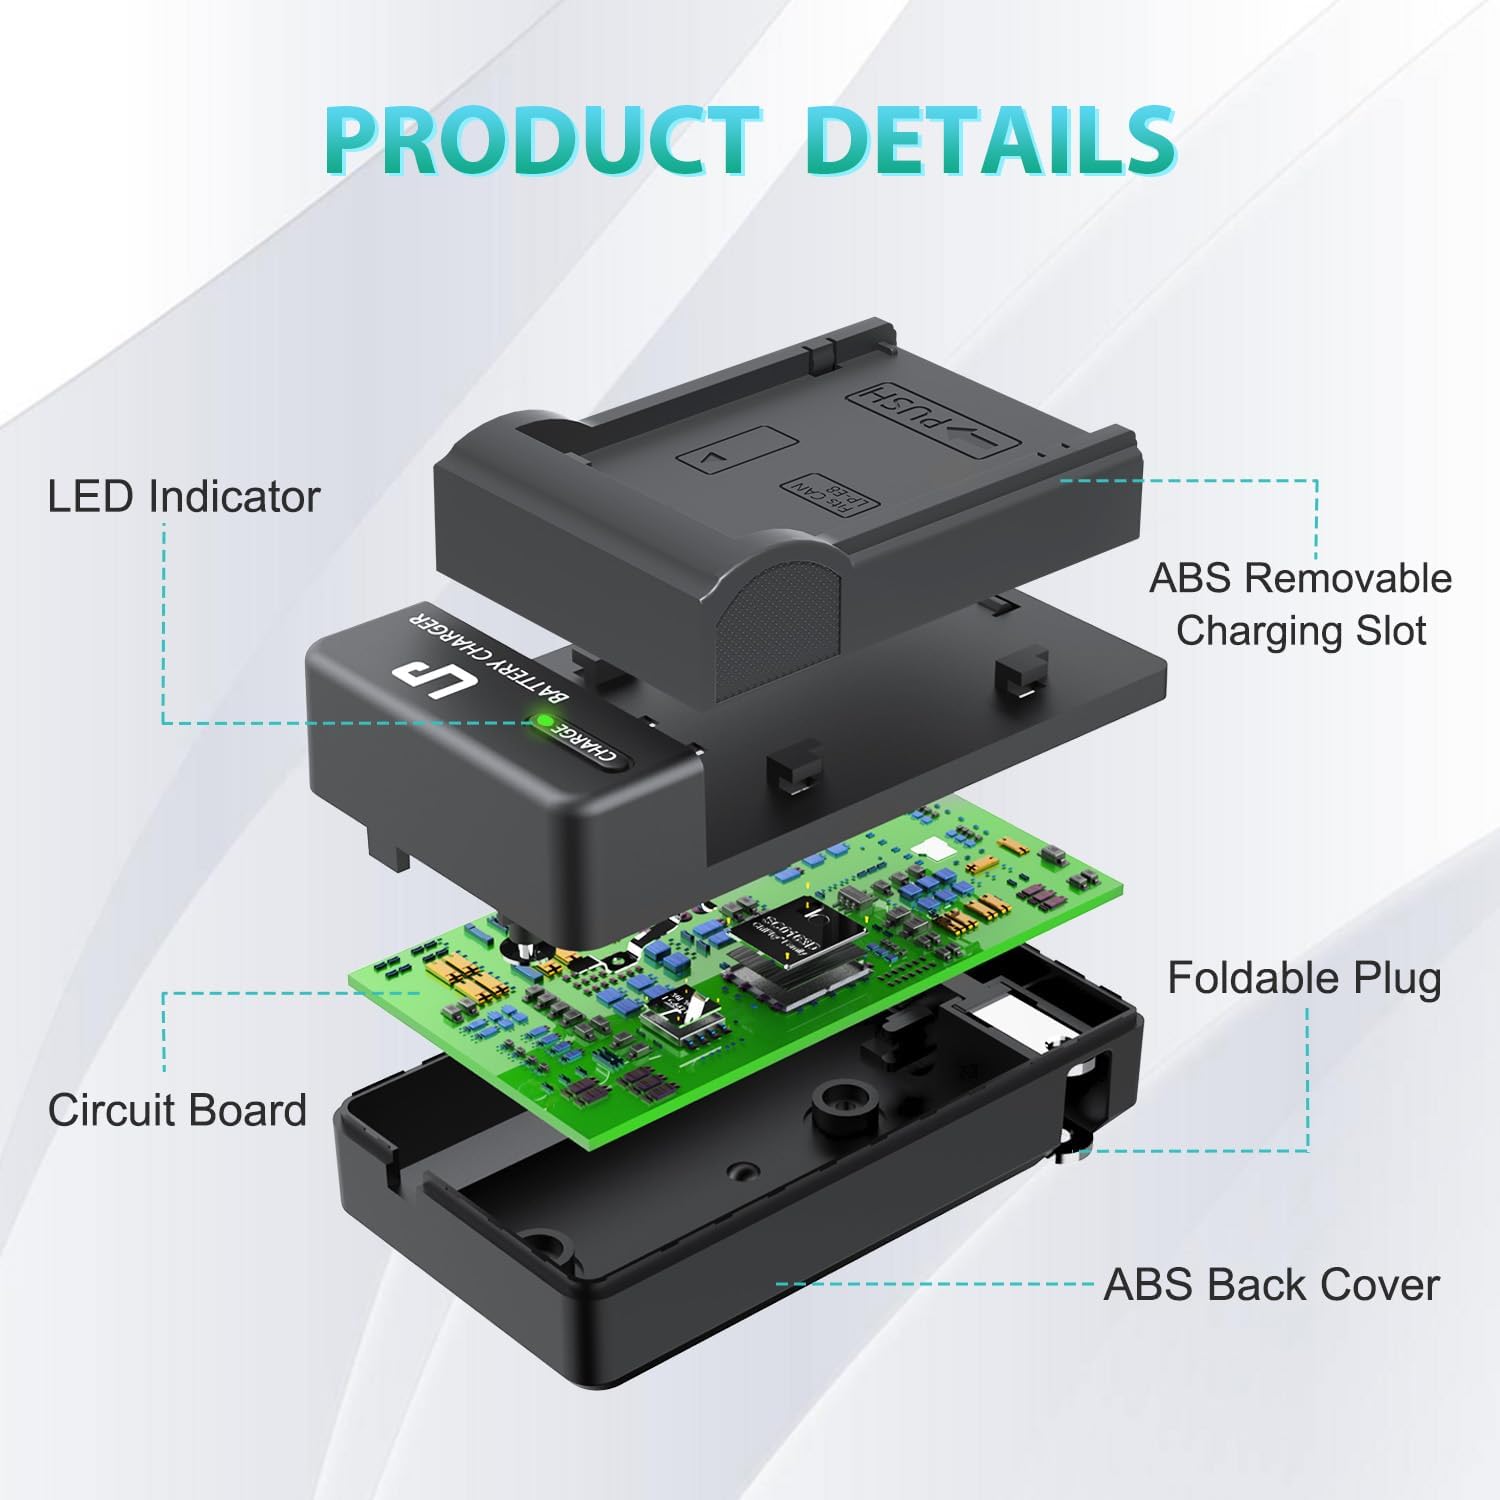
Image: Exploded view illustrating the internal components and design of the LP LP-E8 Battery Charger.

Image: The compact LP LP-E8 Battery Charger shown being held, emphasizing its portability.
Setup and Operating Instructions
Inserting the Battery
- Ensure the charger is unplugged from the power outlet.
- Align the LP-E8 battery with the charging slot on the charger. The "PUSH" indicator on the charger shows the direction for insertion.
- Gently push the battery into the slot until it clicks securely into place.

Image: Demonstrating the correct way to insert an LP-E8 battery into the charger.
Charging Process
- Once the battery is securely inserted, unfold the integrated plug on the charger.
- Plug the charger directly into a standard AC wall outlet (AC100-240V).
- The LED indicator on the charger will illuminate Red to indicate that the battery is currently charging.
- When the battery is fully charged, the LED indicator will change to Green.
- Once charging is complete, unplug the charger from the wall outlet and remove the battery by gently pressing the "PUSH" tab and sliding the battery out.

Image: Step-by-step guide on inserting the battery and plugging in the charger.

Image: LED indicator status: Red for charging, Green for fully charged.

Image: The LP LP-E8 Battery Charger in use, charging a battery while a Canon camera is nearby.
Video: Official LP LED AC Charger demonstration, showing the charging process and LED indicators.
Maintenance and Care
To ensure the longevity and optimal performance of your LP LP-E8 Battery Charger, follow these maintenance guidelines:
- Keep the charger clean and free from dust and debris. Use a soft, dry cloth for cleaning.
- Store the charger in a cool, dry place when not in use.
- Avoid dropping the charger or subjecting it to strong impacts.
- Do not expose the charger to extreme temperatures or direct sunlight for prolonged periods.
Troubleshooting
Charger Not Working / LED Not Lighting Up
- Ensure the charger is securely plugged into a functional wall outlet.
- Verify that the battery is correctly inserted into the charging slot.
- Check if the battery itself is damaged or incompatible.
Battery Not Charging Fully
- Confirm that the LED indicator turns green when charging is complete.
- If the battery consistently fails to charge fully, it may be nearing the end of its lifespan and require replacement.
- Ensure the charger is not exposed to extreme temperatures during charging, which can affect performance.
Specifications
| Model | LP-E8 (Model 996790) |
| Input | AC100-240V, 50/60Hz, MAX 150mA |
| Output | DC8.4V 600mA |
| Product Dimensions | 1.87 x 1.35 x 3.34 inches |
| Item Weight | 2.39 ounces |
| Battery Cell Composition | Lithium Ion |
| Manufacturer | LP |

Image: Product dimensions of the LP LP-E8 Battery Charger.
Warranty and Support
LP provides the following support for this product:
- 30-Day Refund: Eligible for a refund within 30 days of purchase.
- 1-Year After-Sales Service: Comprehensive support for one year after purchase.
- Lifetime Service: Ongoing support for the product's lifespan.
- Customer Response: Expect a quick and friendly response within 24 hours on working days for any inquiries or issues.


