Foreita Digital Alarm Clock
Foreita Digital Alarm Clock with Dual USB Charging Ports User Manual
Model: Digital Alarm Clock
Introduction
Thank you for choosing the Foreita Digital Alarm Clock. This manual provides detailed instructions for setting up, operating, and maintaining your new alarm clock. Please read this manual thoroughly before use to ensure proper function and to maximize your product experience.

Image: The Foreita Digital Alarm Clock displaying the time 3:40 on its large LED mirror surface.
Product Overview
Key Features:
- Dual USB Charging Ports: Equipped with two USB ports (max 2.1A output) for simultaneous charging of two devices.
- Large LED Display: A 6.5-inch ultra-large LED display for easy time readability.
- Mirror Surface: The display surface can function as a mirror.
- Adjustable Brightness: Three levels of adjustable brightness (high, medium, low) and an automatic night light mode.
- Snooze Function: A large snooze button provides an extra 2 minutes of sleep.
- Memory Function: Built-in CR2032 button cell battery retains settings (time, brightness, 12/24 mode) during power outages.
Components:
Familiarize yourself with the clock's components and controls.

Image: Top and side view diagram of the alarm clock, indicating the Snooze button, Alarm button, USB output ports, Input port, Mode button, Up button, and Down button.
- Snooze Button: Located on the top.
- Alarm Button: Located on the side.
- USB Output Ports: Two ports for charging devices.
- Input Port: For power adapter connection.
- Mode Button: For cycling through settings.
- Up Button: For increasing values or navigating.
- Down Button: For decreasing values or navigating.
Setup
- Power Connection: Connect the provided USB power cable to the Input Port on the clock and plug the other end into a USB power adapter (not included). The clock will power on and display the time.
- Backup Battery (CR2032): The clock has a built-in CR2032 button cell battery. This battery maintains time and settings during power interruptions. No user installation is required for this battery.
- Protective Film: Remove any protective film from the mirror surface for optimal display clarity.
Operating Instructions
1. Setting the Time:
- Press and hold the MODE button until the hour digits begin to flash.
- Use the UP or DOWN buttons to adjust the hour.
- Press the MODE button again to confirm the hour and move to minute adjustment. The minute digits will flash.
- Use the UP or DOWN buttons to adjust the minutes.
- Press the MODE button once more to confirm the minutes and exit time setting mode.
2. 12/24 Hour Format:
While in time display mode, press the MODE button briefly to switch between 12-hour and 24-hour formats. In 12-hour format, "PM" will be indicated for afternoon hours.
3. Setting the Alarm:
- Press the ALARM button once. The alarm time will be displayed, and the "AL" indicator will light up.
- Press and hold the ALARM button until the alarm hour digits begin to flash.
- Use the UP or DOWN buttons to adjust the alarm hour.
- Press the ALARM button again to confirm the alarm hour and move to alarm minute adjustment. The alarm minute digits will flash.
- Use the UP or DOWN buttons to adjust the alarm minutes.
- Press the ALARM button once more to confirm the alarm minutes and exit alarm setting mode.
- To activate or deactivate the alarm, press the ALARM button briefly while in time display mode. The "AL" indicator will show if the alarm is active.
4. Snooze Function:
When the alarm sounds, press the large SNOOZE button on top of the clock. The alarm will pause for 2 minutes and then sound again. To turn off the alarm completely, press any other button on the side of the clock.

Image: A hand demonstrating the use of the large snooze button located on the top surface of the alarm clock.
5. Adjusting Display Brightness:
The clock offers three levels of brightness (high, medium, low) and an automatic night light mode.
- Manual Adjustment: In time display mode, press the UP button repeatedly to cycle through high, medium, and low brightness settings.
- Automatic Night Light Mode: The clock can automatically adjust its brightness based on ambient light. The display will become darker in low light conditions.

Image: Illustration demonstrating the clock's ability to automatically adjust brightness from bright (day) to medium and dim (night) based on ambient light conditions.
6. USB Charging Ports:
The two USB output ports on the side of the clock can be used to charge mobile devices. Simply connect your device's USB charging cable to one of the ports. The maximum output for each port is 2.1A.
Maintenance
- Cleaning: Use a soft, dry cloth to clean the clock's surface. Avoid abrasive cleaners or solvents, as they may damage the mirror finish or display.
- Placement: Place the clock on a stable, flat surface. Avoid areas with extreme temperatures, direct sunlight, or high humidity.
- Power: Always use the recommended power adapter. Disconnect power during thunderstorms or when not in use for extended periods.
Troubleshooting
| Problem | Possible Cause | Solution |
|---|---|---|
| Clock does not power on. | No power connection or faulty adapter. | Ensure the USB cable is securely connected and the power adapter is working. Try a different USB port or adapter. |
| Alarm does not sound. | Alarm is not activated or set incorrectly. | Verify the alarm is set and the "AL" indicator is visible. Recheck alarm time settings. |
| Display is too bright/dim. | Brightness setting needs adjustment. | Press the UP button to cycle through brightness levels. Ensure the light sensor (if applicable) is not obstructed. |
| Time changes unexpectedly (e.g., 12hr to 24hr). | Accidental button press or power fluctuation. | Briefly press the MODE button to switch between 12/24 hour format. If issues persist after power cycling, reset the time. |
| USB charging ports not working. | Device not compatible or cable issue. | Ensure your device and cable are functioning correctly. The clock must be powered on for USB charging to work. |
Specifications
- Brand: Foreita
- Display Type: Digital LED
- Display Size: 6.5 inches
- Features: Alarm, Dual USB Charging Ports, Mirror Surface, Adjustable Brightness, Snooze, Memory Function
- Power Source: USB (Adapter not included)
- Backup Battery: CR2032 (built-in)
- USB Output: Max 2.1A per port
- Dimensions: Approximately 6.2 inches (width) x 3 inches (height) x 0.5 inches (depth)
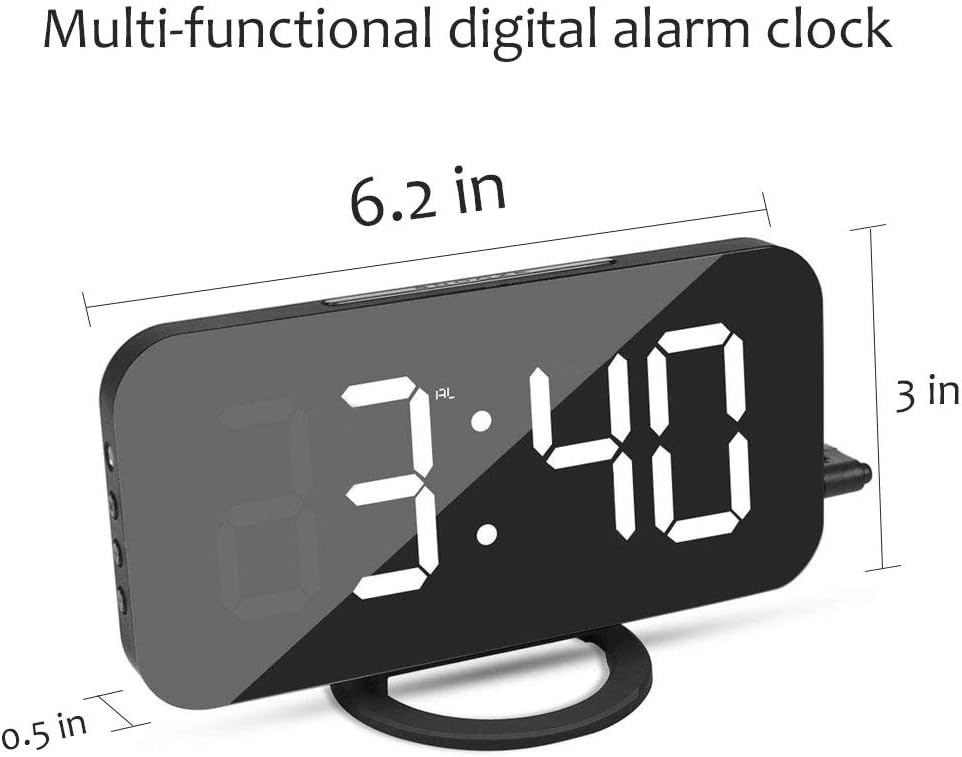
Image: Diagram illustrating the physical dimensions of the Foreita Digital Alarm Clock.
Warranty and Support
Foreita provides a 12-month replacement or refund warranty for this product. If you encounter any issues or require assistance, please contact Foreita customer support. We are committed to providing 100% satisfaction.
For support, please refer to the contact information provided with your purchase or visit the official Foreita website.
Ask a question about this manual
Ask about setup, troubleshooting, compatibility, parts, safety, or missing instructions. Manuals+ will review the question and use this page’s manual context to help answer it.