Introduction
This manual provides essential instructions for the safe and effective use of your Andoer Portable 1080P Digital Camera D11773S. Please read this manual thoroughly before operating the device and retain it for future reference. This digital camera is designed for capturing high-resolution photos and videos, featuring a 48MP image sensor, 1080P video recording, 8X digital zoom, and a 2.7-inch LCD screen.
Safety Information
- Do not expose the camera to water or moisture.
- Avoid dropping the camera or subjecting it to strong impacts.
- Keep the camera away from strong magnetic fields.
- Do not attempt to disassemble or modify the camera. Repairs should only be performed by qualified personnel.
- Use only the specified battery type and charging cable.
- Store the camera in a cool, dry place when not in use.
- Keep out of reach of small children.
Package Contents
Verify that all items are present in the package:
- Andoer Portable Digital Camera (Model D11773S)
- Lithium Battery (3.7V 550mAh)
- Type-C Charge Cable
- Wrist Strap
- Carry Bag
- User Manual

Image: Contents of the camera package, showing the camera, battery, USB-C cable, wrist strap, carry bag, and user manual.
Camera Overview
Familiarize yourself with the main components of your camera.
Front View

Image: Front view of the Andoer D11773S camera. Key features visible include the digital lens, built-in flash, and the 2.7" TFT display and 48 Mega pixels indicators.
- Lens: Captures images and videos.
- Flash: Provides illumination in low-light conditions.
- Microphone: Records audio during video capture.
Rear View

Image: Rear view of the Andoer D11773S camera, displaying the 2.7-inch LCD screen and various control buttons for navigation and settings.
- LCD Screen (2.7 Inch): Displays live view, menus, and playback.
- Control Buttons: For menu navigation, mode selection, zoom, and playback.
- Speaker: For audio playback.
Side View and Dimensions

Image: Diagram illustrating the dimensions of the Andoer D11773S camera: 9.2cm length, 6.1cm width, and 1.4cm thickness.
- USB Port (Type-C): For charging and data transfer.
- Memory Card Slot: For inserting a Micro SD card.
- Battery Compartment: Houses the rechargeable lithium battery.
Setup
1. Charging the Battery
- Insert the provided lithium battery into the camera's battery compartment.
- Connect the camera to a power source (e.g., computer USB port or USB wall adapter) using the supplied Type-C charge cable.
- The charging indicator light will illuminate. Once fully charged, the light may change color or turn off.
2. Inserting a Memory Card
The camera requires a Class-10 external Micro SD memory card (not included) with a maximum capacity of 128GB.
- Locate the memory card slot on the side of the camera.
- Insert the Micro SD card with the metal contacts facing the front of the camera until it clicks into place.
- To remove, gently press the card inward until it springs out.
Operating Instructions
Power On/Off
- To power on, press and hold the Power button.
- To power off, press and hold the Power button again.
Taking Photos
The camera supports picture resolutions up to 48MP.
- Turn on the camera.
- Frame your shot using the 2.7-inch LCD screen.
- Press the Shutter button halfway to focus (if applicable), then fully press to capture the photo.

Image: Visual representation of the camera's capabilities, showing a 48MP photo example and a 1080P video example.
Recording Videos
The camera supports video resolution up to 1920x1080 (1080P).
- Switch the camera to video recording mode (refer to on-screen icons or mode button).
- Press the Record button to start recording.
- Press the Record button again to stop recording.
Zoom Function
The camera features 8X digital zoom.
- Use the zoom buttons (often marked 'W' for Wide and 'T' for Telephoto) to adjust the zoom level.
Flash Settings
The built-in flash can be used in dark conditions.
- Access the flash settings through the camera's menu to select modes like Auto Flash, Fill-in Flash, Red-eye Reduction, or Flash Off.
Special Features: Anti-Shake, Face Detect, Smile Capture, Self-Timer
These features enhance your photography experience.
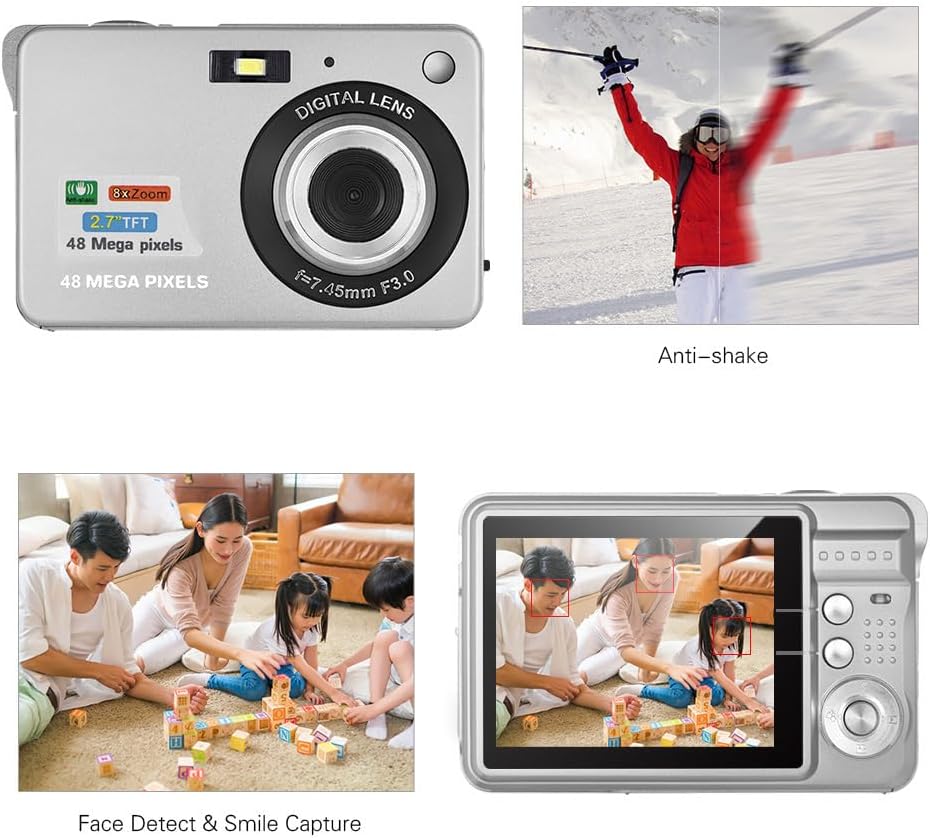
Image: Demonstrations of the camera's Anti-shake function (reducing blur from movement) and Face Detect & Smile Capture (identifying faces and automatically taking a photo when a smile is detected).
- Anti-Shake: Helps reduce blur caused by camera movement. This feature is typically enabled by default or can be toggled in settings.
- Face Detect & Smile Capture: The camera can detect faces and automatically capture a photo when a smile is detected. Enable these options in the camera's menu.
- Self-Timer: Set a delay (2, 5, or 10 seconds) before the photo is taken, allowing you to be in the shot.
Macro Mode
For close-up photography of small objects.

Image: A close-up photograph of an ant, demonstrating the camera's Macro Mode capability for detailed shots of small subjects.
- Activate Macro Mode through the camera's menu or a dedicated button for close-up shots.
Playback Mode
- Press the Playback button to review captured photos and videos on the LCD screen.
- Use the navigation buttons to scroll through your media.
Connecting to a Computer
You can transfer photos and videos to a computer using the supplied Type-C USB cable.
- Ensure the camera is powered on.
- Connect one end of the Type-C USB cable to the camera's USB port and the other end to an available USB port on your computer.
- The camera should appear as a removable disk or media device on your computer.
- Open the camera's folder to access and transfer your files.
- Safely eject the device from your computer before disconnecting the cable.
Maintenance
- Cleaning: Use a soft, dry cloth to clean the camera body. For the lens and LCD screen, use a specialized lens cleaning cloth and solution. Do not use abrasive cleaners.
- Storage: When not in use for extended periods, remove the battery and store the camera in a cool, dry place, preferably in its carry bag.
- Battery Care: Recharge the battery periodically even if not in use to maintain its lifespan.
Troubleshooting
| Problem | Possible Solution |
|---|---|
| Camera does not power on. | Ensure the battery is fully charged and correctly inserted. |
| Cannot take photos/record videos. | Check if a memory card is inserted and has sufficient free space. Ensure the camera is in the correct mode. |
| Images are blurry. | Ensure the lens is clean. Hold the camera steady during capture. Check lighting conditions and use flash if necessary. |
| Camera not recognized by computer. | Ensure the USB cable is securely connected. Try a different USB port or restart the computer. |
| Battery drains quickly. | Reduce LCD brightness. Limit flash usage. Ensure the camera is powered off when not in use. |
Specifications
| Feature | Detail |
|---|---|
| Image Sensor | CMOS Sensor |
| Display | 2.7 Inch LCD |
| File Format | JPEG (Photo), AVI (Video) |
| Picture Resolution | Up to 48M (8000x6000) |
| Video Resolution | 1920x1080 (1080P), 1280x720 |
| Digital Zoom | 8X |
| Exposure Compensation | EV-3 to EV+3 |
| Self-Timer | Off / 2 sec / 5 sec / 10 sec |
| Special Features | Anti-Shake, Face Detect, Smile Capture |
| Power Supply | 1 * Lithium battery (3.7V 550mAh) |
| Supported Memory Card | Class-10 Micro SD, max. 128GB (not included) |
| Interface | Type-C USB |
| Dimensions (L*W*H) | 9.2 * 6.1 * 1.4 cm / 3.6 * 2.4 * 0.5 inch |
| Weight | 99g / 3.5oz |
| Supported System | Windows XP, VISTA, WIN7, MAC |
Warranty and Support
This product comes with a standard manufacturer's warranty. Please refer to the warranty card included in your package for specific terms and conditions. For technical support, troubleshooting assistance, or further inquiries, please visit the official Andoer website or contact their customer service department. Keep your purchase receipt as proof of purchase for warranty claims.
Online Support: Visit the Andoer Store on Amazon