1. Introduction
This manual provides detailed instructions for the installation, operation, and maintenance of the PRO COMP Suspension 61180K Level Lift Nitro Kit. This kit is designed to provide a level lift for 2009-2016 Ram 1500 vehicles. Please read this manual thoroughly before beginning installation to ensure proper procedure and safety.
2. Safety Information
WARNING: Installation of this lift kit requires specialized tools and mechanical knowledge. If you are not confident in your ability to perform this installation, seek assistance from a certified professional. Failure to follow proper installation procedures can result in serious injury or vehicle damage.
- Always wear appropriate personal protective equipment (PPE), including safety glasses and gloves.
- Ensure the vehicle is securely supported on jack stands on a level surface before beginning work. Never rely solely on a jack.
- Disconnect the vehicle's battery before performing any electrical work.
- Refer to your vehicle's service manual for specific torque specifications and additional safety guidelines.
- After installation, perform a thorough inspection of all components and a test drive to ensure proper function and alignment.
3. Package Contents
Verify that all components listed below are present and undamaged before beginning installation. If any parts are missing or damaged, contact PRO COMP customer support.

Figure 3.1: Overview of all components included in the Pro Comp Suspension 61180K Level Lift Nitro Kit. This includes two large coil spring spacers, two smaller strut spacers, two L-shaped brackets, two rectangular plates, and various bolts, nuts, and washers.
| Item | Description | Quantity |
|---|---|---|
| A | Front Coil Spring Spacers (Large, Black) | 2 |
| B | Front Strut Spacers (Small, Black) | 2 |
| C | Rear Shock Extension Brackets (L-shaped, Black) | 2 |
| D | Rear Coil Spring Spacers (Rectangular, Black) | 2 |
| E | Bump Stop Extensions (Rubber with bolt) | 2 |
| F | Hardware Kit (Bolts, Nuts, Washers) | 1 set |

Figure 3.2: Front Coil Spring Spacer (Item A). This component is installed above the front coil spring assembly.

Figure 3.3: Front Strut Spacer (Item B). This spacer is designed to be installed on top of the front strut assembly.

Figure 3.4: Rear Shock Extension Brackets (Item C). These brackets are used to extend the rear shocks to accommodate the lift.

Figure 3.5: Rear Coil Spring Spacers (Item D). These rectangular spacers are installed with the rear coil springs.

Figure 3.6: Bump Stop Extensions (Item E). These rubber components extend the factory bump stops.
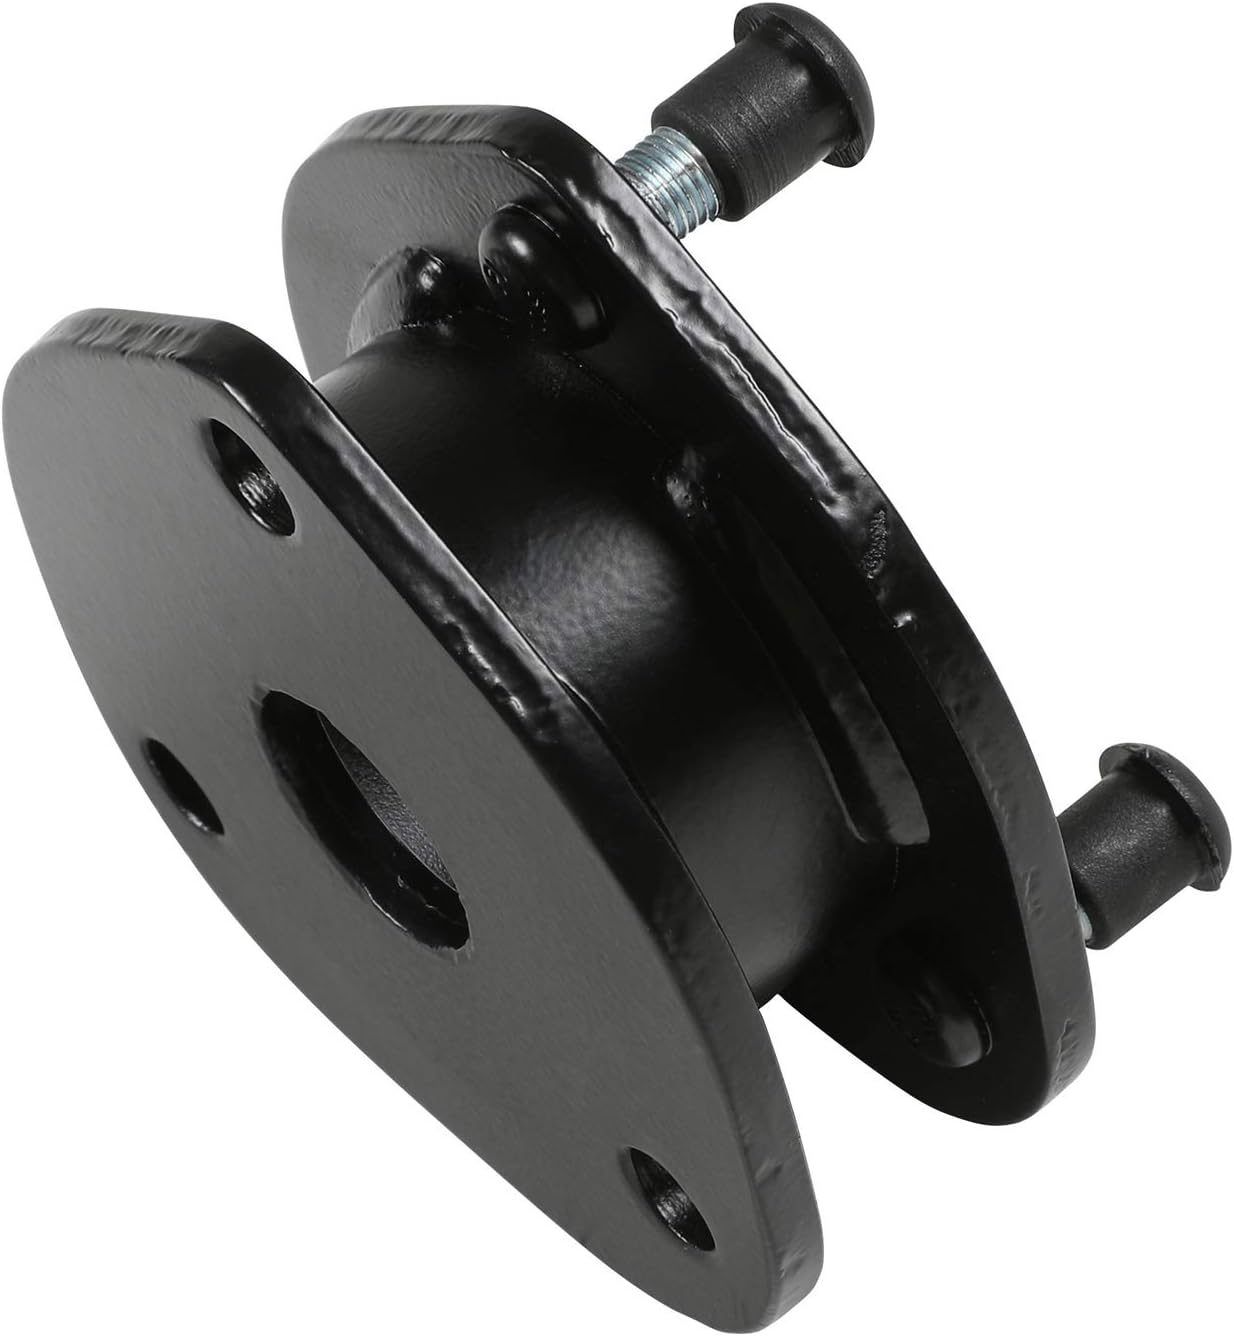
Figure 3.7: Detailed view of a Front Strut Spacer (Item B) showing the integrated mounting studs.
4. Setup and Installation
4.1 Required Tools
- Vehicle lift or heavy-duty jack and jack stands
- Metric and standard socket/wrench set
- Torque wrench
- Spring compressor (if required for strut disassembly)
- Pry bar, hammer, penetrating oil
- Wheel chocks
- Measuring tape
4.2 Pre-Installation Steps
- Park the vehicle on a flat, level surface.
- Engage the parking brake and chock the rear wheels.
- Measure and record the vehicle's factory ride height from the center of the wheel hub to the fender lip for both front and rear. This will help verify the lift amount.
- Loosen the front and rear lug nuts.
- Raise the front of the vehicle and support it securely with jack stands under the frame. Remove the front wheels.
- Raise the rear of the vehicle and support it securely with jack stands under the frame. Remove the rear wheels.
4.3 Front Installation
- Disconnect the sway bar end links from the lower control arm.
- Remove the upper strut mounting nuts from the strut tower.
- Remove the lower strut mounting bolts from the lower control arm.
- Carefully remove the entire strut assembly from the vehicle.
- Install the Front Strut Spacer (Item B) onto the top of the factory strut assembly using the provided hardware. Ensure proper orientation.
- Install the Front Coil Spring Spacer (Item A) above the coil spring, ensuring it seats correctly. This may require a spring compressor depending on the vehicle's specific strut design.
- Reinstall the modified strut assembly into the vehicle. Secure the lower strut bolts first, then the upper strut nuts. Do not fully tighten at this stage.
- Reconnect the sway bar end links.
- Repeat for the other front side.
4.4 Rear Installation
- Support the rear axle with a jack.
- Disconnect the lower shock mounting bolts.
- Carefully lower the axle to allow the coil springs to be removed. Be mindful of brake lines and ABS wires.
- Remove the factory coil springs.
- Install the Rear Coil Spring Spacers (Item D) on top of the factory coil spring isolators or directly under the coil springs, as per specific vehicle requirements.
- Reinstall the coil springs with the new spacers.
- Install the Rear Shock Extension Brackets (Item C) to the lower shock mounts using the provided hardware.
- Install the Bump Stop Extensions (Item E) to the factory bump stop locations.
- Raise the axle to reconnect the shocks to the extension brackets.
- Repeat for the other rear side.
4.5 Post-Installation
- Reinstall all wheels and hand-tighten lug nuts.
- Lower the vehicle to the ground.
- Torque all lug nuts to vehicle manufacturer specifications.
- Torque all suspension fasteners (strut nuts, strut bolts, sway bar links, shock bolts) to vehicle manufacturer specifications. Refer to your vehicle's service manual.
- Perform a final visual inspection to ensure all components are correctly installed and tightened.
- Have a professional alignment performed immediately after installation to prevent premature tire wear and ensure proper handling.
5. Operating Considerations After Lift Kit Installation
After installing the PRO COMP Level Lift Nitro Kit, your vehicle's handling characteristics may change slightly. It is important to be aware of these changes for safe operation.
- Alignment: Ensure a professional wheel alignment is performed immediately after installation. Incorrect alignment can lead to poor handling and accelerated tire wear.
- Center of Gravity: A lifted vehicle has a higher center of gravity, which can affect stability. Exercise caution when cornering, braking, and driving on uneven terrain.
- Braking: While the kit does not directly alter braking components, changes in suspension geometry can subtly affect braking feel. Allow for adequate stopping distances.
- Tire Pressure: Maintain correct tire pressure as recommended by your tire manufacturer, especially if larger tires were installed.
- Headlight Aim: Adjust headlight aim after lifting the vehicle to ensure proper visibility and to avoid blinding oncoming traffic.
6. Maintenance
Regular inspection and maintenance are crucial for the longevity and safe operation of your lifted vehicle.
- Periodic Inspection: Every 3,000-5,000 miles or during routine oil changes, inspect all suspension components, including the lift kit parts, for signs of wear, damage, or looseness.
- Fastener Torque: Re-check the torque on all suspension fasteners (strut nuts, strut bolts, sway bar links, shock bolts, lug nuts) after the first 500 miles of driving and periodically thereafter.
- Component Condition: Look for cracks, bends, or corrosion on the spacers and brackets. Replace any damaged components immediately.
- Bushings and Joints: Inspect rubber bushings and ball joints for cracking, tearing, or excessive play.
7. Troubleshooting
| Symptom | Possible Cause | Solution |
|---|---|---|
| Uneven ride height (side to side) | Improper installation of spacers; factory spring sag; uneven tire pressure. | Verify spacer installation; check tire pressure; consult a suspension specialist. |
| Clunking or rattling noises | Loose fasteners; components contacting other parts; worn bushings. | Re-torque all fasteners; inspect for contact points; replace worn components. |
| Poor handling or steering issues | Incorrect wheel alignment; loose steering components; improper tire pressure. | Perform wheel alignment; inspect steering and suspension components; check tire pressure. |
| Premature tire wear | Incorrect wheel alignment; improper tire pressure; worn suspension components. | Perform wheel alignment; maintain correct tire pressure; inspect and replace worn parts. |
If you experience persistent issues not covered here, or if you are unsure about any troubleshooting steps, contact PRO COMP customer support or a qualified automotive technician.
8. Specifications
| Brand | PRO COMP |
| Model Number | 61180K |
| Compatible Vehicles | 2009-2016 Ram 1500 |
| Lift Type | Level Lift Kit |
| Material | Alloy Steel |
| Product Dimensions | 19 x 14 x 4 inches (Packaging) |
| Included Components | Installation Hardware (Spacers, Brackets, Bolts, Nuts, Washers) |
| UPC | 614901022490 |
9. Warranty Information
PRO COMP products are manufactured to high standards. For specific warranty details regarding the 61180K Level Lift Nitro Kit, please refer to the official PRO COMP website or contact their customer service department. Keep your proof of purchase for any warranty claims.
10. Customer Support
If you have any questions regarding the installation, operation, or maintenance of your PRO COMP Suspension 61180K Level Lift Nitro Kit, please contact PRO COMP customer support:
- Website: www.procompusa.com (Note: This is a placeholder link, please verify the official website.)
- Phone: Refer to the PRO COMP website for current contact numbers.
- Email: Refer to the PRO COMP website for current contact email.
When contacting support, please have your product model number (61180K) and purchase information readily available.