1. Product Overview
This manual provides essential information for the safe and efficient use of your CAN 2-Burner Cooktop with Right Sink and Smoked Glass Lid. This unit features two burners and an integrated sink, designed for compact spaces such as RVs or small kitchens. The cooktop is equipped with a durable smoked glass lid for protection and a sleek appearance.
Key Features:
- Integrated 2-burner cooktop with right-side sink.
- Smoked glass lid for protection and aesthetic appeal.
- Freestanding burner design.
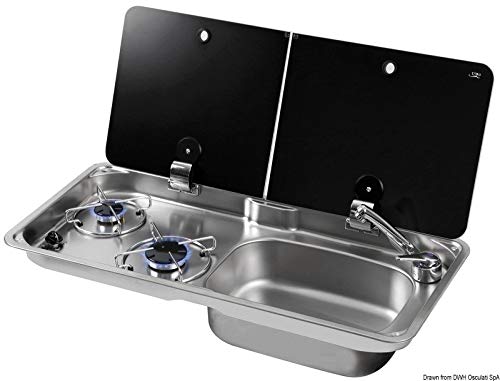
Image: The CAN 2-Burner Cooktop with Right Sink and Smoked Glass Lid, showcasing its compact design and integrated features.
2. What's in the Box
Upon unpacking, please ensure all components are present and undamaged. The package includes:
- Cooktop unit only.
Note: Additional installation hardware, such as water supply lines or gas connections, may need to be purchased separately depending on your specific setup.
3. Installation and Setup
Proper installation is crucial for safety and performance. It is recommended that installation be performed by a qualified technician.
3.1 Sink Installation
The sink component requires careful installation to ensure proper drainage and water sealing. Follow these steps:
- Prepare the countertop cutout according to the provided dimensions (refer to product specifications for exact measurements).
- Place the sink unit into the cutout.
- Install the drain assembly from underneath the sink, ensuring the rubber gasket is properly seated to prevent leaks. Tighten the drain nut securely.
- Connect the water supply lines to the faucet.
- Secure the sink unit to the countertop using appropriate fasteners (not included).
Video: Demonstrates the installation process for the integrated sink, including fitting the unit into a countertop cutout and securing the drain assembly.
Video: Another view of the sink installation, focusing on the faucet and drain connections.
3.2 Cooktop Burner Assembly
The cooktop burners are designed for easy assembly and maintenance. Ensure all components are correctly placed before use.
- Carefully remove the burner caps and grates.
- Ensure the burner bases are clean and free from debris.
- Place the burner caps back onto their respective bases, aligning them correctly.
- Position the grates securely over the burners.
Video: Shows the assembly and disassembly of cooktop burner components, including the thermocouple connection.
4. Operating Instructions
To operate the cooktop burners:
- Ensure the gas supply is open.
- Press and turn the desired burner knob counter-clockwise to the "High" position.
- The integrated igniter will spark. Hold the knob for a few seconds after the flame ignites to allow the thermocouple to heat up and activate the safety valve.
- Release the knob. If the flame goes out, repeat the process.
- Adjust the flame intensity by turning the knob between "High" and "Low" settings.
- To turn off, turn the knob clockwise to the "Off" position.
Video: Illustrates how to ignite and adjust the flame on the cooktop burners.
5. Maintenance
Regular maintenance ensures the longevity and safe operation of your cooktop and sink unit.
5.1 Cleaning
- Cooktop Surface: Clean the glass surface with a soft cloth and mild detergent after each use. Avoid abrasive cleaners that can scratch the glass.
- Burner Grates and Caps: These can be removed and washed with warm soapy water. Ensure they are completely dry before reassembling.
- Sink: Clean the stainless steel sink with a non-abrasive cleaner and rinse thoroughly.
5.2 Thermocouple Maintenance
The thermocouple is a safety device that cuts off gas supply if the flame goes out. If you experience issues with the flame staying lit, the thermocouple might need cleaning or replacement. This procedure should ideally be performed by a qualified technician.
Video: Demonstrates the process of inspecting or repairing a thermocouple on a cooktop burner. This is an advanced maintenance task.
6. Troubleshooting
Before contacting customer support, please refer to the following common issues and solutions:
| Problem | Possible Cause | Solution |
|---|---|---|
| Burner does not ignite. | No gas supply, igniter blocked, or faulty igniter. | Check gas supply. Clean igniter. If problem persists, contact a technician. |
| Flame goes out after releasing knob. | Thermocouple not heating sufficiently or faulty. | Hold knob longer after ignition. Clean or replace thermocouple (professional service recommended). |
| Water leaks from sink drain. | Loose drain nut or improperly seated gasket. | Tighten drain nut. Re-seat or replace drain gasket. |
7. Specifications
| Feature | Detail |
|---|---|
| Manufacturer Reference | 50.805.06 |
| Brand | Can |
| Color | Silver |
| Dimensions | 20" x 14" (approximately 50.8 cm x 35.56 cm) |
| Fuel Type | Gas (Electric ignition) |
| Material | Glass (surface), Tempered Glass (heater surface) |
| Power Source | Wired Electric (for ignition) |
| Special Feature | Freestanding Burner |
| Number of Heating Elements | 2 |
| Burner Type | Gas |
| Control Type | Tactile (Knobs) |
| First Available Date | July 25, 2018 |
8. Warranty and Support
This product comes with a standard manufacturer's warranty. Please retain your proof of purchase for warranty claims. For technical support, spare parts, or further assistance, please contact your retailer or the manufacturer directly.
Note: Unauthorized repairs or modifications may void your warranty.


