1. Introduction
This manual provides essential information for the safe and efficient operation, installation, and maintenance of your GE GDT605PSMSS Dishwasher. Please read all instructions carefully before using the appliance to ensure optimal performance and longevity.
The GE GDT605PSMSS Dishwasher is designed to provide thorough cleaning for your dishes. Key features include an Autosense cycle that automatically adjusts to soil levels, a 1-hour wash option for quick cleaning, and a clean design inner door for easy maintenance.
2. Safety Information
Important Safety Instructions:
- Read all instructions before using the dishwasher.
- Use the dishwasher only for its intended function.
- Do not touch the heating element during or immediately after use.
- Do not operate the dishwasher unless all enclosure panels are properly in place.
- Do not allow children to play in or on the dishwasher.
- Store dishwasher detergents and wetting agents out of the reach of children.
- Always disconnect the appliance from the power supply before cleaning or performing any maintenance.
3. Setup and Installation
The GE GDT605PSMSS is a built-in dishwasher designed for permanent installation under a kitchen counter. Professional installation is recommended to ensure proper water and electrical connections.
Dimensions:
- Product Dimensions: 24"D x 23.75"W x 33.37"H
- Item Weight: 82 pounds
Ensure adequate space and proper utility connections (water inlet, drain, electrical) are available before installation. The dishwasher comes with the main unit as the included component.

Figure 3.1: The GE GDT605PSMSS Dishwasher seamlessly integrated into a modern kitchen setting.
4. Operating Instructions
4.1 Loading the Dishwasher
Proper loading is crucial for effective cleaning. Ensure that water jets can reach all surfaces of the dishes. Avoid overcrowding.
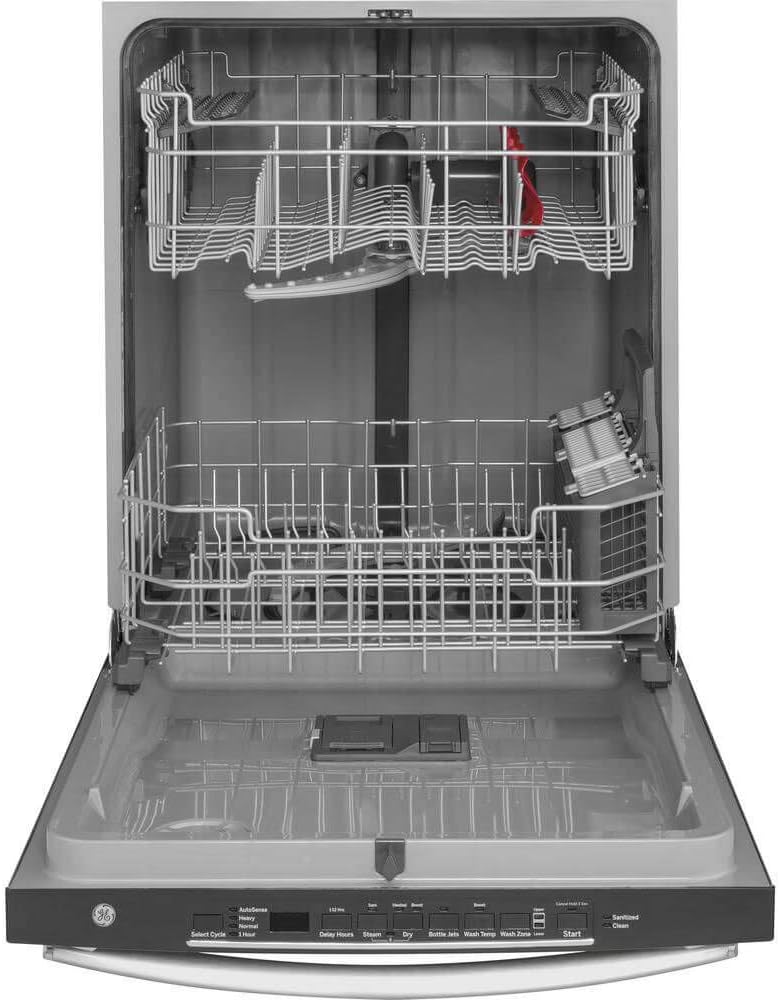
Figure 4.1: Interior view of the GE GDT605PSMSS Dishwasher with empty racks, showing the upper and lower baskets.
Upper Rack: Ideal for glasses, cups, and smaller bowls. Place items face down or at an angle for better drainage.
Lower Rack: Suitable for dinner plates, serving dishes, and larger items. Ensure larger items do not block the spray arm.

Figure 4.2: An example of a properly loaded dishwasher, demonstrating placement of various dishware items in the upper and lower racks.
Silverware Basket: The dishwasher features a three-piece silverware basket. Place forks and spoons with handles down, and knives with handles up for safety. Separate the basket sections for flexible placement.

Figure 4.3: A close-up of the removable three-piece silverware basket, designed for organized placement of forks, spoons, and knives.
Bottle Jets: Utilize the dedicated bottle jets for thorough cleaning of tall or narrow items like bottles and vases.

Figure 4.4: A hand placing a bottle over a dedicated jet, demonstrating how hard-to-reach areas inside bottles are thoroughly cleaned.
4.2 Cycle Options
Select the appropriate wash cycle based on the soil level and type of dishes.
- Autosense: Automatically adjusts wash time and water temperature based on soil level to optimize cleaning and energy usage.
- Quick Wash: For lightly soiled dishes that need to be cleaned quickly.
- Normal: Standard cycle for everyday loads with normal soil.
- Intensive: For heavily soiled pots, pans, and dishes with baked-on food.
- Delicate: Gentle cycle for fragile items and glassware.
The dishwasher also features a Steam PreWash option, which loosens tough soils before any cycle, reducing the need for manual soaking or pre-rinsing.

Figure 4.5: This image illustrates the Steam PreWash feature, showing steam working to loosen tough food soils from dishes before the main wash cycle.
You can also wash a half-load using any setting, optimizing water and energy for smaller quantities of dishes.

Figure 4.6: An example of loading for a half-load, showing dishes concentrated in one area of the lower rack to optimize water and energy usage for smaller loads.
5. Maintenance and Care
Regular maintenance ensures the longevity and efficiency of your dishwasher.
- Cleaning the Interior: Periodically clean the interior with a dishwasher cleaner or a mixture of vinegar and baking soda to remove mineral deposits and odors.
- Cleaning the Exterior: Wipe down the exterior surfaces with a soft, damp cloth. For stainless steel finishes, use a specialized stainless steel cleaner. The clean design inner door has no visible hardware, making it easy to maintain.
- Filter Maintenance: Check and clean the dishwasher filter regularly to prevent food particles from recirculating and affecting wash performance. Refer to your full installation guide for specific filter cleaning instructions.
- Door Gasket: Wipe the door gasket with a damp cloth to remove any food residue or grime.
6. Troubleshooting
If your dishwasher is not operating correctly, refer to the following common issues before contacting service.
- Dishwasher not starting: Ensure the door is fully closed and latched. Check if the power supply is connected and the circuit breaker has not tripped.
- Dishes not clean: Verify proper loading, ensure spray arms are not blocked, check detergent dispenser, and clean the filter. Ensure the correct cycle is selected for the soil level.
- Water not draining: Check for clogs in the drain hose or air gap (if installed). Ensure the drain pump is clear.
- Unusual noises: Foreign objects might be in the pump or spray arm area. Check for proper loading to prevent items from interfering with moving parts.
For more detailed troubleshooting or issues not listed here, please consult the comprehensive service manual or contact GE customer support.
7. Specifications
| Feature | Specification |
|---|---|
| Model Number | GDT605PSMSS |
| Brand | GE |
| Installation Type | Built-In |
| Color | Stainless Steel |
| Product Dimensions (D x W x H) | 24" x 23.75" x 33.37" |
| Item Weight | 82 pounds |
| Voltage | 120 Volts |
| Noise Level | 44 Decibels |
| Cycle Options | Autosense, Quick Wash, Normal, Intensive, Delicate |
| Number of Settings | 4 |
| Certification | Energy Star |
8. Warranty and Support
For warranty information, please refer to the separate warranty document included with your purchase or visit the official GE Appliances website. Warranty terms and conditions may vary.
For customer support, technical assistance, or to schedule service, please contact GE Appliances directly. You can find contact information on the GE Appliances website or through the customer support link provided at the point of purchase.
Online Support: Visit the GE Store on Amazon